
Within the earlier tutorial, I’ve walked you thru the fundamentals of SwiftData, a brand new framework launched in iOS 17 as a substitute for Core Information. In case you have adopted that tutorial, you need to now be acquainted with utilizing SwiftData to save lots of and handle knowledge in a database. The built-in @Mannequin macro and the @Question macro tremendously simplify the method of defining knowledge mannequin and retrieving data from the database, making it extraordinarily simple for builders to deal with persistent knowledge.
The Preview characteristic in SwiftUI is very priceless because it permits builders to immediately visualize the app’s person interface with out the necessity to launch the simulator. Nonetheless, utilizing SwiftData with SwiftUI Preview requires some further steps. On this tutorial, we are going to discover methods to combine SwiftData with SwiftUI Preview successfully.
Word: If you happen to haven’t learn the SwiftData tutorial, I extremely advocate checking it out first, as this tutorial references a few of the supplies coated in that tutorial.
Revisiting the Information Mannequin and SwiftData
Within the earlier instance, we have now constructed a mannequin class for ToDoItem like this:
import Basis
import SwiftData

@Mannequin class ToDoItem: Identifiable {
    var id: UUID
    var title: String
    var isComplete: Bool

    init(id: UUID = UUID(), title: String = "", isComplete: Bool = false) {
        self.id = id
        self.title = title
        self.isComplete = isComplete
    }
}
SwiftData simplifies the method of defining a schema utilizing code. You solely have to mark the mannequin class with the @Mannequin macro. SwiftData will then robotically allow persistence for the information class.
So as to drive the information operations (like replace, insert, learn, and delete), we additionally have to arrange the mannequin container. Within the ToDoDemoAppApp.swift, we have now hooked up the modelContainer modifier like beneath:
struct ToDoDemoAppApp: App {
    var physique: some Scene {
        WindowGroup {
            ContentView()
        }
        .modelContainer(for: ToDoItem.self)
    }
}
This configuration is basically all you want earlier than beginning to work with SwiftData.
Preview with SwiftData and In-memory Container
Within the Todo app demo, we have now a ContentView that hundreds and shows the to-do merchandise within the checklist view. Right here is the pattern code:
struct ContentView: View {
    @Atmosphere(.modelContext) non-public var modelContext

    @Question var todoItems: [ToDoItem]

    var physique: some View {
        NavigationStack {
            Listing {
                ForEach(todoItems) { todoItem in
                    HStack {
                        Textual content(todoItem.title)

                        Spacer()

                        if todoItem.isComplete {
                            Picture(systemName: "checkmark")
                        }
                    }
                }
            }

            .navigationTitle("To Do Listing")
        }
    }
    }
You can also make the preview work by writing the preview code like this:
#Preview {
    ContentView()
        .modelContainer(for: ToDoItem.self)
}
Nonetheless, on this case, the preview solely shows an empty Todo checklist as a result of the container doesn’t have any knowledge populated. If you happen to want to have some pattern knowledge, you may create a customized mannequin container particularly for the preview. Right here is an instance:
@MainActor
let previewContainer: ModelContainer = {
do {
let container = attempt ModelContainer(for: ToDoItem.self,
configurations: .init(isStoredInMemoryOnly: true))
for _ in 1...10 {
container.mainContext.insert(generateRandomTodoItem())
}
return container
} catch {
fatalError("Did not create container")
}
}()
func generateRandomTodoItem() -> ToDoItem {
let duties = [ "Buy groceries", "Finish homework", "Go for a run", "Practice Yoga", "Read a book", "Write a blog post", "Clean the house", "Walk the dog", "Attend a meeting" ]
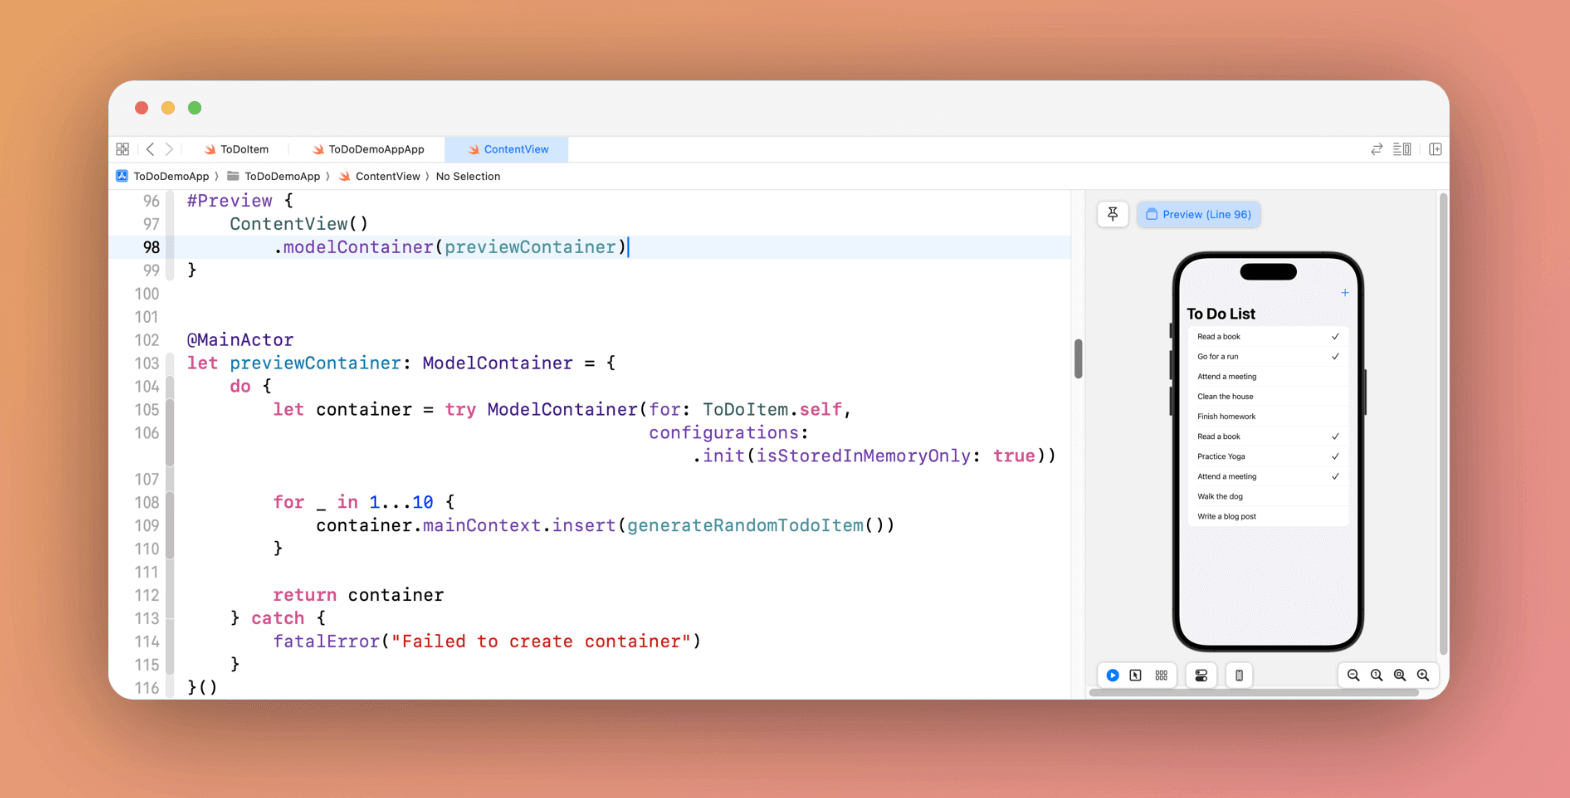
let randomIndex = Int.random(in: 0..We instantiate a ModelContainer with an in-memory configuration and populate the container with 10 random to-do objects. To make use of this preview container, you merely modify the preview code and specify to make use of the previewContainer:
#Preview {
    ContentView()
        .modelContainer(previewContainer)
}
When you made the modification, the preview pane ought to present you the Todo checklist view with 10 random objects.
Abstract
SwiftUI Preview is a priceless characteristic that permits builders to visualise their app’s person interface immediately, with out the necessity to launch the simulator. This tutorial offers complete steerage on successfully utilizing SwiftData with SwiftUI Preview. You must discover ways to create a customized container populated with pattern knowledge particularly for preview functions.
If you happen to take pleasure in studying this tutorial and need to study extra about SwiftUI, don’t overlook to take a look at our Mastering SwiftUI e-book for iOS 17 and Xcode 15.
