
Throughout our SwiftUI Workshop we regularly discover that only a few individuals appear to learn about transitions, regardless that they don’t seem to be very difficult and extremely helpful.
Transitions occur when a view is faraway from the view tree, or added to the view tree. Nonetheless, should you’ve executed some SwiftUI, you should have observed that there is no such thing as a precise manner so as to add views to the view tree — there is no such thing as a addSubview(_:). As an alternative, you possibly can solely add and take away views by the mixture of a state change and utilizing an if assertion (or change or ForEach). In different phrases, views are by some means added and eliminated for us routinely, but transitions hearth solely as soon as. Earlier than we dive into the small print of this, let’s take into account a quite simple transition:
								struct ContentView: View {
    @State var seen = false
    var physique: some View {
        VStack {
            Toggle("Seen", isOn: $seen)
            if seen {
                Textual content("Good day, world!")
            }
        }
        .animation(.default, worth: seen)
    }
}
After we run the above code we will see the textual content fade out and in. That is the default transition (.opacity). When the view will get inserted into the view tree, it fades in, and as soon as it will get eliminated it fades out. Notice that if the physique executes once more, the view would not fade in once more except the situation within the if assertion modifications.
To construct up a psychological mannequin of what is taking place, we will take into account the SwiftUI view tree for the above view:
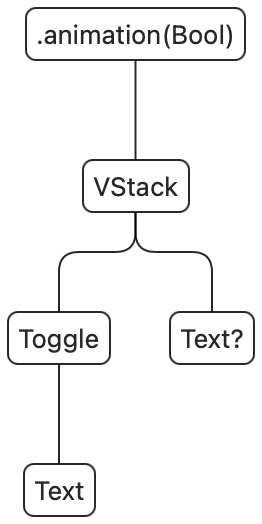
SwiftUI views are ephemeral: the physique of ContentView will get executed and from it a render tree is created. This render tree is persistent throughout view updates, and it represents the precise views on display. As soon as the render tree is up to date, the worth for physique then goes away. Here is the render tree after the preliminary rendering:
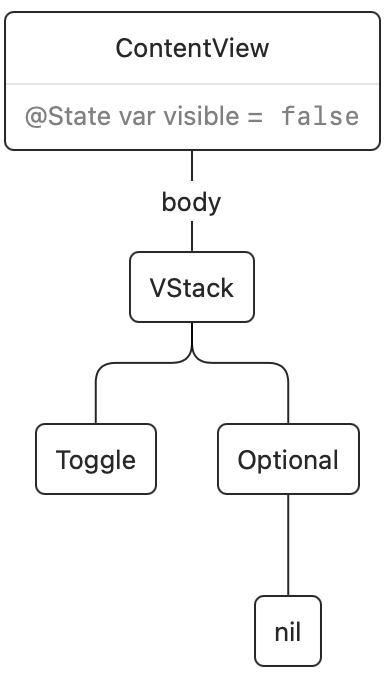
As soon as we faucet the change, a state change occurs and the physique of ContentView executes once more. The present render tree is then up to date. On this case, SwiftUI observed that the if situation modified from false to true, and it’ll insert our Textual content view into the render tree:
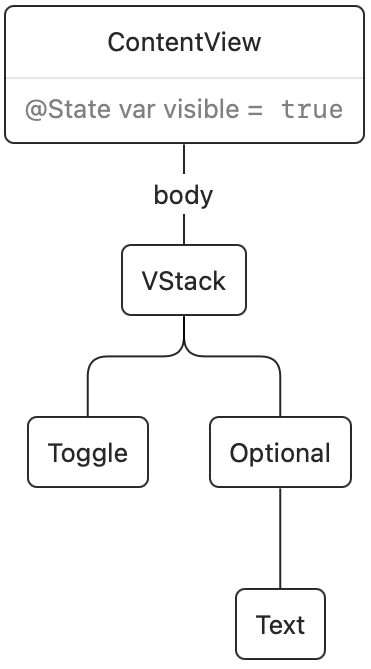
The change within the render tree is what triggers the transition. Transitions solely animate when the present transaction incorporates an animation. Within the instance above, the .animation name causes the transition to animate.
The render tree doesn’t really exist with that title or type, however is just a mannequin for understanding how SwiftUI works. We’re not utterly positive how this stuff are represented below the hood.
After we change our view to have an if/else situation, issues get a bit extra attention-grabbing. Here is the code:
								struct ContentView: View {
    @State var seen = false
    var physique: some View {
        VStack {
            Toggle("Seen", isOn: $seen)
            if seen {
                Textual content("Good day, world!")
            } else {
                Picture(systemName: "hand.wave")
            }
        }
        .animation(.default, worth: seen)
    }
}
After we render the preliminary view tree, it’s going to comprise a VStack with a Toggle and a Textual content. As soon as the state modifications from false to true, the textual content is changed by a picture. Within the ephemeral view tree there may be all the time both the Textual content or the Picture, by no means each. Within the render tree nevertheless, in the course of the animation the tree will comprise each views:
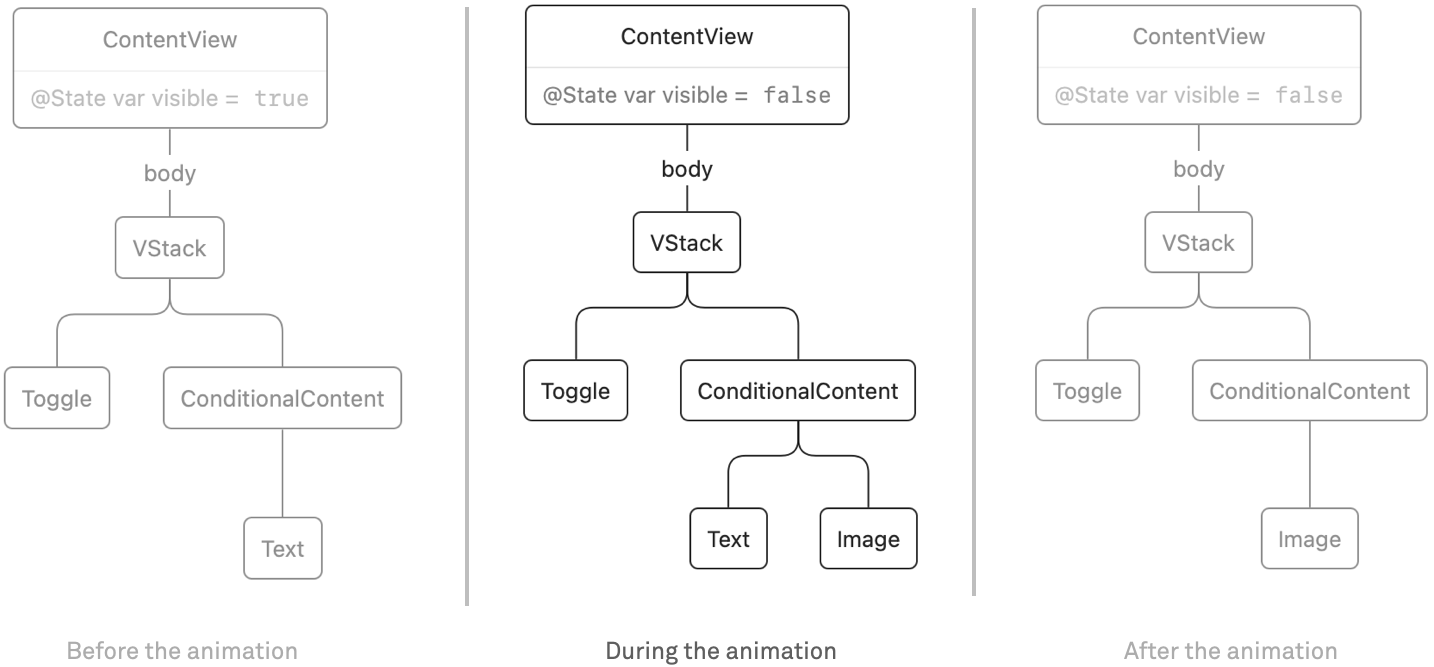
As a result of we use the default transition, it appears to be like just like the textual content fades into the picture and again. Nonetheless, you possibly can consider them as separate transitions: the textual content has a removing transition (fade out) and the picture has an insertion transition (fade in).
We aren’t restricted to the default fade transition. For instance, here’s a transition that slides in from the forefront when a view is inserted, and removes the view by scaling it down:
let transition = AnyTransition.uneven(insertion: .slide, removing: .scale)
We will then mix it with an .opacity (fade) transition. The .mixed operator combines each transitions in parallel to get the next impact:
								let transition = AnyTransition.uneven(insertion: .slide, removing: .scale).mixed(with: .opacity)
VStack {
    Toggle("Seen", isOn: $seen)
    if seen {
        Textual content("Good day, world!")
            .transition(transition)
    } else {
        Textual content("Good day world!")
            .transition(transition)
    }
}
.animation(.default.velocity(0.5), worth: seen)
Notice that within the pattern above, we used a seen worth to modify between the 2 Textual contents, regardless that they’re the identical. We will simplify the code a bit through the use of id(_:). Every time the worth we cross to id modifications, SwiftUI considers this to be a brand new view within the render tree. After we mix this with our information of transitions, we will set off a transition simply by altering the id of a view. For instance, we will rewrite the pattern above:
								let transition = AnyTransition.uneven(insertion: .slide, removing: .scale).mixed(with: .opacity)
VStack {
    Toggle("Seen", isOn: $seen)
    Textual content("Good day, world!")
        .id(seen)
        .transition(transition)
}
.animation(.default.velocity(0.5), worth: seen)
Earlier than the animation, the textual content is current, and in the course of the animation the newly inserted view (with id(false)) is transitioned in, and the previous view (with id(true)) is transitioned out. In different phrases: each views are current in the course of the animation:
![]()
When the builtin transitions do not cowl your wants, you too can create customized transitions. There may be the .modifier(energetic:identification) transition. When a view is not transitioning, the identification modifier is utilized. When a view is eliminated, the animation interpolates in between the identification modifier and the energetic modifier earlier than eradicating the view utterly. Likewise, when a view is inserted it begins out with the energetic modifier at the beginning of the animation, and ends with the identification modifier on the finish of the animation.
Here is an instance of a favourite button with a customized transition. This is not an ideal implementation (we might not hardcode the offsets and width of the button) but it surely does present what’s potential:
The complete code is out there as a gist.
Typically when performing a transition you would possibly see surprising side-effects. In our case we have been virtually all the time capable of resolve these by wrapping the view we’re transitioning inside a container (for instance, a VStack or ZStack). This provides some “stability” to the view tree that may assist forestall glitches.
In essence, transitions aren’t very difficult. Nonetheless, attaining the end result you need is usually a bit difficult generally. In an effort to successfully work with transitions you need to perceive the distinction between the view tree and the render tree. And whenever you wish to have customized transitions, you additionally want to grasp how animations work. We cowl this in each our workshops and our e-book Pondering in SwiftUI.
If your organization is fascinated with a workshop on SwiftUI, do get in contact.
