
On this submit, we present how one can migrate an Oracle information warehouse to Amazon Redshift utilizing Oracle GoldenGate and DMS Schema Conversion, a characteristic of AWS Database Migration Service (AWS DMS). This method facilitates minimal enterprise disruption by steady replication. Amazon Redshift is a quick, totally managed, petabyte-scale information warehouse service that makes it easy and cost-effective to effectively analyze your information utilizing your current enterprise intelligence instruments.
Answer overview
Our migration method combines DMS Schema Conversion for schema migration and Oracle GoldenGate for information replication. The migration course of consists of 4 essential steps:
- Schema conversion utilizing DMS Schema Conversion.
- Preliminary information load utilizing Oracle GoldenGate.
- Change information seize (CDC) for ongoing replication.
- Closing cutover to Amazon Redshift.
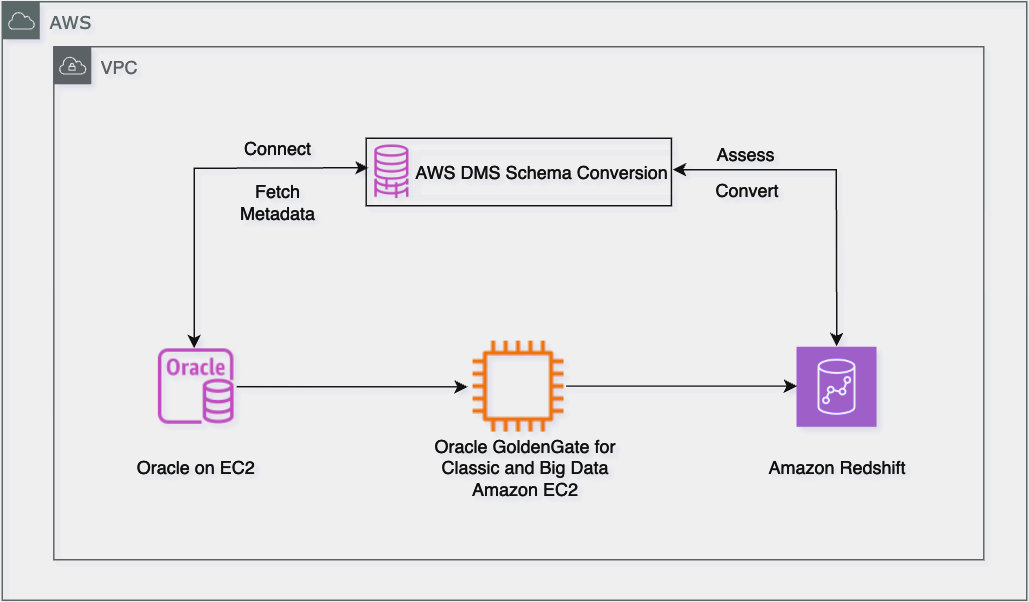
The next diagram exhibits the migration workflow structure from Oracle to Amazon Redshift, the place DMS Schema Conversion handles schema migration and Oracle GoldenGate manages each preliminary information load and steady replication by Extract and Replicat processes operating on Amazon Elastic Compute Cloud (Amazon EC2) situations. The answer facilitates minimal downtime by sustaining real-time information synchronization till the ultimate cutover.
The answer contains the next key migration parts:
Within the following sections, we stroll by how one can migrate an Oracle information warehouse to Amazon Redshift. For demonstration functions, we use an Oracle information warehouse consisting of 4 tables:
Stipulations
We advocate reviewing the licensing necessities for Oracle GoldenGate. For extra info, consult with Oracle GoldenGate Licensing Data.
Run schema conversion utilizing DMS Schema Conversion
DMS Schema Conversion mechanically converts your Oracle database schemas and code objects to Amazon Redshift-compatible codecs. This consists of tables, views, saved procedures, capabilities, and information varieties.
Arrange community for DMS Schema Conversion
DMS Schema Conversion requires community connectivity to each your supply and goal databases. To arrange this connectivity, full the next steps:
- Specify a digital personal cloud (VPC) and subnet the place DMS Schema Conversion will run.
- Configure safety group guidelines to permit visitors between the next:
- DMS Schema Conversion and your supply Oracle database
- DMS Schema Conversion and your goal Redshift cluster
- For on-premises databases, arrange both:
For complete details about community configurations, consult with Establishing a community for DMS Schema Conversion.
Retailer database credentials in AWS Secrets and techniques Supervisor
DMS Schema Conversion makes use of secrets and techniques saved in AWS Secrets and techniques Supervisor to hook up with your database. For directions so as to add supply and goal credentials to Secrets and techniques Supervisor, consult with Retailer database credentials in AWS Secrets and techniques Supervisor.
Create S3 bucket
DMS Schema Conversion saves gadgets akin to evaluation stories, transformed SQL code, and details about database schema objects in an S3 bucket. For directions to create an S3 bucket, consult with Create an S3 bucket.
Create IAM insurance policies and roles
To arrange DMS Schema Conversion, it’s essential to create applicable IAM insurance policies and roles. This course of makes positive AWS DMS has the required permissions to entry your supply and goal databases, in addition to different AWS providers required for the migration.
Put together DMS Schema Conversion
On this part, we undergo the steps to configure DMS Schema Conversion.
Arrange occasion profile
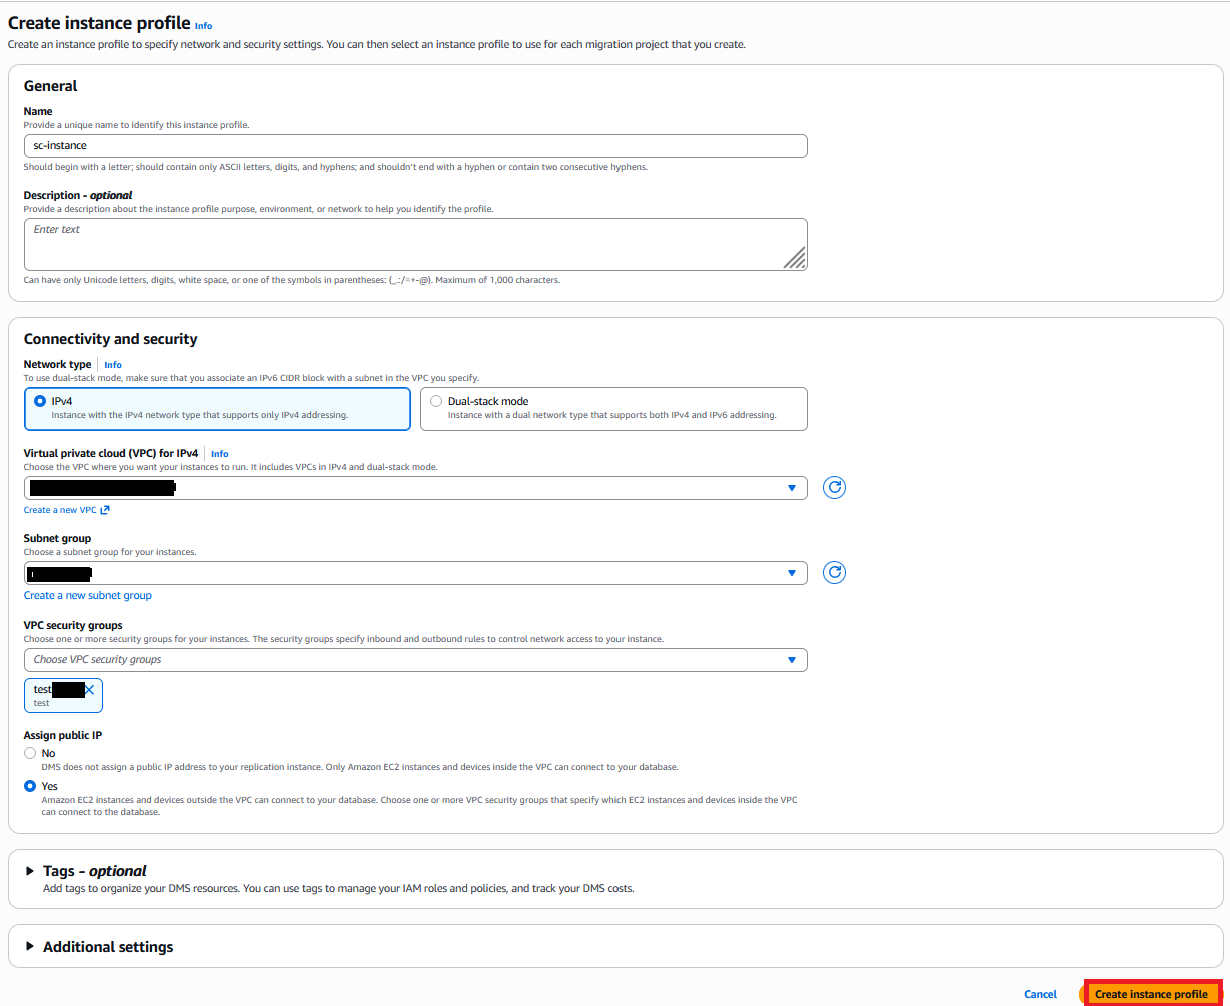
An occasion profile specifies the community, safety, and Amazon S3 settings for DMS Schema Conversion to make use of. Create an occasion profile with the next steps:
- On the AWS DMS console, select Occasion profiles within the navigation pane.
- Select Create occasion profile.
- For Identify, enter a reputation (for instance, sc-instance).
- For Community sort, we use IPv4. DMS Schema Conversion additionally presents Twin-stack mode for each IPv4 and IPv6.
- For Digital personal cloud (VPC) for IPv4, select Default VPC.
- For Subnet group, select your subnet group (for this submit, default).
- For VPC safety teams, select your safety teams. As beforehand said, the occasion profile’s VPC safety group should have entry to each the supply and goal databases.
- For S3 bucket, specify a bucket to retailer schema conversion metadata.
- Select Create occasion profile.
Add information suppliers
Information suppliers retailer database varieties and details about supply and goal databases for DMS Schema Conversion to hook up with. Configure information suppliers for the supply and goal databases with the next steps:
- On the AWS DMS console, select Information suppliers within the navigation pane.
- Select Create information supplier.
- To create your goal, for Identify, enter a reputation (for instance, redshift-target).
- For Engine sort, select Amazon Redshift.
- For Engine configuration, choose Select from Redshift.
- For Redshift cluster, select the goal Redshift cluster.
- For Port, enter the port quantity.
- For Database title, enter the title of your database.
- Select Create information supplier.
- Repeat comparable steps to create your supply information supplier.

Create migration mission
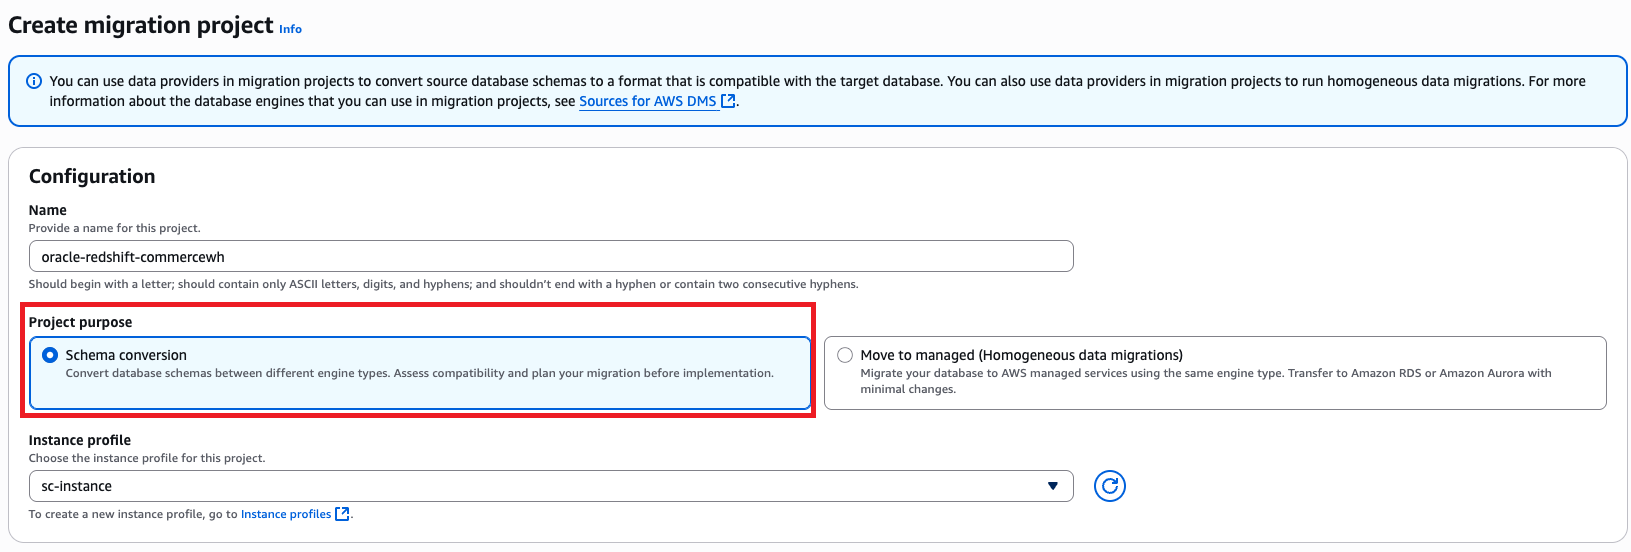
The DMS Schema Conversion migration mission defines migration entities, together with occasion profiles, supply and goal information suppliers, and migration guidelines. Create a migration mission with the next steps:
- On the AWS DMS console, select Migration tasks within the navigation pane.
- Select Create migration mission.
- For Identify, enter a reputation to establish your migration mission (for instance, oracle-redshift-commercewh).
- For Occasion profile, select the occasion profile you created.
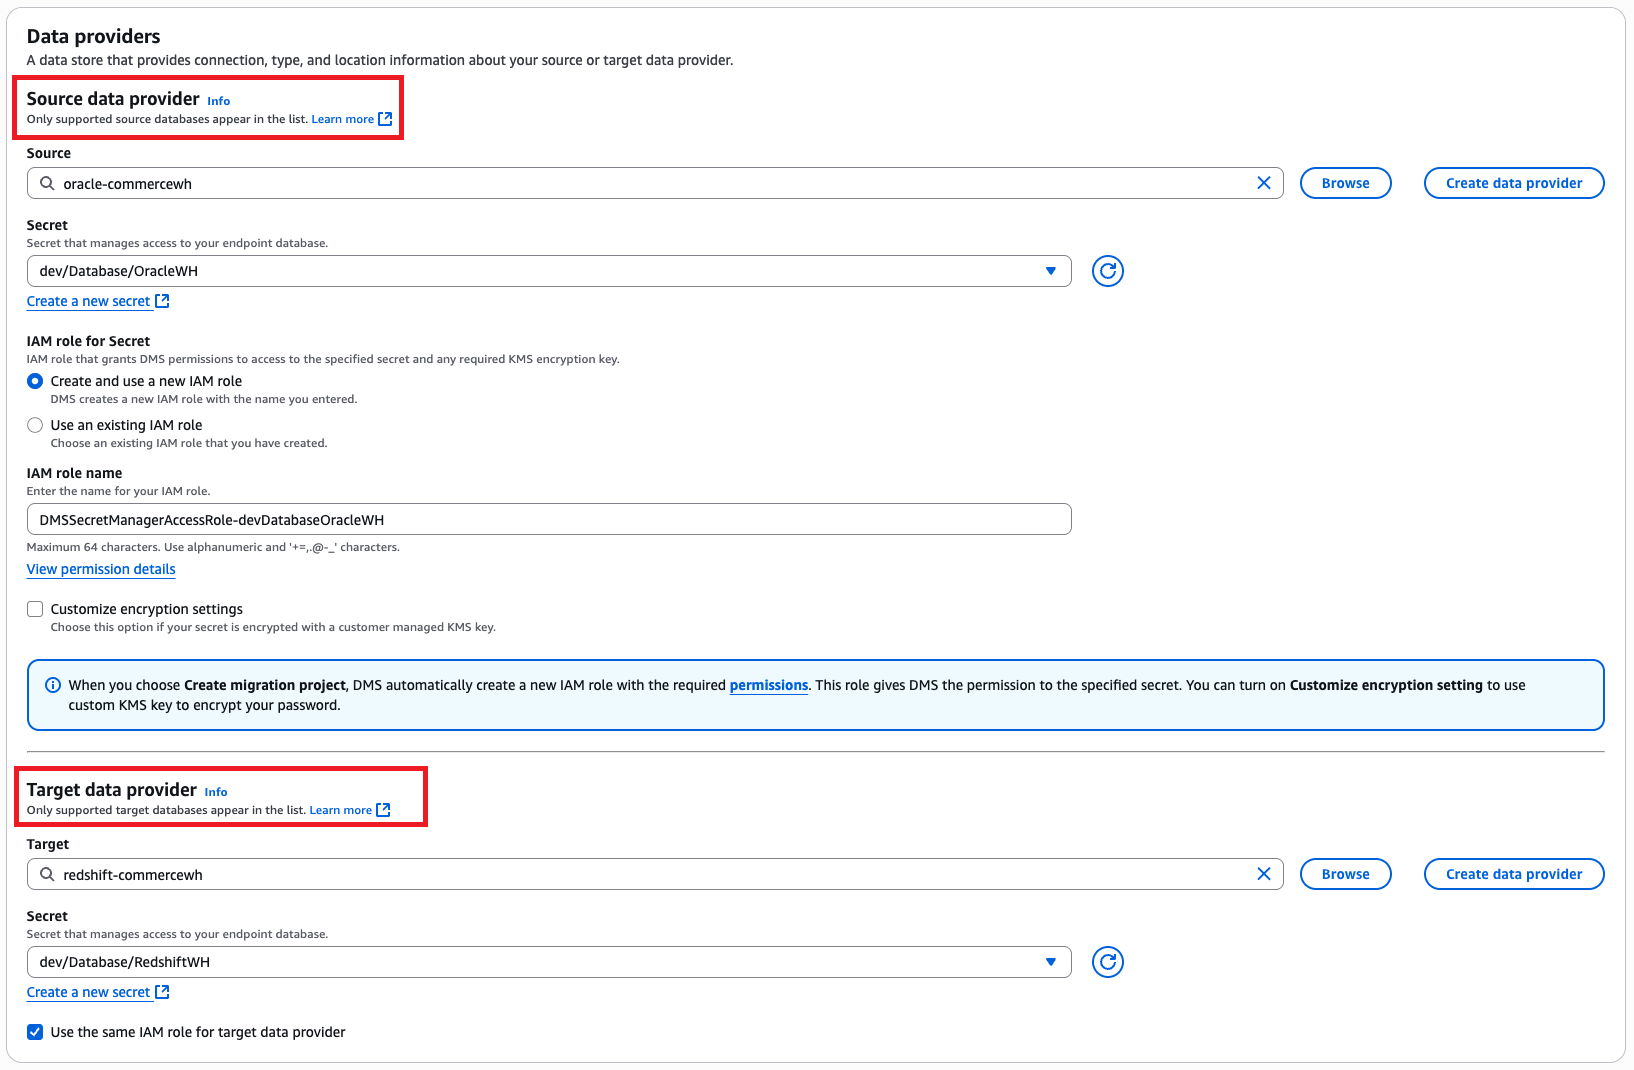
- Within the Information suppliers part, enter the supply and goal information suppliers, Secrets and techniques Supervisor secret, and IAM roles.
- Within the Schema conversion settings part, enter the S3 URL and select the relevant IAM function.
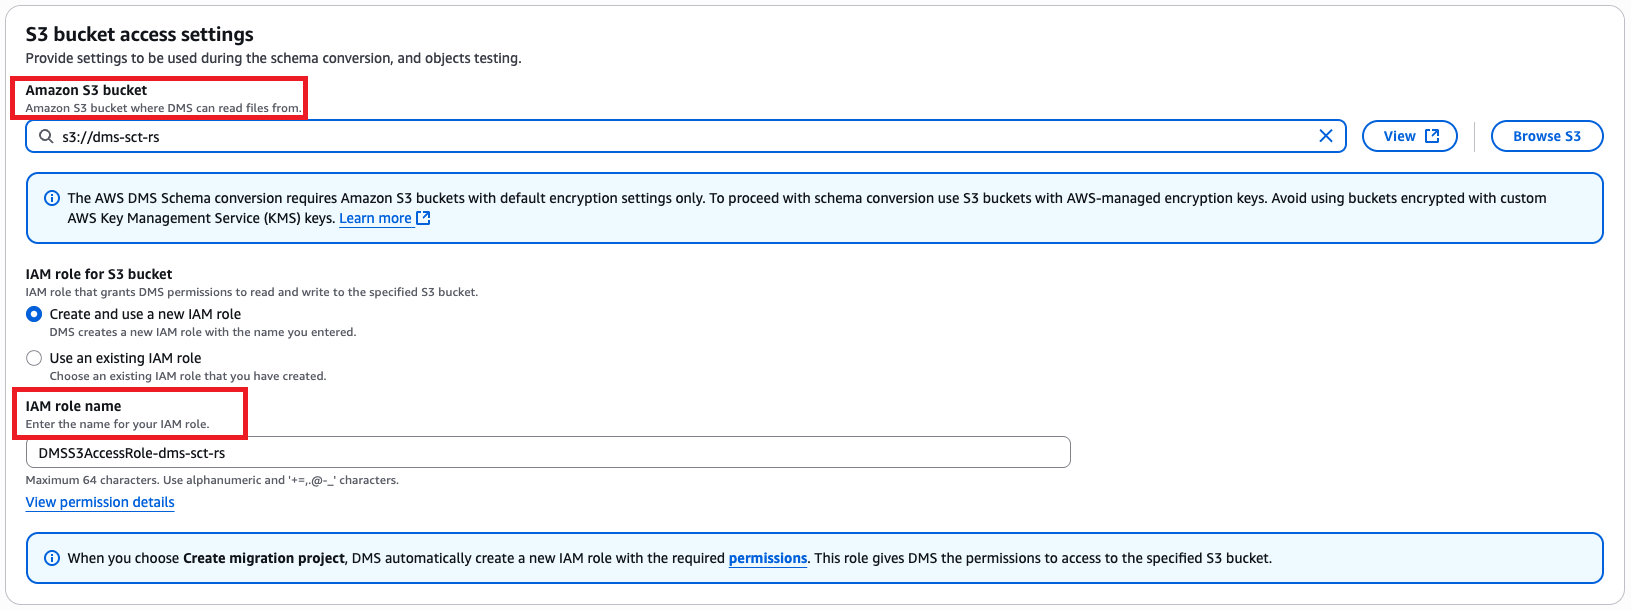
- Select Create migration mission.
Use DMS Schema Conversion to remodel Oracle database objects
Full the next steps to convert supply database objects:
- On the AWS DMS console, select Migration tasks within the navigation pane.
- Select the migration mission you created.
- On the Schema conversion tab, select Launch schema conversion.
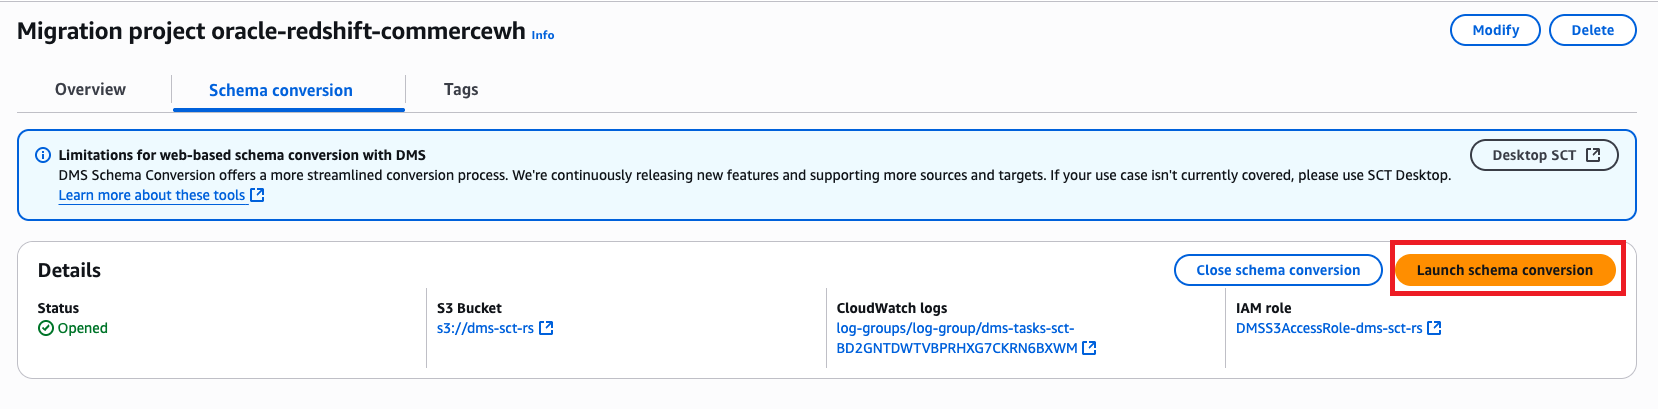
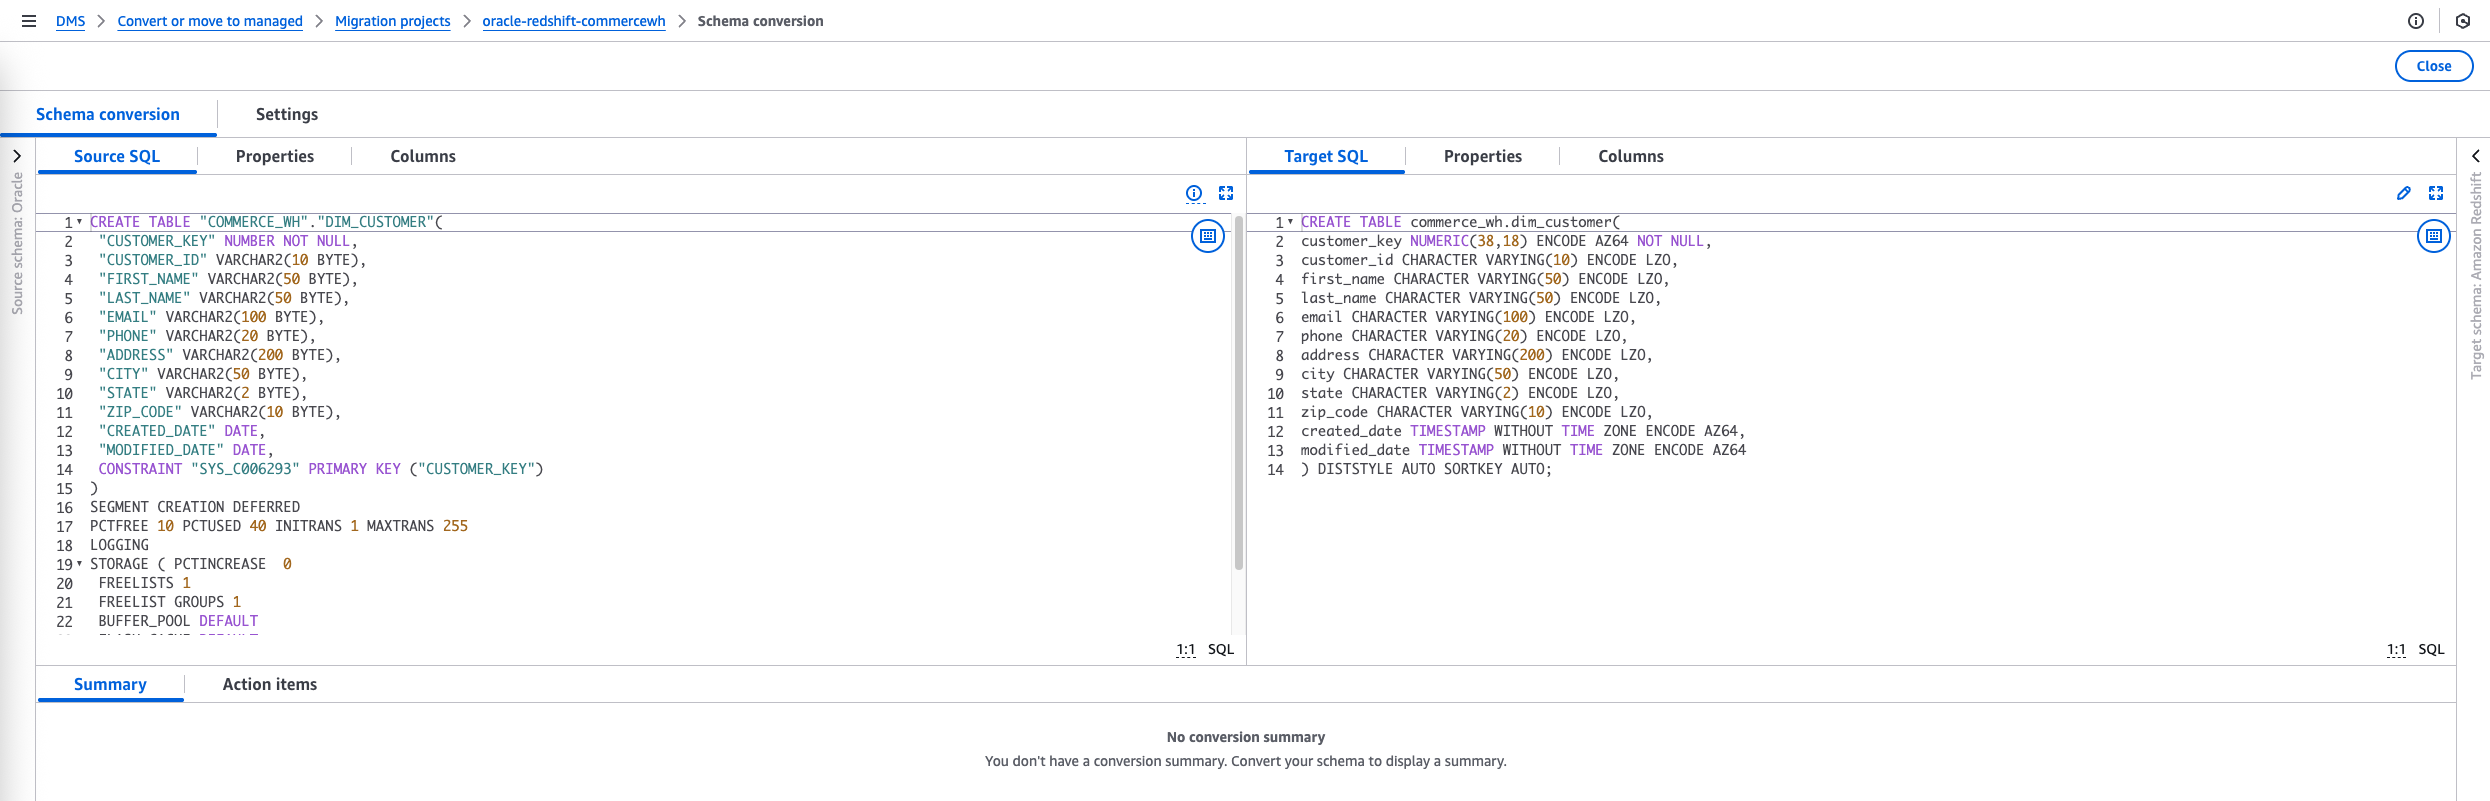
The schema conversion mission might be prepared when the launch is full. The left navigation tree represents the supply database, and the correct navigation tree represents the goal database.
- Generate and view the evaluation report.
- Choose the objects you wish to convert after which select Convert on the Actions menu to transform the supply objects to the goal database.
The conversion course of may take a while relying on the quantity and complexity of the chosen objects.
It can save you the transformed code to the S3 bucket that you simply created earlier within the prerequisite steps.
- To save lots of the SQL scripts, choose the article within the goal database tree and select Save as SQL on the Actions menu.
- After you finalize the scripts, run them manually within the goal database.
- Alternatively, you possibly can apply the scripts on to the database utilizing DMS Schema Conversion. Choose the precise schema within the goal database, and on the Actions menu, select Apply adjustments.
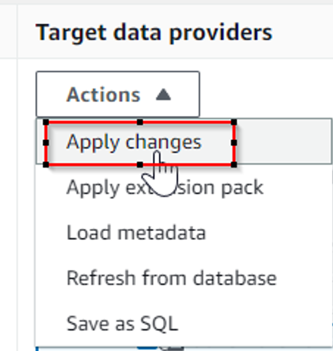
This may apply the mechanically transformed code to the goal database.
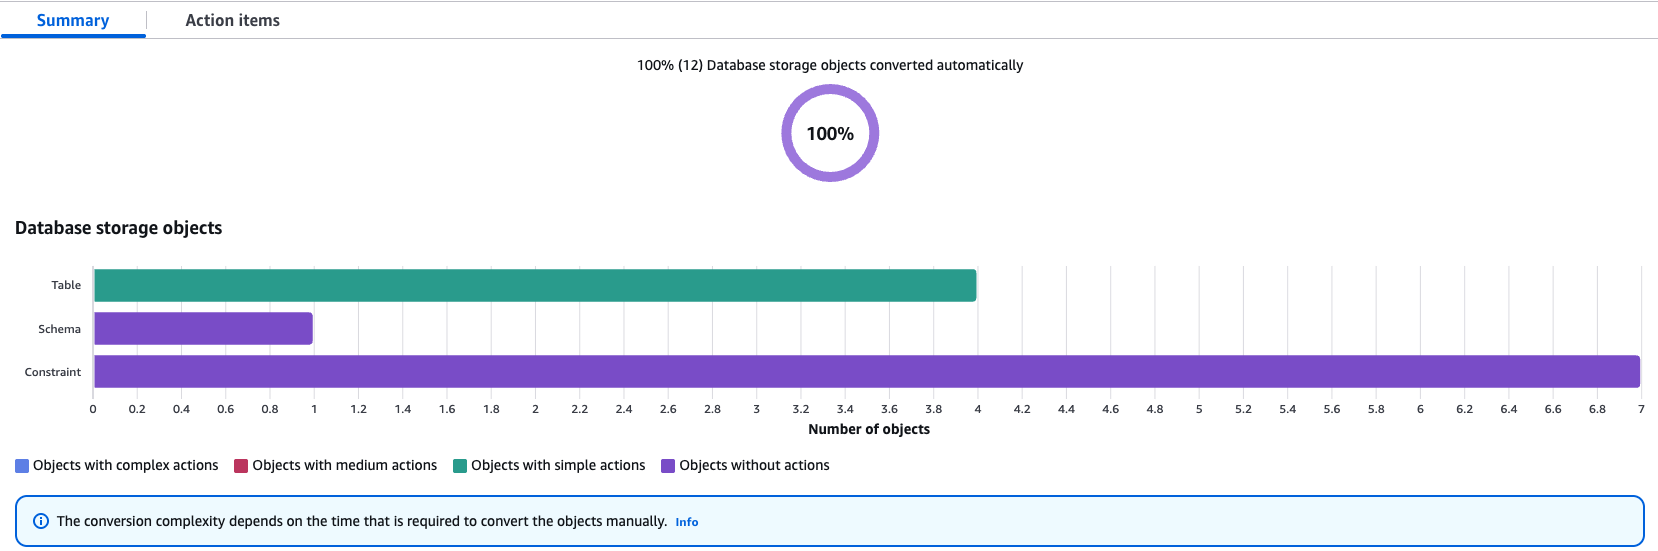
If some objects require motion gadgets, DMS Schema conversion flags them and gives particulars of motion gadgets. For the gadgets that require decision, carry out guide adjustments and apply the transformed adjustments on to the goal database.
Carry out information migration
The migration from Oracle Database to Amazon Redshift utilizing Oracle GoldenGate begins with an preliminary load course of, the place Oracle GoldenGate’s Extract course of captures the prevailing information from the Oracle supply tables and sends this information to the Replicat course of, which masses it into Redshift goal tables by the suitable database connectivity. Concurrently, Oracle GoldenGate’s CDC mechanism tracks the continuing adjustments (inserts, updates, and deletes) within the supply Oracle database by studying the redo logs. These captured adjustments are then synchronized to Amazon Redshift in close to actual time by the Extract-Pump-Replicat course of, facilitating information consistency between the supply and goal techniques all through the migration course of.
Put together supply Oracle database for GoldenGate
Put together your database for Oracle GoldenGate, together with configuring connections and logging, enabling Oracle GoldenGate in your database, establishing the flashback question, and managing server assets.
Oracle GoldenGate for BigData solely helps uncompressed UPDATE data when replicating to Amazon Redshift. When UPDATE data include lacking columns, these columns are set to null within the goal.
To deal with this case, configure Extract to generate path data with the column values (allow trandata for the columns). Alternatively, you possibly can disable this verify by setting gg.abend.on.lacking.columns=false, which can end in unintended NULLs on the goal database.When gg.abend.on.lacking.columns=true, Replicat course of on Oracle GoldenGate for BigData fails and returns the next error for compressed replace data:
Set up Oracle GoldenGate software program on Amazon EC2
You could run Oracle GoldenGate on EC2 situations. The situations should have sufficient CPU, reminiscence, and storage to deal with the anticipated replication quantity. For extra particulars, consult with Working System Necessities. After you identify the CPU and reminiscence necessities, choose a present era EC2 occasion sort for Oracle GoldenGate.
When the EC2 occasion is up and operating, obtain the next Oracle GoldenGate software program from the Oracle GoldenGate Downloads web page:
- Oracle GoldenGate for Oracle 21.3.0.0
- Oracle GoldenGate for Large Information 21c
For set up, consult with Set up, Patch, and Improve and Putting in and Upgrading Oracle GoldenGate for Large Information.
Configure Oracle GoldenGate for preliminary load
The preliminary load configuration transfers current information from Oracle Database to Amazon Redshift. Full the next configuration steps:
- Create an preliminary load extract parameter file for the supply Oracle database utilizing GoldenGate for Oracle. The next code is the pattern file content material:
- Add the EXTRACT on the GoldenGate for Oracle immediate by operating the next command:
- Create a Replicat parameter file for the goal Redshift database for the preliminary load utilizing GoldenGate for Large Information. The next code is the pattern file content material:
- Add the REPLICAT on the GoldenGate for Large Information immediate by operating the next command:
Configure Oracle GoldenGate for CDC and Amazon Redshift handler
On this part, we stroll by the steps to configure Oracle GoldenGate for CDC and the Amazon Redshift handler.
Configure Oracle GoldenGate for extracting from supply
For steady replication, arrange the Extract, Pump, and Replicat processes:
- Create an Extract parameter file for the supply Oracle database for CDC utilizing GoldenGate for Oracle. The next code is the pattern file content material:
- Add the Extract course of and register it:
- Create an Extract Pump parameter file for the supply Oracle database to ship the path recordsdata to the goal Redshift database. The next code is the pattern file content material:
- Add the Pump course of:
Configure Oracle GoldenGate Redshift handler to use adjustments to focus on
To configure an Oracle GoldenGate Replicat to ship information to a Redshift cluster, it’s essential to arrange a Redshift properties file and a Replicat parameter file that defines how information is migrated to Amazon Redshift. Full the next steps:
- Configure the Replicat properties file (rs.props), which consists of an S3 occasion handler and Redshift occasion handler. The next is an instance Replicat properties file configured to hook up with Amazon Redshift:
To authenticate Oracle GoldenGate’s entry to the Redshift cluster for information load operations, you will have two choices. The really useful and safer methodology is to make use of IAM function authentication by configuring the gg.eventhandler.redshift.AwsIamRole property within the properties file. This method gives safer, role-based entry. Alternatively, you should utilize entry key authentication by setting the setting variables AWS_ACCESS_KEY_ID and AWS_SECRET_ACCESS_KEY. For extra info, consult with the Oracle GoldenGate for BigData documentation.
- Create a Replicat parameter file for the goal Redshift database utilizing Oracle GoldenGate for BigData. The next code is the pattern file content material:
- Add a Replicat course of:
Begin preliminary load and alter sync
First begin the change sync extract and information pump on the supply Oracle database. This may begin capturing adjustments whilst you carry out the preliminary load.
- Within the GoldenGate for Oracle GGSCI utility, begin EXTPRD and PMPPRD:
Don’t begin Replicat at this level.
- Document the Supply System Change Quantity (SCN) from the Oracle database, which serves as the place to begin for replication on the goal system:
- Begin the preliminary load Extract course of, which is able to mechanically set off the corresponding preliminary load Replicat on the goal system:
- Monitor the preliminary load completion standing by executing the next command on the GoldenGate for BigData GGSCI utility. Be sure the preliminary load course of has accomplished efficiently earlier than continuing to the following step. The report will point out the load standing and potential errors that want consideration.
- Begin the change synchronization Replicat RSPRD utilizing the beforehand captured SCN to facilitate steady information replication:
Seek advice from the Oracle GoldenGate documentation for Amazon Redshift handlers to be taught extra about its detailed performance, unsupported operations, and system limitations.
When transitioning from preliminary load to steady replication in an Oracle database to Amazon Redshift migration utilizing Oracle GoldenGate, it’s essential to correctly handle information collisions to keep up information integrity. The bottom line is to seize and use an applicable SCN that marks the precise level the place preliminary load ends and CDC begins. With out correct collision dealing with, you may encounter duplicate data or lacking information through the transition interval. Implementing applicable collision dealing with mechanisms makes positive duplicate data are correctly managed with out inflicting information inconsistencies within the goal system. For extra info on HANDLECOLLISIONS, consult with the Oracle GoldenGate documentation.
Clear up
When the migration is full, full the next steps:
- Cease and take away Oracle GoldenGate processes (EXTRACT, PUMP, REPLICAT).
- Delete EC2 situations used for Oracle GoldenGate.
- Take away IAM roles created for migration.
- Delete S3 buckets used for DMS Schema Conversion (if now not wanted).
- Replace software connection strings to level to the brand new Redshift cluster.
Conclusion
On this submit, we confirmed how one can modernize your information warehouse by migrating to Amazon Redshift utilizing Oracle GoldenGate. This method facilitates minimal downtime and gives a versatile, dependable methodology for transitioning your crucial information workloads to the cloud. With the complexity concerned in database migrations, we extremely advocate testing the migration steps in non-production environments prior to creating adjustments in manufacturing. By following the perfect practices outlined on this submit, you possibly can obtain a easy migration course of and set the muse for a scalable, cost-effective information warehousing resolution on AWS. Keep in mind to repeatedly monitor your new Amazon Redshift setting, optimize question efficiency, and benefit from the AWS suite of analytics instruments to derive most worth out of your modernized information warehouse.
Concerning the authors
