
Your Images library would possibly sync with iCloud, however in macOS Sequoia, making a guide backup remains to be a sensible method to guard in opposition to deletion or corruption. This is easy methods to maintain your reminiscences secure.
Apple’s cloud service mirrors your library throughout units, but when one thing will get deleted or corrupted, it vanishes in every single place. That is why a guide, native backup of your Images library is important.
Images changed iPhoto in 2015 however the native library construction stays largely the identical. In macOS Sequoia, backing it up entails guaranteeing originals are downloaded, then copying the total library to an exterior or secondary location.
Methods to choose the right Images library on Mac
To verify your Mac’s Images app syncs correctly with iCloud, it is necessary to designate the right System Picture Library. If this is not set, you would possibly encounter the error, “iCloud options for Images are solely out there within the System Picture Library,” stopping iCloud Images from syncing in your Mac.
The error normally pops up when customers primarily use iPhones or iPads for picture administration and overlook the Mac’s library settings. In such circumstances, the Mac’s Images app will not be linked to the iCloud Picture Library, resulting in synchronization issues.
- Stop the Images app.
- Maintain down the Possibility key and open the Images app.
- Within the Select Library window, choose the library you want to use.
- As soon as the library opens, go to the Images menu and choose Settings.
- Underneath the Common tab, click on “Use as System Picture Library.” If this feature is grayed out, the present library is already set because the System Picture Library.
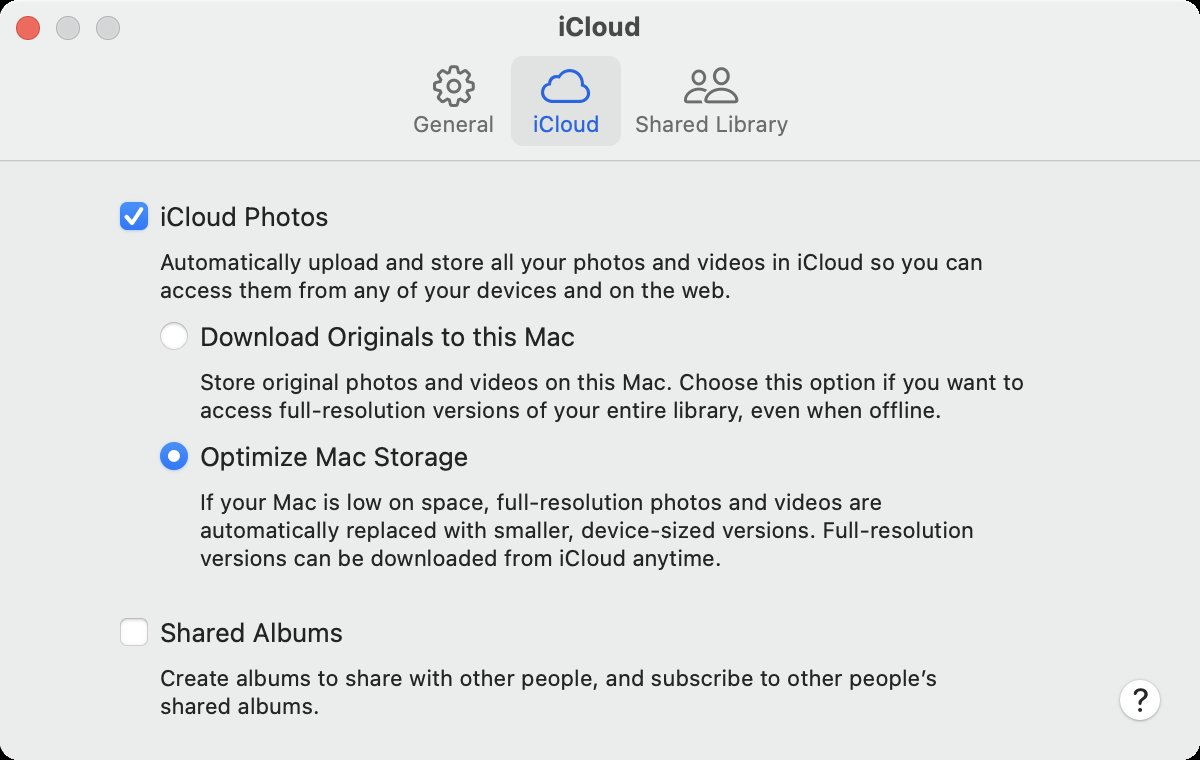
After setting the System Picture Library, navigate to the iCloud tab within the Images settings and guarantee “iCloud Images” is checked to allow synchronization.
Methods to obtain full-resolution originals to your Mac
Images is the app that manages your picture library in your Mac, whereas iCloud Images is the elective sync service that retains your pictures and movies updated throughout all Apple units.
Turning on iCloud Images shops your library within the cloud, however except you additionally obtain originals to your Mac, the native Images app might solely include lower-quality previews.
- Open the Images app.
- Go to Images, Settings and choose the iCloud tab.
- Allow Obtain Originals to this Mac.
That disables the “Optimize Mac Storage” setting and triggers a obtain of your full picture library. Relying in your assortment, this might require tens or tons of of gigabytes of native storage.
Obtain full-resolution originals to your Mac
Preserve your Mac plugged in and on-line till it finishes downloading. To stop it going to sleep, go to System Settings, Battery, then click on Choices and tick “Forestall automated sleeping on energy adapter when the
show is off.”
In case your Mac would not have sufficient area to retailer your full library, think about using an exterior drive as your System Picture Library. Alternatively, you would use an exterior drive so that you just quickly releasing up area till the obtain completes.
Manually again as much as an exterior drive
As soon as all originals are saved domestically, you possibly can copy your Images library to an exterior arduous drive or community share.
- Stop the Images app utterly.
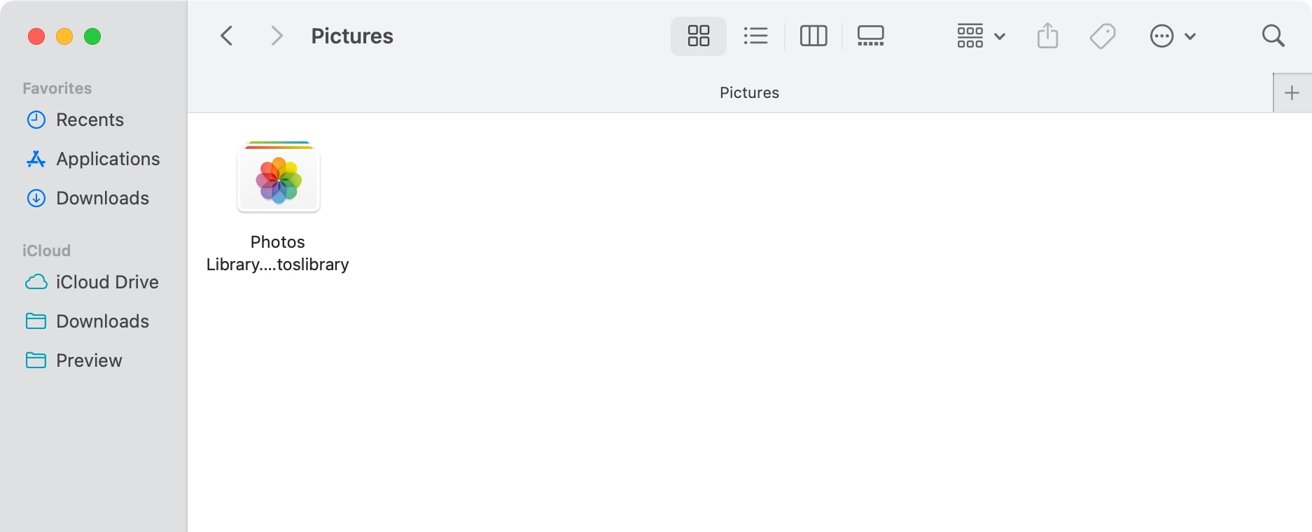
- In Finder, open your Photos folder and find Images Library.photoslibrary.
- Join an exterior drive formatted as APFS or Mac OS Prolonged (Journaled).
- Drag the Images Library file onto the exterior drive and watch for the copy to finish.
With all originals now saved domestically, you possibly can manually copy your Images Library to an exterior drive. Stop the Images app first, then drag the file named Images Library.photoslibrary out of your Photos folder to the exterior disk.
Manually again as much as an exterior drive
Do not disconnect the drive or let your Mac sleep in the course of the switch, as that may corrupt the backup. As soon as the copy completes, you will have a full duplicate of your picture library, together with high-resolution pictures, movies, and metadata.
For long-term storage, by no means use a drive that is additionally used for Time Machine. Apple warns in opposition to storing Images libraries on backup volumes managed by Time Machine.
Should you plan to open the Images Library immediately from the exterior drive, slightly than simply storing it as a backup, you will want to regulate the drive’s permissions to forestall entry errors.
- Proper-click the exterior drive in Finder and select Get Data.
- Test the field labeled “Ignore possession on this quantity” on the backside of the data window.
The choice tells macOS to deal with the drive’s contents as universally accessible, which avoids Images permission errors tied to consumer accounts.
Again as much as one other location in your Mac
We do not advocate this, but when you do not have an exterior drive, you possibly can nonetheless create a secondary copy of your Images Library by storing it on a separate quantity or partition in your Mac. It will not shield in opposition to full drive failure, however it might probably provide a layer of isolation in case of software program corruption, consumer error, or unintentional deletion.
To do that, you could wish to create a second quantity or partition utilizing Disk Utility.
- Open the Disk Utility app out of your Purposes > Utilities folder.
- Choose your inside disk (normally referred to as “Macintosh HD”) within the sidebar.
- Click on the plus (+) button so as to add a brand new APFS quantity, or use the Partition tab for an HFS+ partition if wanted.
- Title the amount (comparable to “Picture Backup”), select the format (APFS beneficial), and click on Add.
Including a brand new quantity to an APFS disk would not erase current information, which makes it a secure method to separate your backup out of your boot quantity with out wiping your Mac. As soon as the brand new quantity seems in Finder, give up the Images app and duplicate Images Library.photoslibrary out of your primary Photos folder to the brand new quantity.
Whereas this setup offers you an additional copy in a separate area, it is nonetheless on the identical bodily drive. So if the drive itself fails, you will lose each variations. For full safety, use this methodology as a brief measure or together with an exterior backup.
Use Time Machine as an extra safeguard
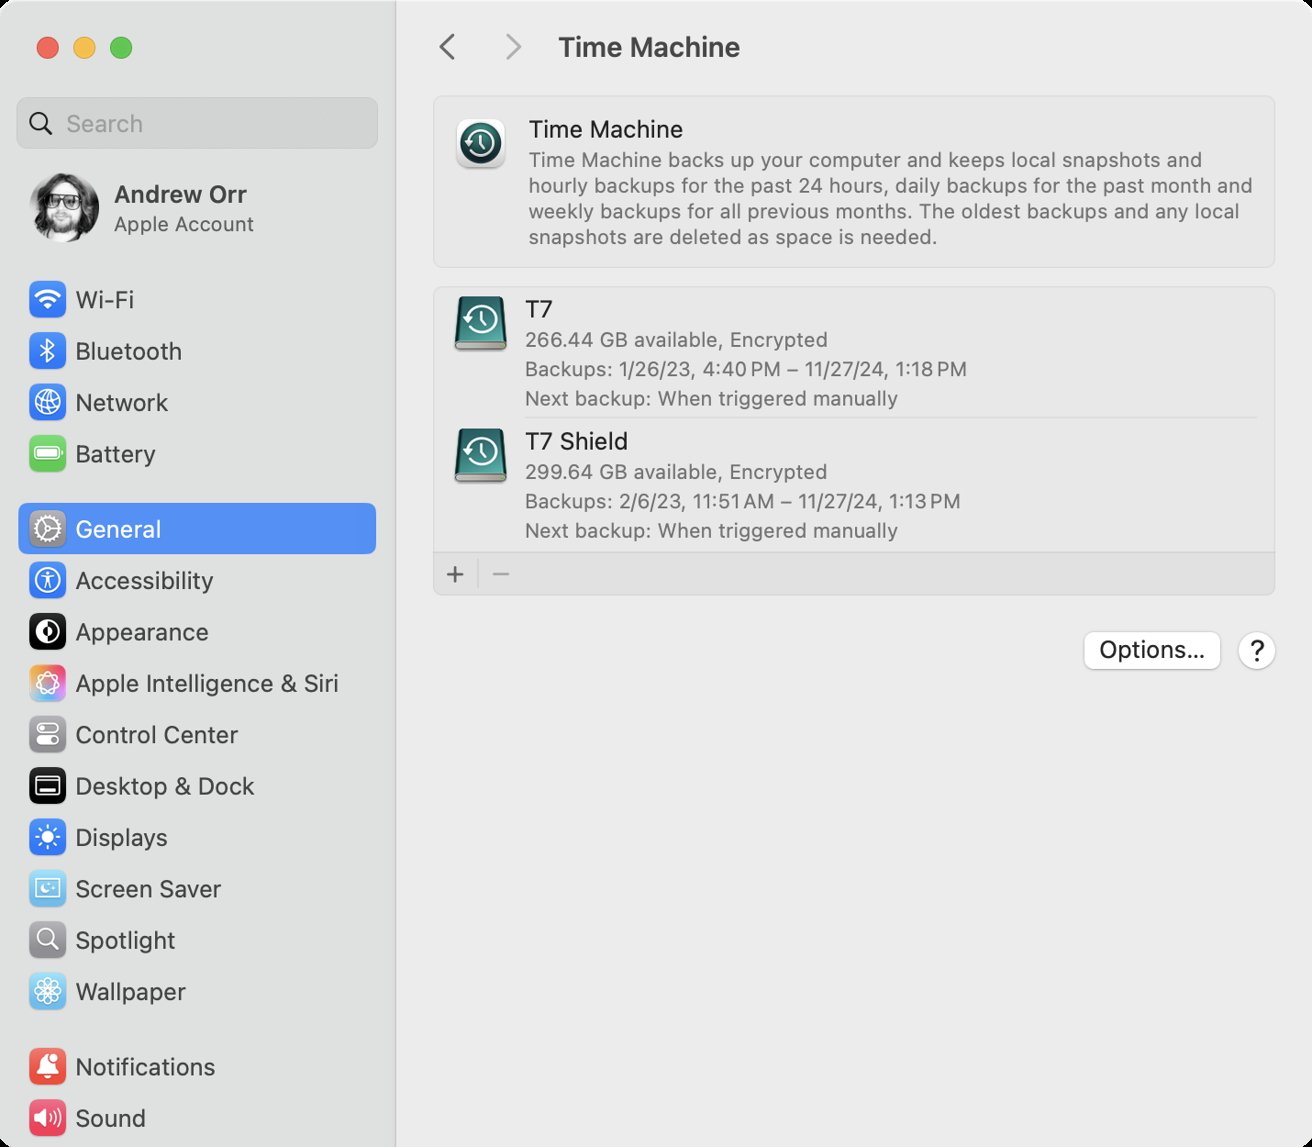
Time Machine can function a beneficial second layer of safety on your Images Library. So long as the library is saved in your Mac’s inside drive, Time Machine consists of it in common backups robotically.
Use Time Machine as an extra safeguard
You will get versioned restore factors {that a} guide copy alone cannot present.
- Make sure that your Images Library is situated in your inside disk, not on an exterior or community quantity.
- Join a Time Machine-compatible drive and activate Time Machine in System Settings.
- Let Time Machine run scheduled backups or begin one manually.
- If wanted, use Time Machine later to flick through earlier variations of your Images Library and get well deleted or modified content material.
Do not retailer your lively Images Library on the identical drive used for Time Machine. Apple warns that doing so can result in corruption or backup failures, as a result of Time Machine treats the complete drive as a backup vacation spot.
For Time Machine to work accurately, your Images Library should stay in your Mac’s inside storage, within the default location, ideally.
The Images app is designed to sync, to not archive. If a file is deleted or corrupted on one system, the change propagates to all linked units. That is why native backups are important.
We advocate sustaining each a guide backup and a Time Machine backup of your Images library. Even when iCloud fails, you will have full-resolution safety and historic restoration choices.
