
On the upcoming WWDC, Apple is anticipated to announce an on-device giant language mannequin (LLM). The following model of the iOS SDK will seemingly make it simpler for builders to combine AI options into their apps. Whereas we await Apple’s debut of its personal Generative AI fashions, corporations like OpenAI and Google already present SDKs for iOS builders to include AI options into cellular apps. On this tutorial, we’ll discover Google Gemini, previously often known as Bard, and exhibit learn how to use its API to construct a easy SwiftUI app.
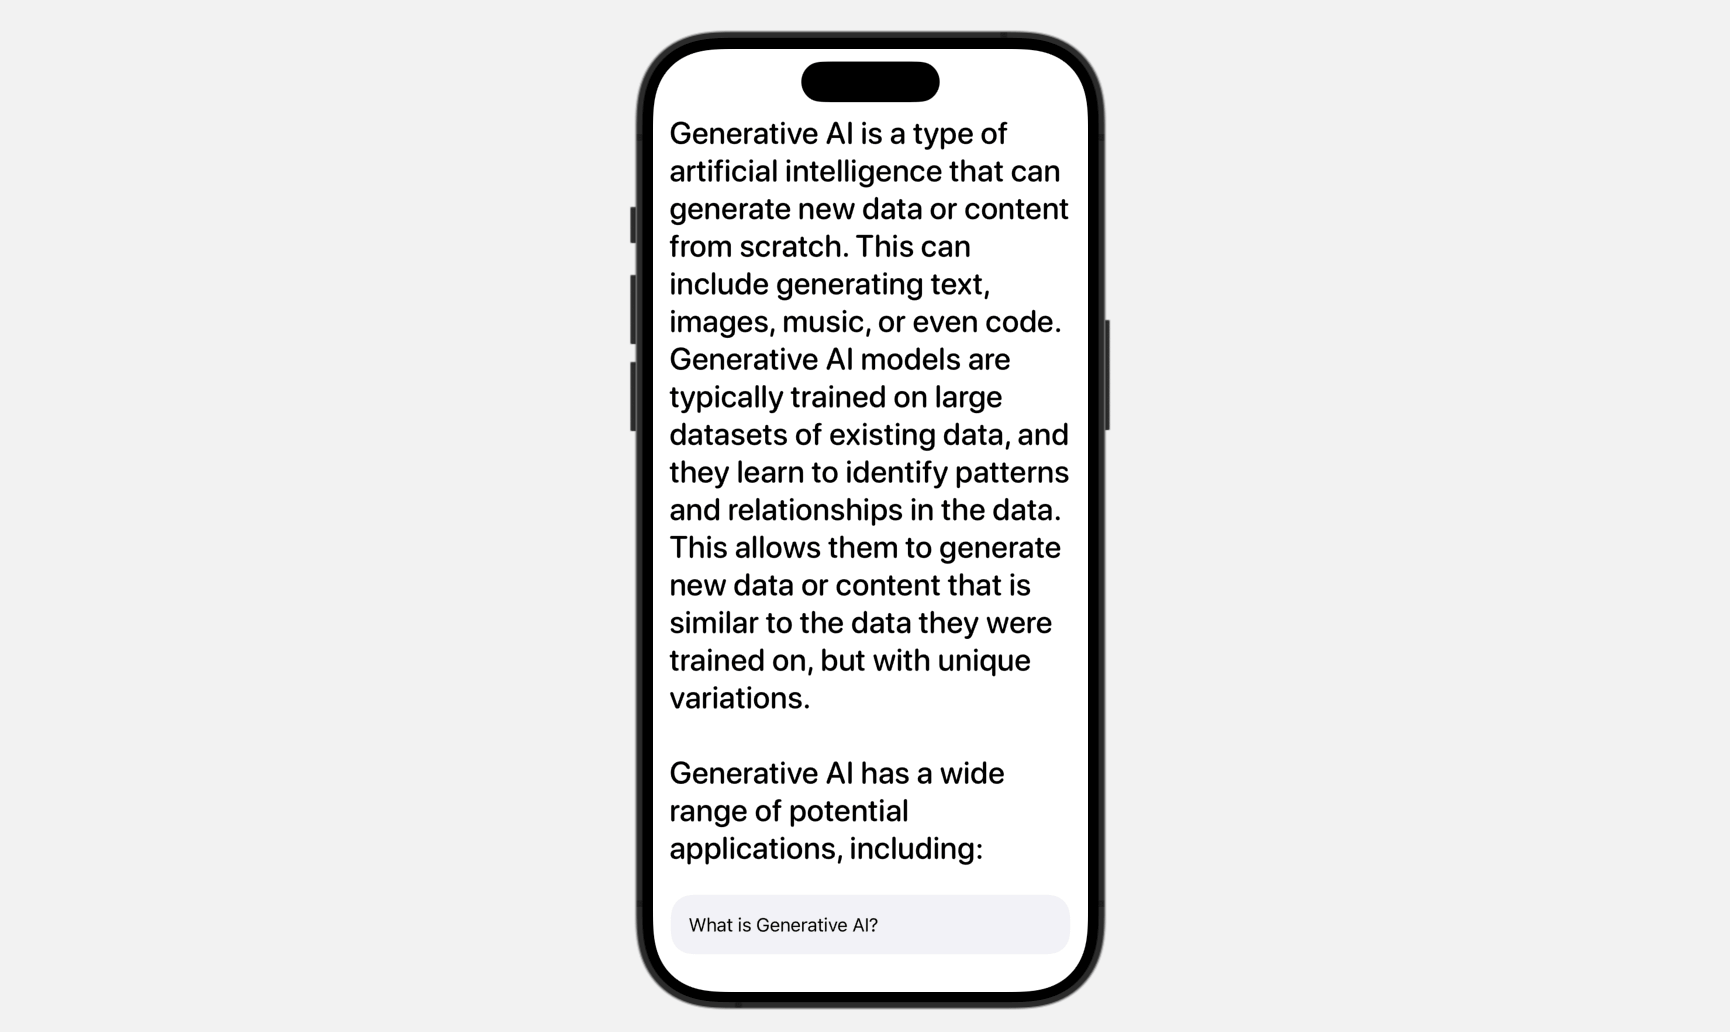
We’re set to construct a Q&A app that makes use of the Gemini API. The app encompasses a simple UI with a textual content discipline for customers to enter their questions. Behind the scenes, we’ll ship the consumer’s query to Google Gemini to retrieve the reply.
Please word that you must use Xcode 15 (or up) to comply with this tutorial.
Getting Began with Google Gemini APIs
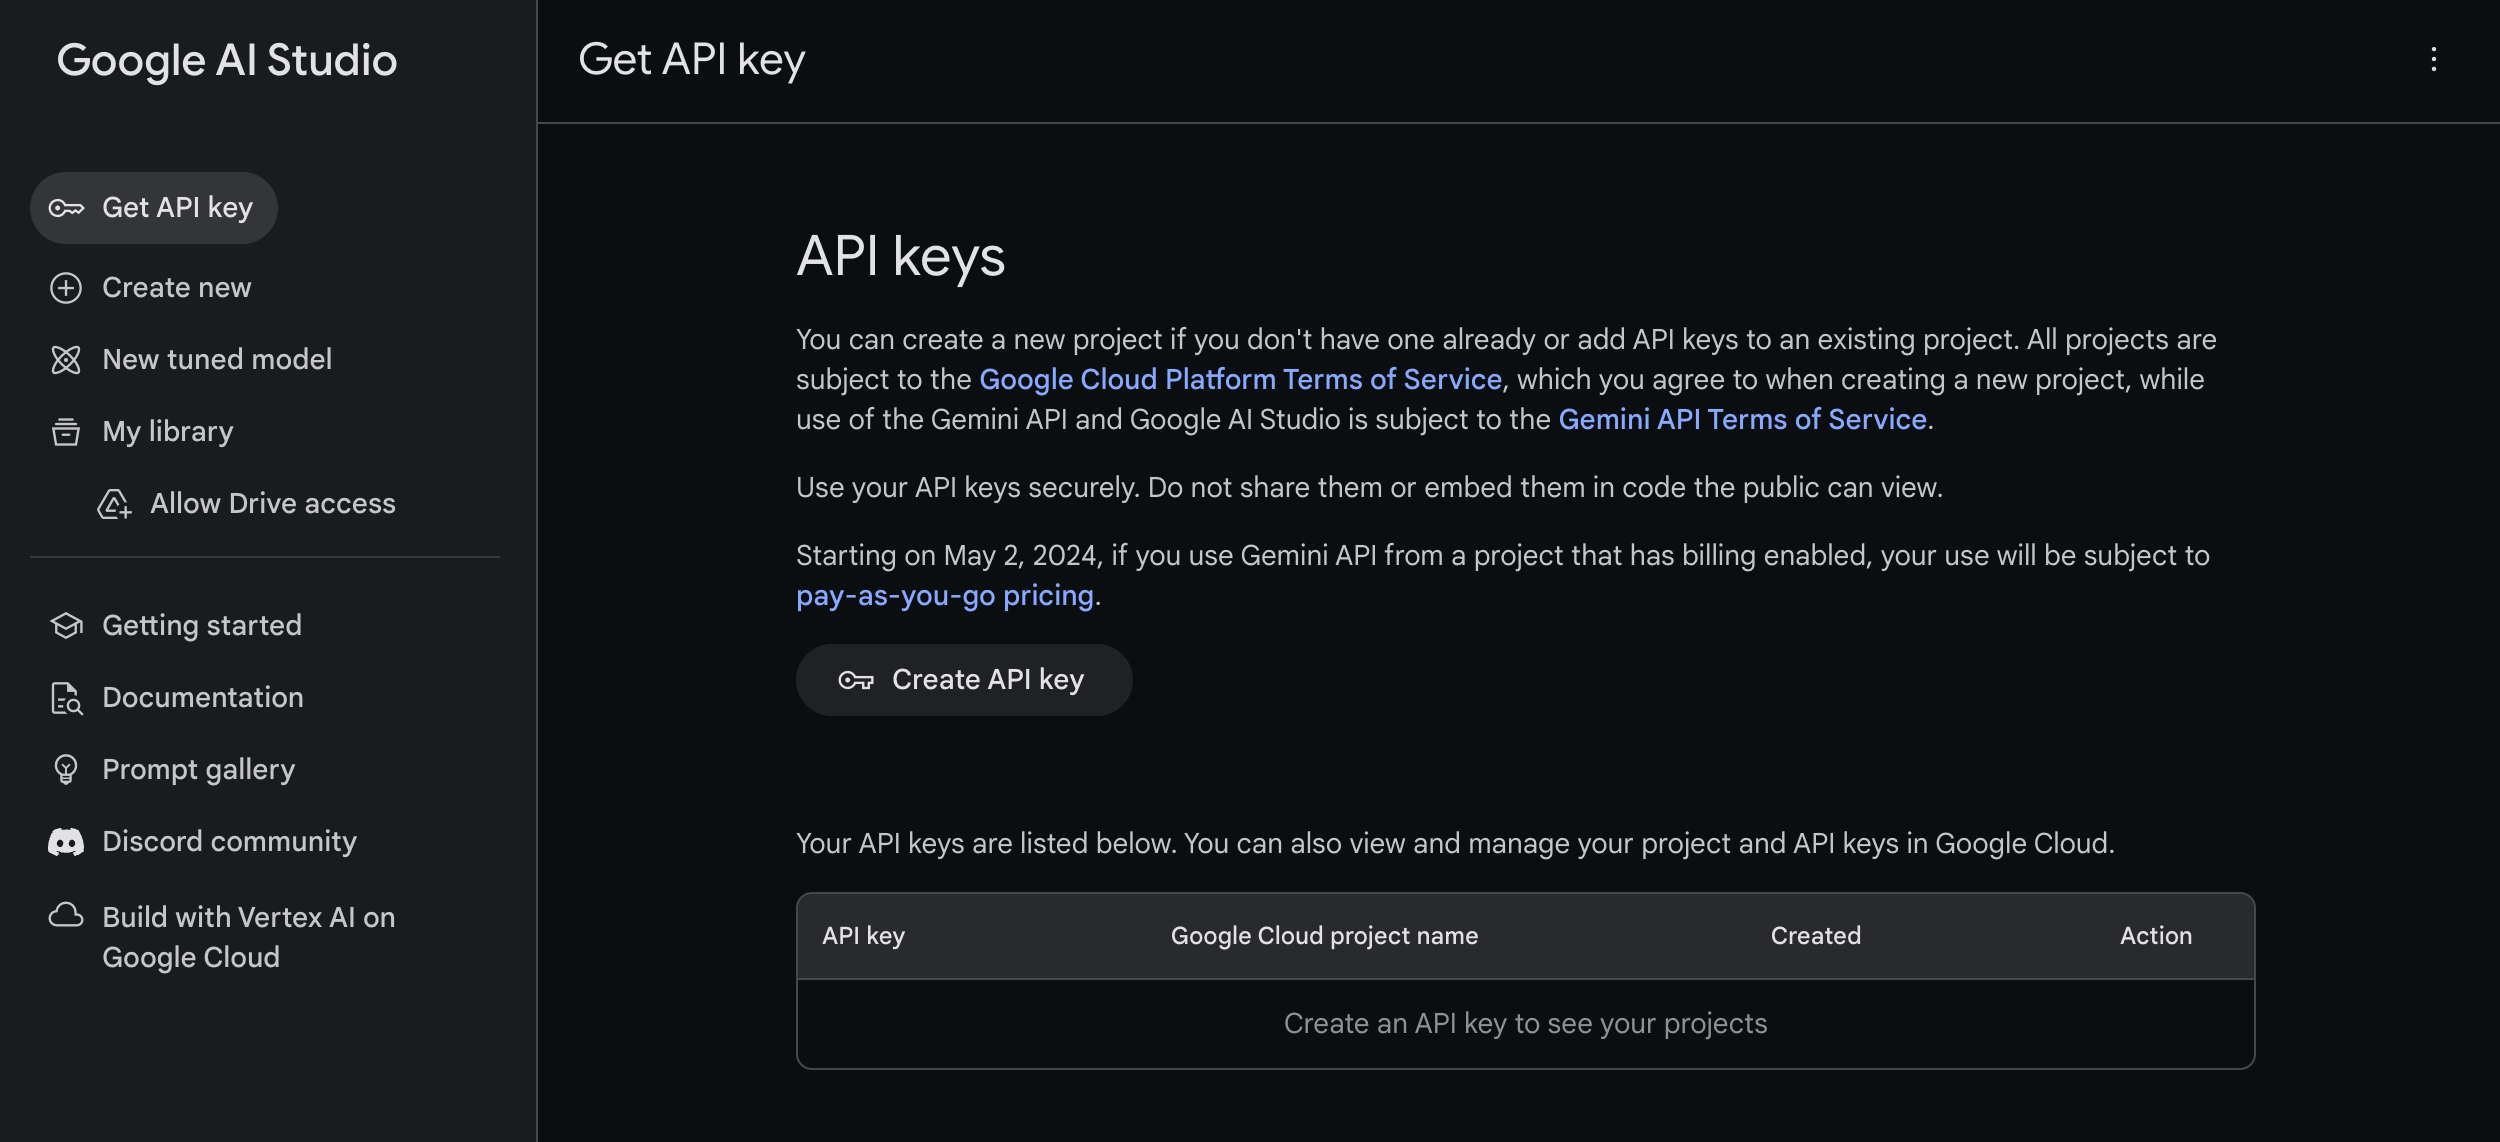
Assuming that you just haven’t labored with Gemini, the very very first thing is to go as much as get an API key for utilizing the Gemini APIs. To create one, you possibly can go as much as Google AI Studio and click on the Create API key button.
Utilizing Gemini APIs in Swift Apps
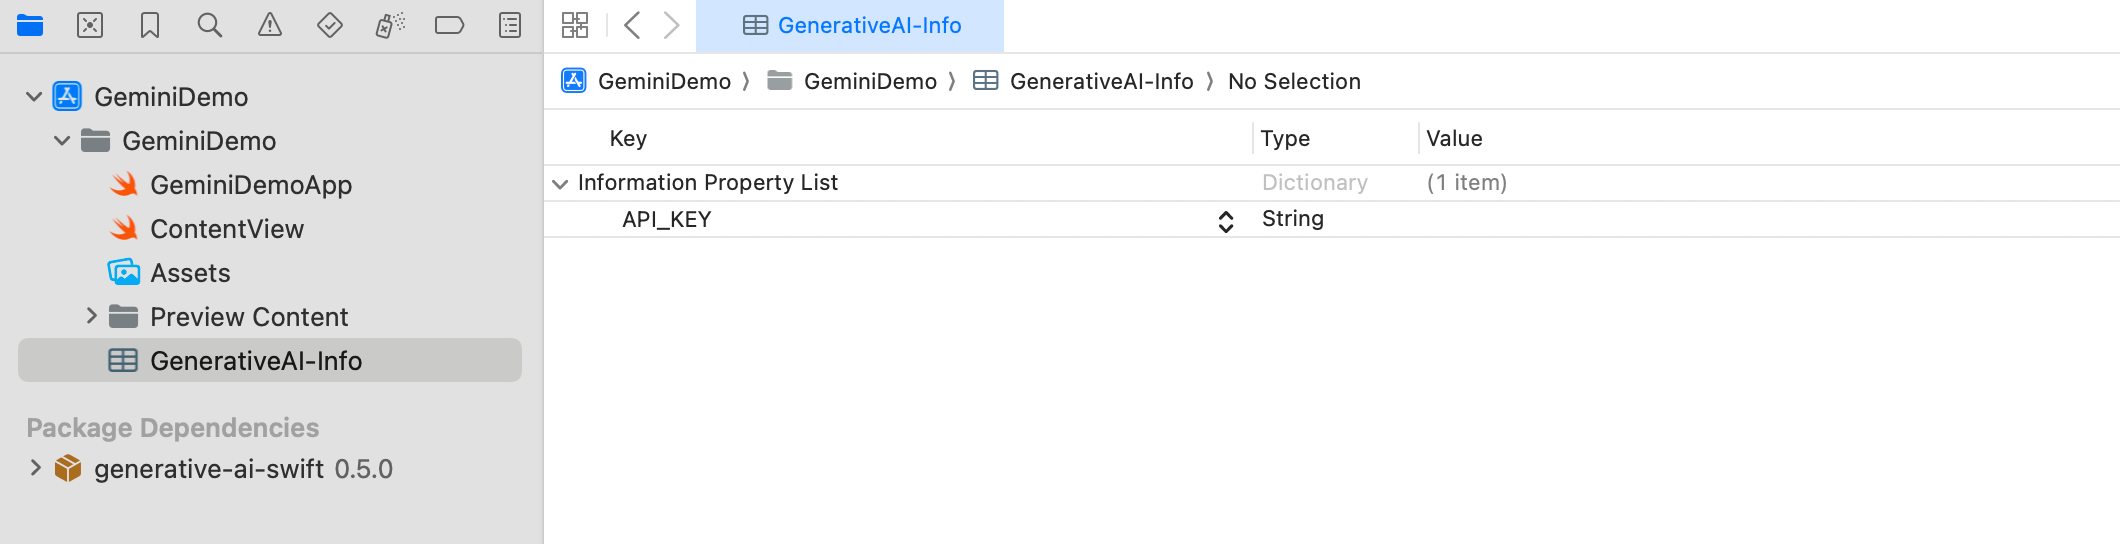
It is best to now have created the API key. We’ll use this in our Xcode challenge. Open Xcode and create a brand new SwiftUI challenge, which I’ll name GeminiDemo. To retailer the API key, create a property file named GeneratedAI-Data.plist. On this file, create a key named API_KEY and enter your API key as the worth.
To learn the API key from the property file, create one other Swift file named APIKey.swift. Add the next code to this file:
enum APIKey {
  // Fetch the API key from `GenerativeAI-Data.plist`
  static var `default`: String {

    guard let filePath = Bundle.fundamental.path(forResource: "GenerativeAI-Data", ofType: "plist")
    else {
      fatalError("Could not discover file 'GenerativeAI-Data.plist'.")
    }

    let plist = NSDictionary(contentsOfFile: filePath)

    guard let worth = plist?.object(forKey: "API_KEY") as? String else {
      fatalError("Could not discover key 'API_KEY' in 'GenerativeAI-Data.plist'.")
    }

    if worth.begins(with: "_") {
      fatalError(
        "Observe the directions at https://ai.google.dev/tutorials/setup to get an API key."
      )
    }

    return worth
  }
}
In the event you resolve to make use of a special identify for the property file as an alternative of the unique ‘GenerativeAI-Data.plist’, you will have to change the code in your ‘APIKey.swift’ file. This modification is critical as a result of the code references the particular filename when fetching the API key. So, any change within the property file identify ought to be mirrored within the code to make sure the profitable retrieval of the API key.
Including the SDK Utilizing Swift Bundle
The Google Gemini SDK is definitely accessible as a Swift Bundle, making it easy so as to add to your Xcode challenge. To do that, right-click the challenge folder within the challenge navigator and choose Add Bundle Dependencies. Within the dialog, enter the next bundle URL:
https://github.com/google/generative-ai-swiftYou’ll be able to then click on on the Add Bundle button to obtain and incorporate the GoogleGenerativeAI bundle into the challenge.
Constructing the App UI
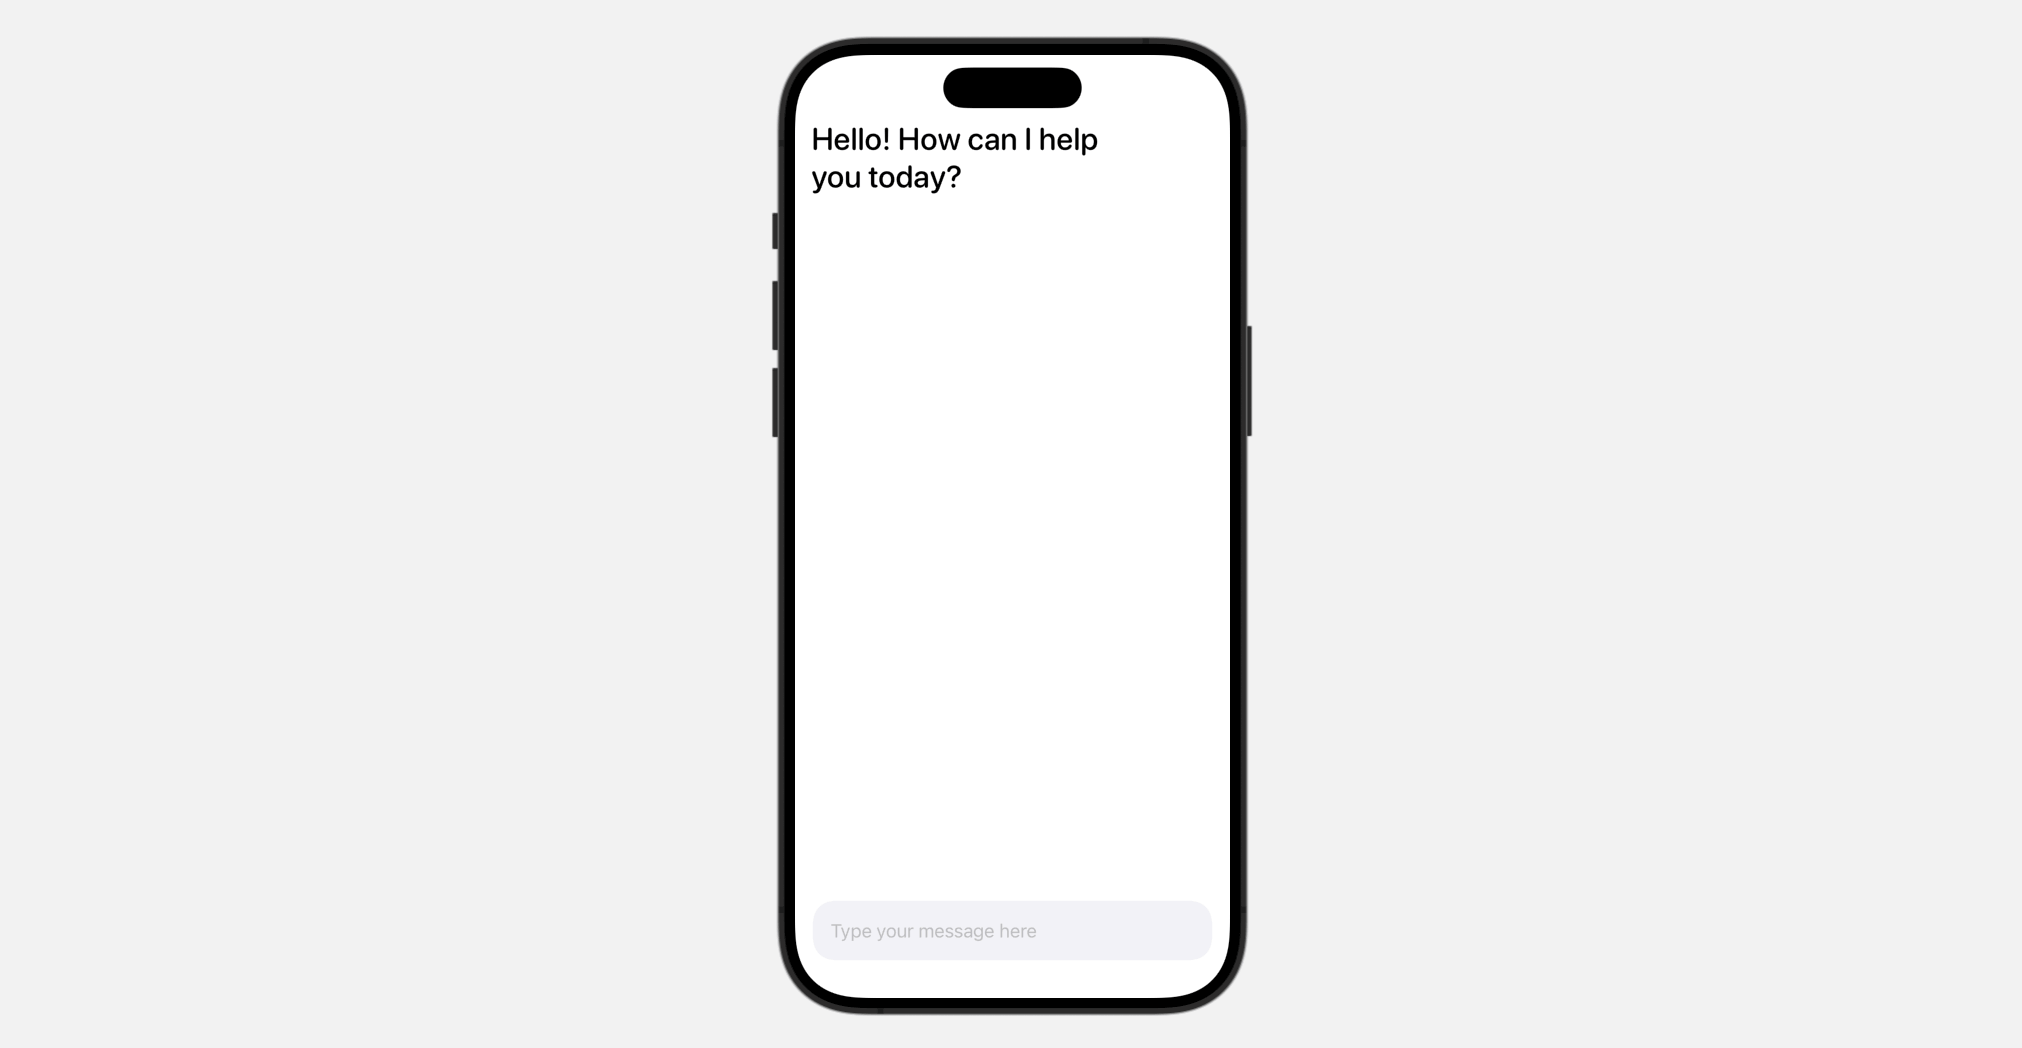
Let’s begin with the UI. It’s simple, with solely a textual content discipline for consumer enter and a label to show responses from Google Gemini.
Open ContentView.swift and declare the next properties:
@State personal var textInput = ""
@State personal var response: LocalizedStringKey = "Good day! How can I aid you as we speak?"

@State personal var isThinking = false
The textInput variable is used to seize consumer enter from the textual content discipline. The response variable shows the API’s returned response. Given the API’s response time, we embody an isThinking variable to observe the standing and present animated results.
For the physique variable, substitute it with the next code to create the consumer interface:
VStack(alignment: .main) {

    ScrollView {
        VStack {
            Textual content(response)
                .font(.system(.title, design: .rounded, weight: .medium))
                .opacity(isThinking ? 0.2 : 1.0)
        }
    }
    .contentMargins(.horizontal, 15, for: .scrollContent)

    Spacer()

    HStack {

        TextField("Kind your message right here", textual content: $textInput)
            .textFieldStyle(.plain)
            .padding()
            .background(Shade(.systemGray6))
            .clipShape(RoundedRectangle(cornerRadius: 20))

    }
    .padding(.horizontal)
}
The code is sort of simple, particularly when you’ve got some expertise with SwiftUI. After making the adjustments, it’s best to see the next consumer interface within the preview.
Integrating with Google Gemini
Earlier than you should utilize the Google Gemini APIs, you first must import the GoogleGenerativeAI module:
import GoogleGenerativeAISubsequent, declare a mannequin variable and initialize the Generative mannequin like this:
let mannequin = GenerativeModel(identify: "gemini-pro", apiKey: APIKey.default)Right here, we make the most of the gemini-pro mannequin, which is particularly designed to generate textual content from textual content enter.
To ship the textual content to Google Gemini, let’s create a brand new perform known as sendMessage():
func sendMessage() {
    response = "Considering..."

    withAnimation(.easeInOut(period: 0.6).repeatForever(autoreverses: true)) {
        isThinking.toggle()
    }

    Activity {
        do {
            let generatedResponse = attempt await mannequin.generateContent(textInput)

            guard let textual content = generatedResponse.textual content else  {
                textInput = "Sorry, Gemini bought some issues.nPlease attempt once more later."
                return
            }

            textInput = ""
            response = LocalizedStringKey(textual content)

            isThinking.toggle()
        } catch {
            response = "One thing went flawed!n(error.localizedDescription)"
        }
    }
}
As you possibly can see from the code above, you solely must name the generateContent methodology of the mannequin to enter textual content and obtain the generated response. The result’s in Markdown format, so we use LocalizedStringKey to wrap the returned textual content.
To name the sendMessage() perform, replace the TextField view and connect the onSubmit modifier to it:
TextField("Kind your message right here", textual content: $textInput)
    .textFieldStyle(.plain)
    .padding()
    .background(Shade(.systemGray6))
    .clipShape(RoundedRectangle(cornerRadius: 20))
    .onSubmit {
        sendMessage()
    }
On this state of affairs, when the consumer finishes inputting the textual content and presses the return key, the sendMessage() perform is known as to submit the textual content to Google Gemini.
That’s it! Now you can run the app in a simulator or execute it immediately within the preview to check the AI characteristic.

Abstract
This tutorial exhibits learn how to combine Google Gemini AI right into a SwiftUI app. It solely requires just a few strains of code to allow your app with Generative AI options. On this demo, we use the gemini-pro mannequin to generate textual content from text-only enter.
Nevertheless, the capabilities of Gemini AI usually are not simply restricted to text-based enter. Gemini additionally provides a multimodal mannequin named gemini-pro-vision that permits builders to enter each textual content and pictures. We encourage you to take full benefit of this tutorial by modifying the supplied code and experimenting with it.
In case you have any questions concerning the tutorial, please let me know by leaving a remark under.
