
When making a challenge in Amazon SageMaker Unified Studio, customers choose a challenge profile to outline sources and instruments to be provisioned within the challenge. These are utilized by Amazon SageMaker Catalog to implement a knowledge mesh sample. Some customers don’t wish to reap the benefits of sources provisioned together with the challenge for numerous causes. As an illustration, they could wish to keep away from making adjustments to their current purposes and information merchandise.
This put up exhibits you tips on how to implement a knowledge mesh sample by utilizing Amazon SageMaker Catalog whereas protecting your present information repositories and client purposes unchanged.
Resolution overview
On this put up, you’ll simulate a state of affairs based mostly on information producer and information client that exists earlier than Amazon SageMaker Catalog adoption. For this objective, you’ll use a pattern dataset to simulate current information and simulate an current utility utilizing an AWS Lambda perform. You may apply the identical resolution to your real-life information and workloads.
The next diagram illustrates the answer structure’s key configurations. On this structure, the Amazon Easy Storage Service (Amazon S3) bucket and the AWS Glue Knowledge Catalog within the producer account simulate the prevailing information repository. The Lambda perform within the client account simulates the prevailing client utility.
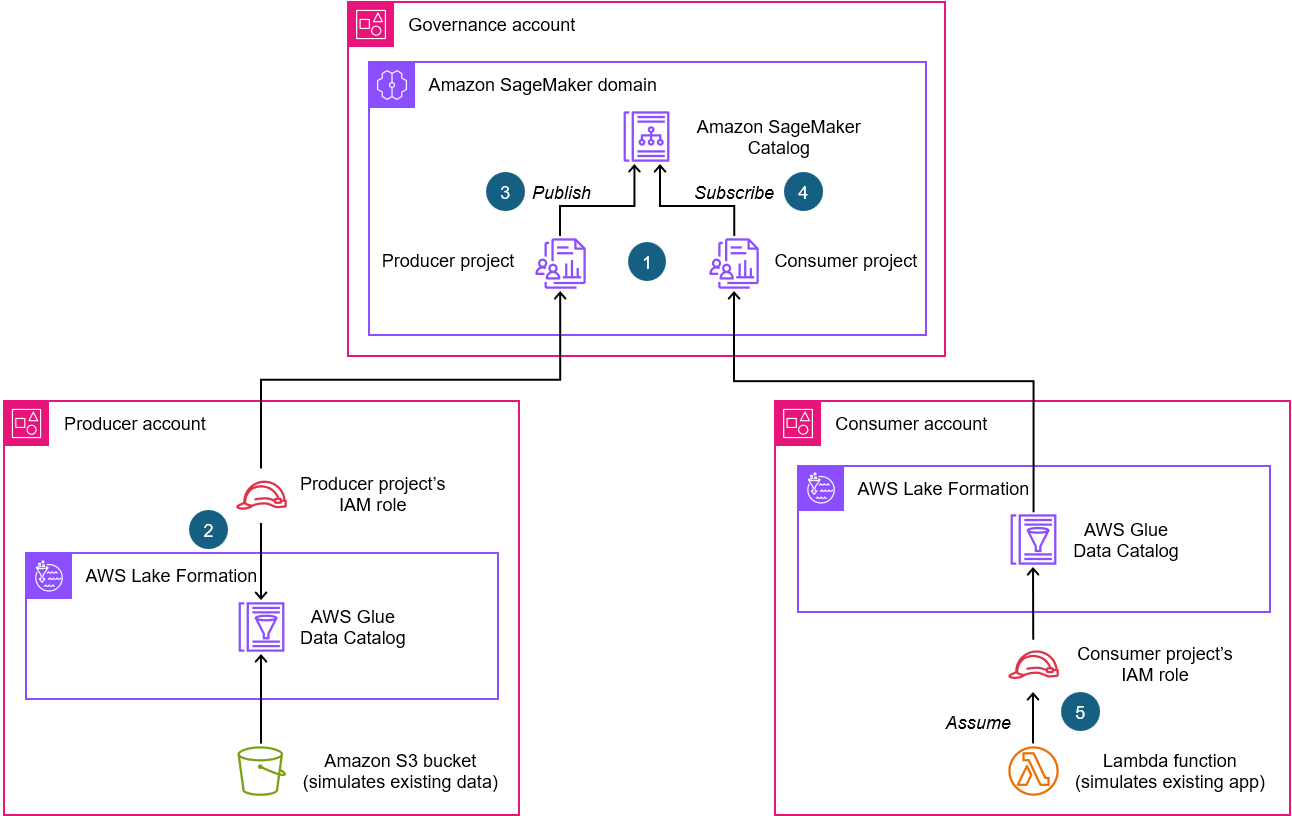
Here’s a description of the important thing configurations highlighted within the structure:
- As a part of an Amazon SageMaker area, create a producer challenge (related to a producer account) and a client challenge (related to a client account). Amongst different sources, a challenge AWS Id and Entry Administration (IAM) position is created for every challenge within the related account.
- Within the producer account, use AWS Lake Formation to grant producer challenge’s IAM position permissions to entry the prevailing information asset.
- Publish the information asset within the Amazon SageMaker Catalog from the producer challenge.
- Subscribe the information asset from the buyer challenge.
- Within the client account, configure your Lambda perform to imagine client challenge’s IAM position to entry the subscribed information asset.
The answer structure relies on the next Amazon Internet Providers (AWS) providers and options:
- Amazon SageMaker Catalog affords you a method to uncover, govern, and collaborate on information and AI securely.
- Amazon SageMaker Unified Studio gives a single information and AI improvement setting to find and construct together with your information. Amazon SageMaker Unified Studio tasks present collaborative boundaries for customers to perform information and AI duties.
- The lakehouse structure of Amazon SageMaker is absolutely suitable with Apache Iceberg. It unifies information throughout Amazon S3 information lakes, Amazon Redshift information warehouses, and third-party and federated information sources.
- AWS Lake Formation, which you should utilize centrally to control, safe, and share information for analytics and machine studying.
- AWS Glue Knowledge Catalog is a persistent metadata retailer to your information belongings. It comprises desk definitions, job definitions, schemas, and different management data that can assist you handle your AWS Glue setting.
- Amazon S3 is an object storage service that gives industry-leading scalability, information availability, safety, and efficiency.
Establishing sources
On this part, you’ll put together the sources and configurations you want for this resolution.
Three AWS accounts
To comply with this resolution, you want three AWS accounts, and it’s higher in the event that they’re a part of the identical group in AWS Organizations:
- Producer account – Hosts the information asset to be revealed
- Client account – Hosts the applying that consumes the information revealed from the producer account
- Governance account – The place the Amazon SageMaker Unified Studio area is configured
Every account will need to have an Amazon Digital Personal Cloud (Amazon VPC) with no less than two non-public subnets in two completely different Availability Zones. For instruction, seek advice from Create a VPC plus different VPC sources. Be sure to create each VPCs in the identical Area you propose to use this resolution.
A governance account is used for the sake of comfort, nevertheless it’s not strictly wanted as a result of Amazon SageMaker will be configured and managed in producer or client accounts.In the event you don’t have entry to 3 accounts, you possibly can nonetheless use this put up to know the important thing configurations required to implement a knowledge mesh sample with Amazon SageMaker Catalog whereas protecting your present information repositories and client purposes unchanged.
Create a knowledge repository within the producer account
First, create a pattern dataset by following these directions:
- Open a textual content editor.
- Paste the next textual content in a brand new file:
- Save the file as
timber.csv. That is your pattern information file.
After you create the pattern dataset, create an S3 bucket and an AWS Glue database within the producer account, which is able to act as the information repository.
Create the S3 bucket and add the timber.csv file within the producer account:
- Entry the S3 console within the producer account.
- Create an S3 bucket. For directions, seek advice from Making a common objective bucket.
- Add to the S3 bucket the
timber.csvpattern information file that you simply created. For directions, seek advice from Importing objects.
Create the AWS Glue database and desk within the producer account:
- Entry the Glue console within the producer account.
- Within the navigation pane, beneath Knowledge Catalog, select Databases.
- Select Add database.
- For Title, enter
collections. - For Description, enter
This database comprises collections of statistics for pure sources. - Select Create database.
- Within the navigation pane, beneath Knowledge Catalog, select Tables.
- Select Add desk.
- Within the desk creation guided process, enter the next enter for Step 1: Set desk properties:
- For Title, enter
timber. - For Database, choose
collections. - For Description, enter
This desk captures scores information associated to the traits of assorted tree species. - For Desk format, choose Normal AWS Glue desk (default).
- For Choose the kind of supply, choose S3.
- For Knowledge location is laid out in, choose my account.
- For Embody path, enter
s3://the place/ / timber.csvfile you uploaded. - For Knowledge format, choose CSV.
- For Delimeter, choose Comma (,).
- For Title, enter
- Select Subsequent.
- For Step 2: Select or outline schema, enter the next:
- For Schema, choose Outline or add a schema.
- Select Edit schema as JSON and enter the next schema within the pop-up:
- Select Save.
- Select Subsequent.
- Select Create.
Create a Lambda perform within the client account
Create the Lambda perform within the client account. This can simulate a knowledge client utility.First, within the client account create the IAM coverage and the IAM position to be assigned to the Lambda perform:
- Entry the IAM console within the client account.
- Create an IAM coverage and title it
smus_consumer_athena_executionby utilizing the next coverage. Be sure to exchange placeholders - Create an IAM position for AWS Lambda service and title it
smus_consumer_lambda. Assign to it the AWS managed permissionAWSLambdaBasicExecutionRoleand the permission namedsmus_consumer_athena_executionthat you simply simply created. For directions, seek advice from Create a job to delegate permissions to an AWS service.
After the IAM position for the Lambda perform is in place, you possibly can create the Lambda perform within the client account:
- Entry the Lambda console within the client account.
- Within the navigation pane, select Features.
- Select Create perform and enter the next data:
- For Operate title, enter
consumer_function. - For Runtime, choose Python 3.14.
- Develop Change default execution position part.
- For Execution position, choose Use an current position.
- For Current position, choose
smus_consumer_lambda.
- For Operate title, enter
- Select Create perform.
- Beneath the Code tab, within the Code supply, exchange the prevailing code with the next:
- Select Deploy.
The code offered for the Lambda perform contains some placeholders that you’ll exchange later, after you’ve gotten the required data. Don’t take a look at the Lambda perform presently as a result of it should fail due to the presence of the placeholders.
Create a person with administrative entry
Amazon SageMaker Unified Studio helps two distinct area varieties: AWS IAM Id Heart based mostly domains and IAM based mostly domains. On the time of scripting this put up, solely IAM Id Heart based mostly domains help multi-accounts affiliation, due to this fact on this put up you’re employed with this sort of area that requires IAM Id Heart.
Within the governance account, you allow IAM Id Heart and create an administrative person to create and handle the Amazon SageMaker Unified Studio area. Create a person with administrative entry:
- Allow IAM Id Heart within the governance account. For directions, seek advice from Allow IAM Id Heart.
- In IAM Id Heart within the governance account, grant administrative entry to a person. For a tutorial about utilizing the IAM Id Heart listing as your identification supply, seek advice from Configure person entry with the default IAM Id Heart listing.
Sign up because the person with administrative entry:
- To sign up together with your IAM Id Heart person, use the sign-in URL that was despatched to your electronic mail tackle once you created the IAM Id Heart person. For assist signing in utilizing an IAM Id Heart person, seek advice from Sign up to your AWS entry portal.
Create a SageMaker Unified Studio area
To create the Amazon SageMaker Unified Studio area within the governance account seek advice from Create a Amazon SageMaker Unified Studio area – fast setup.
After your area is created, you possibly can navigate to the Amazon SageMaker Unified Studio portal (a browser-based internet utility) the place you should utilize your information and configured instruments for analytics and AI. Save the Amazon SageMaker Unified Studio portal URL as a result of you’ll use this URL later.
Resolution steps
Now that you’ve the stipulations in place, you possibly can full the next ten high-level steps to implement the answer.
Affiliate the producer and client accounts to the Amazon SageMaker Unified Studio area
Begin by associating the producer and client accounts to the newly created Amazon SageMaker Unified Studio area. While you affiliate your producer and client accounts to the area, be sure that to pick IAM customers and roles can entry APIs and IAM customers can log in to Amazon SageMaker Unified Studio within the AWS RAM share managed permission part. For step-by-step directions, seek advice from Related accounts in Amazon SageMaker Unified Studio. In case your AWS accounts are a part of the identical group, your affiliation requests are robotically accepted. Nonetheless, in case your AWS accounts aren’t a part of the identical group, request affiliation with the opposite AWS accounts within the governance account after which settle for the affiliation request in each the producer and client accounts.
Create two challenge profiles
Now, create two challenge profiles, one for the producer challenge and one for the buyer challenge.
In Amazon SageMaker Unified Studio, a challenge profile defines an uber template for tasks in your Amazon SageMaker area. A challenge profile is a set of blueprints that gives reusable AWS CloudFormation templates used to create challenge sources.
A challenge profile is related to a particular AWS account. This implies, when a challenge is created the blueprints listed within the challenge profile are deployed within the related AWS account. To make use of a challenge profile, you should allow its blueprints within the AWS account related to the challenge profile.
Create the producer challenge profile
You’re going to create the producer challenge profile that’s related to the producer account. This challenge profile shall be used to create the producer challenge. This profile contains by default the Tooling blueprint that creates sources for the challenge, together with IAM person roles and safety teams.
Earlier than creating the challenge profile, you’ll allow the Tooling blueprint within the producer account utilizing the next process:
- Entry the SageMaker console within the producer account.
- Within the navigation pane, select Related domains.
- Choose the area you created whereas establishing.
- On the Blueprints tab, select Allow within the Tooling blueprint part as proven within the following picture:
- For Digital non-public cloud (VPC) choose your account VPC.
- For Subnets, choose no less than two subnets in several Availability Zones.
- Select Allow blueprint.

Proceed to creating the challenge profile within the governance account:
- Entry the SageMaker console within the governance account.
- Within the navigation pane, select Domains.
- Choose the area you created as a part of stipulations.
- Beneath the Venture profiles tab, select Create and enter the next data:
- For Venture profile title, enter
producer-project-profile. - For Venture profile creation choices, choose Customized create.
- DO NOT SELECT A BLUEPRINT for Blueprints as a result of the
Toolingblueprint is included by default in any challenge profile. - For Account, choose Present an account ID.
- For Account ID, enter the producer account ID.
- For Area, choose Present area title after which choose the Area by which you’re working.
- For Authorization, choose Permit all customers and teams.
- For Venture profile readiness, choose Allow challenge profile on creation.
- For Venture profile title, enter
- Select Create challenge profile.
Create a client challenge profile
You additionally create a client challenge profile and affiliate it to the buyer account. This profile shall be used to create the buyer challenge. The buyer challenge profile contains the LakeHouseDatabase blueprint, which is required to create a lakehouse setting with an AWS Glue database for information administration and an Amazon Athena workgroup for querying. The Tooling blueprint is included by default within the challenge profile.
Earlier than creating the challenge profile, allow the Tooling and LakeHouseDatabase blueprints within the client account:
- Entry the SageMaker console within the client account.
- Within the navigation pane, select Related domains.
- Choose the area you created as a part of stipulations.
- On the Blueprints tab, select Allow within the Tooling blueprint part.
- For Digital non-public cloud (VPC) choose your account VPC.
- For Subnets, choose no less than two subnets in several Availability Zones.
- Select Allow blueprint.
- Within the navigation pane, select Related domains.
- Choose the area you created as a part of stipulations.
- Beneath the Blueprints tab, choose the
LakeHouseDatabaseblueprint. - Select Allow.
- Select Allow blueprint.
After blueprints are enabled within the client account, you possibly can proceed creating the challenge profile:
- Entry the SageMaker console within the governance account.
- Within the navigation pane, select Domains.
- Choose the area you created as a part of stipulations.
- Beneath Venture profiles tab select Create and enter the next data:
- For Venture profile title, enter
consumer-project-profile. - For Venture profile creation choices, choose Customized create.
- For Blueprints, choose
LakeHouseDatabase. - For Account, choose Present an account ID.
- For Account ID, enter the buyer account ID.
- For Area, choose Present area title after which choose the Area you’re working.
- For Authorization, choose Permit all customers and teams.
- For Venture profile readiness, choose Allow challenge profile on creation.
- For Venture profile title, enter
- Select Create challenge profile.
Create SageMaker Unified Studio producer and client tasks
In Amazon SageMaker Unified Studio, a challenge is a boundary inside a website the place you possibly can collaborate with different customers to work on a enterprise use case. In tasks, you possibly can create and share information and sources.To create producer and client tasks in Amazon SageMaker Unified Studio use the next directions:
- Entry the Amazon SageMaker Unified Studio portal.
- Select the Choose a challenge dropdown listing.
- Select Create challenge and enter the next data:
- For Venture title, enter
Producer. - For Venture profile, choose
producer-project-profile.
- For Venture title, enter
- Select Proceed.
- Select Proceed.
- Select Create challenge.
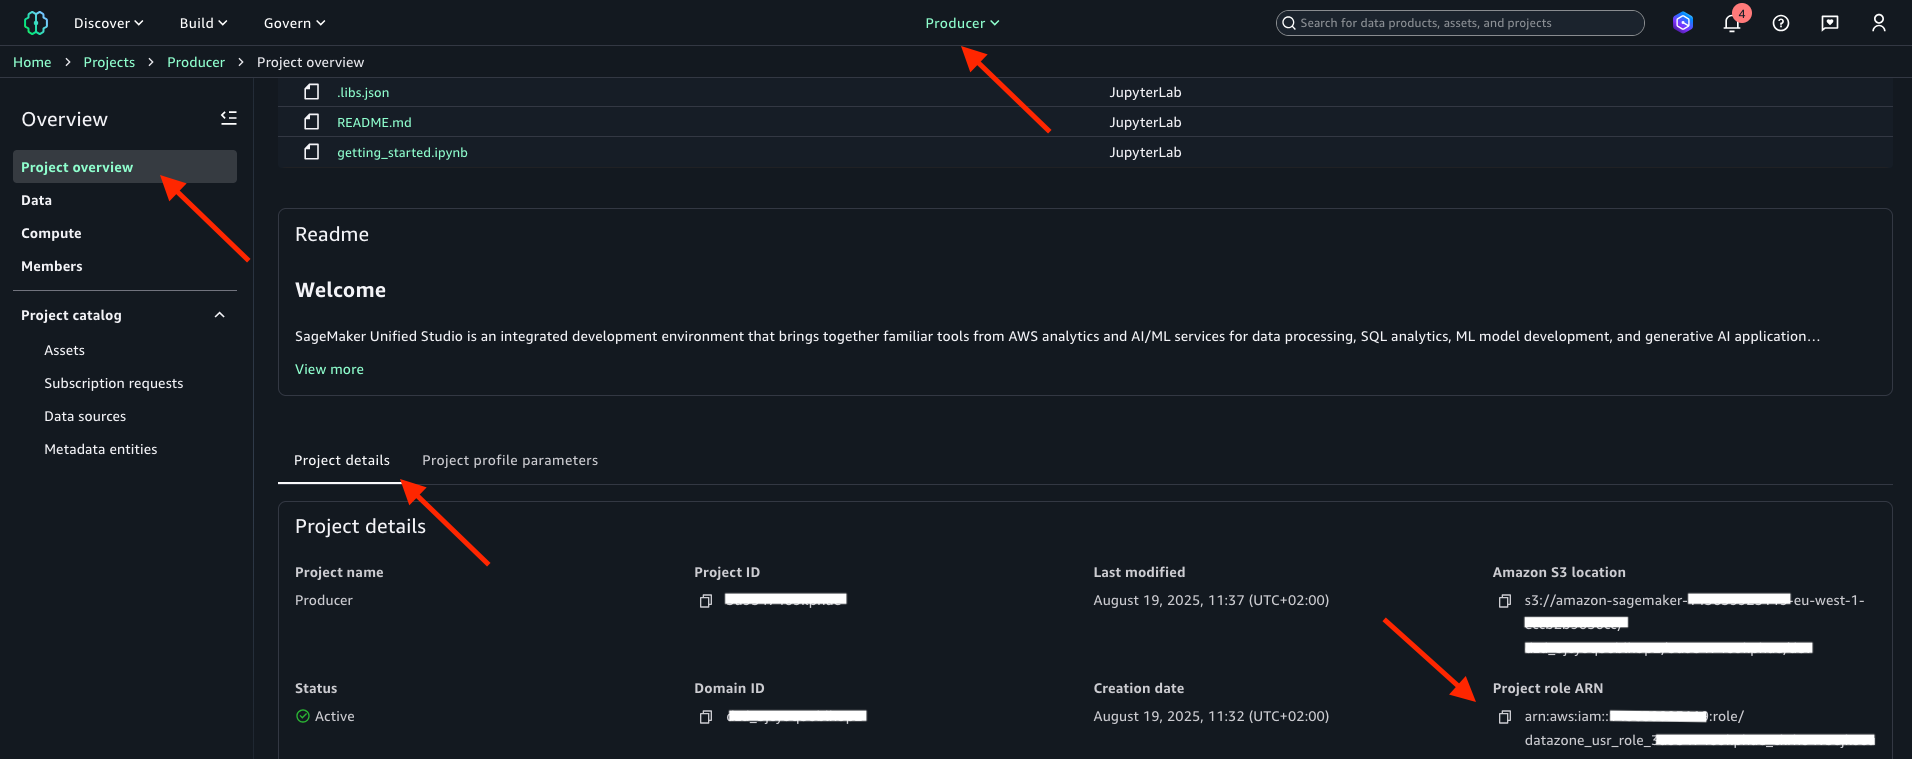
After you’ve created the Producer challenge, notice in a textual content file the Venture position ARN that’s displayed within the Venture overview. The next picture is proven for reference. The challenge position title is the string that follows arn:aws:iam:: within the challenge position Amazon Useful resource Title (ARN). You’ll use each challenge position title and ARN later.
Repeat the previous process to create the Client challenge. Make sure you enter Client for Venture title after which choose consumer-project-profile for Venture profile. After it’s created, notice the Venture position ARN in a textual content file. The challenge position title is the string that follows arn:aws:iam:: within the challenge position ARN. You’ll use each challenge position title and ARN later.
Convey your individual information from the producer account
Convey your individual information to the Amazon SageMaker Unified Studio Producer challenge. AWS gives a number of choices to realize this onboarding. The primary choice is automated onboarding in Amazon SageMaker lakehouse, by which you ingest the Amazon SageMaker lakehouse metadata of datasets into Amazon SageMaker Catalog. With this feature, you possibly can onboard your Amazon SageMaker lakehouse information as a part of creating a brand new Amazon SageMaker Unified Studio area or for an current area.
For extra details about automated onboarding of Amazon SageMaker lakehouse information, seek advice from Onboarding information in Amazon SageMaker Unified Studio. As different choices, you possibly can usher in current sources to your Amazon SageMaker Unified Studio challenge by utilizing the Knowledge and Compute pages in your challenge, or by utilizing scripts offered in GitHub. For extra details about utilizing the Knowledge and Compute pages or about utilizing scripts, seek advice from Bringing current sources into Amazon SageMaker Unified Studio. On this put up, you’ll use Amazon SageMaker lakehouse capabilities to import your timber AWS Glue desk into the Producer challenge.
Register the Amazon S3 location for the desk
To make use of Lake Formation permissions for fine-grained entry management to the timber desk, that you must register in Lake Formation the Amazon S3 location of the timber desk. To do this, full the next actions:
- Entry the Lake Formation console within the producer account.
- Within the navigation pane beneath Administration, select Knowledge lake places.
- Select Register location and enter the next data:
- For S3 URI, enter
s3://the place/ / timber.csvfile you uploaded as a part of the prerequisite. - For IAM position, choose
AWSServiceRoleForLakeFormationDataAccess. - For Permission mode, choose Lake Formation.
- For S3 URI, enter
- Select Register location.
Grant Producer challenge position permissions on the database
Grant database entry to the IAM position that’s related together with your Producer challenge. This position is named the challenge position, and it was created in IAM upon challenge creation.
To entry the AWS Glue Knowledge Catalog collections database from the Producer challenge within the Amazon SageMaker Unified Studio, full the next actions:
- Entry the Lake Formation console within the producer account.
- Within the navigation pane beneath Knowledge Catalog, select Databases.
- Select the
collectionsdatabase. - From the Actions menu, select Grant and enter the next data:
- For IAM customers and roles, choose your
Producerchallenge’s position title. That is the string beginning withdatazone_usr_role_that’s a part of theProducerchallenge position ARN that you simply famous in step 3 “Create SageMaker Unified Studio producer and client tasks”. - For Database permissions, choose Describe.
- For IAM customers and roles, choose your
- Select Grant.
Grant Producer challenge position permissions on the desk
Grant timber desk entry to the IAM position that’s related together with your Producer challenge. To grant these permissions use the next directions:
- Entry the Lake Formation console within the producer account.
- Within the navigation pane beneath Knowledge Catalog, select Tables and MVs.
- Choose the
timberdesk. - From the Actions menu, select Grant and enter the next data:
- For IAM customers and roles, choose your
Producerchallenge’s position. That is the string beginning withdatazone_usr_role_that’s a part of theProducerchallenge position ARN that you simply famous in step 3 “Create SageMaker Unified Studio producer and client tasks”. - For Desk permissions, choose Choose and Describe.
- For Grantable permissions, choose Choose and Describe.
- For IAM customers and roles, choose your
- Select Grant.
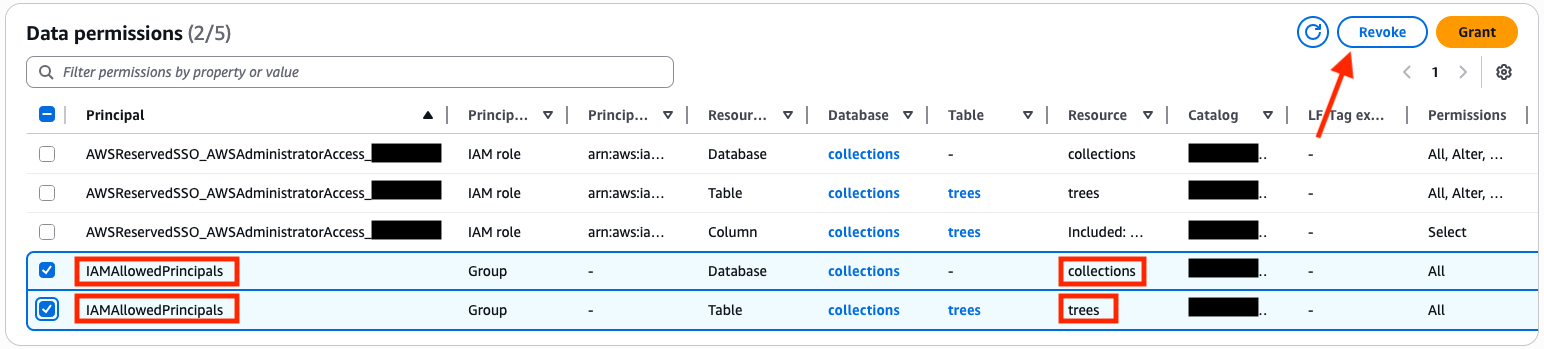
Revoke any current permissions of IAMAllowedPrincipals
You should revoke the IAMAllowedPrincipals group permissions on each the database and desk to implement Lake Formation permission for entry. For extra data, seek advice from Revoking permission utilizing the Lake Formation console.
- Entry the Lake Formation console within the producer account.
- Within the navigation pane beneath Permission, select Knowledge permissions.
- Choose the entries the place Principal is ready to
IAMAllowedPrincipalsand Useful resource is ready tocollectionsortimberas within the following picture: - Select Revoke.
- Enter
revoke. - Select Revoke once more.
Confirm that information is out there within the Producer challenge
Confirm that your collections database and timber desk are accessible within the Producer challenge:
- Entry the Amazon SageMaker Unified Studio portal.
- Select the Choose a challenge drop-down menu and select the
Producerchallenge. - Within the navigation pane beneath Overview, select Knowledge.
- Select Lakehouse.
- Select AwsDataCatalog.
- Select
collections. - Select tables.
- Select the three-dot motion menu subsequent to your
timberdesk and select Preview information, as proven within the following picture.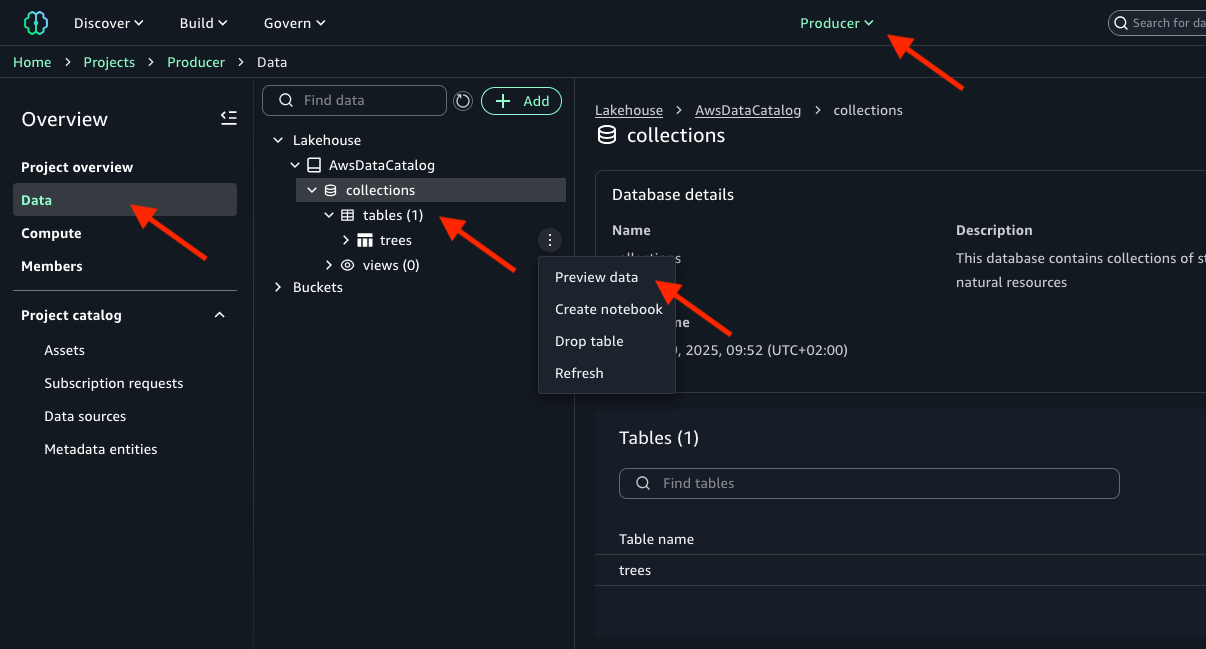
- You’ll discover information from the
timberdesk as proven within the following picture.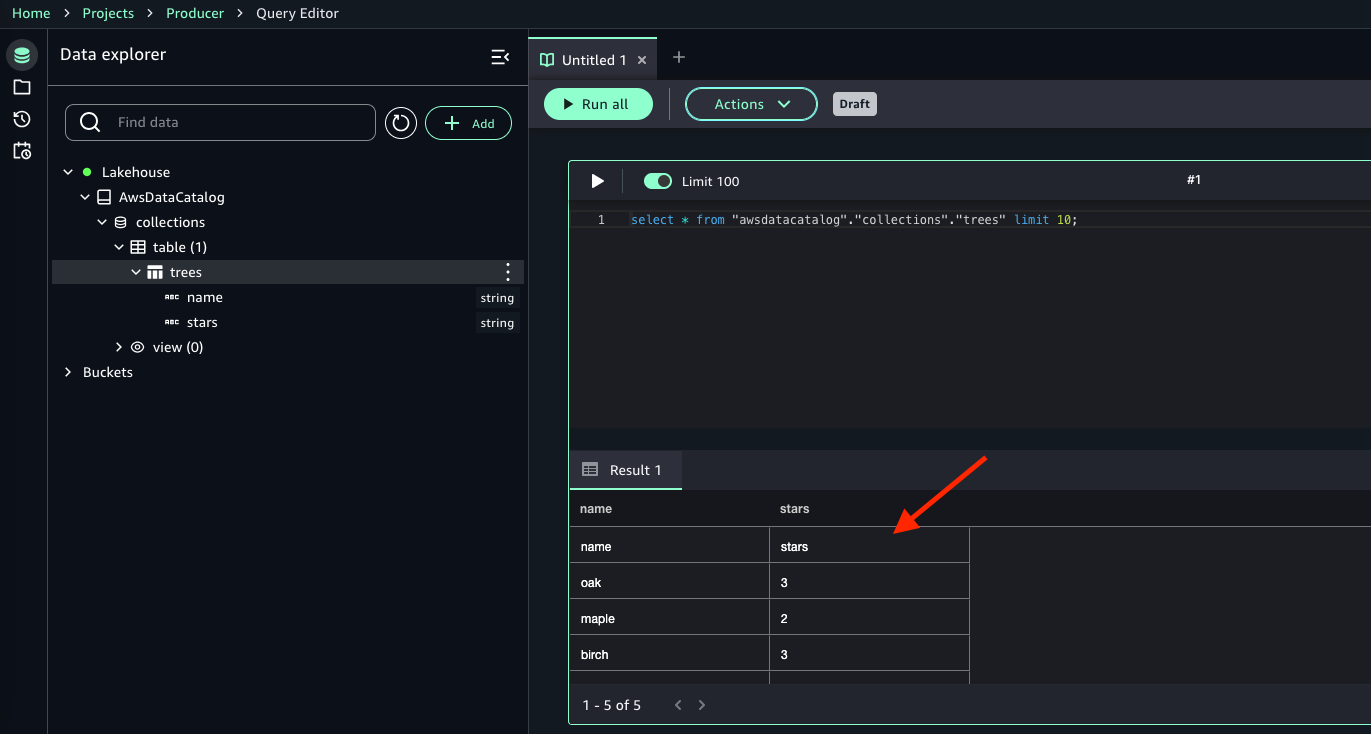
Create Amazon SageMaker Catalog asset
Even when it’s accessible within the challenge, to work with the timber desk in Amazon SageMaker Catalog, that you must register the information supply and create an Amazon SageMaker Catalog asset:
- Entry the Amazon SageMaker Unified Studio portal.
- Select the Choose a challenge dropdown listing and select the
Producerchallenge. - On the challenge web page, beneath Venture catalog within the navigation pane, select Knowledge sources.
- Select Create Knowledge Supply and make the next choices:
- For Title, enter
collections. - For Knowledge supply kind, choose AWS Glue (Lakehouse).
- For Database title, choose
collections. - Select Subsequent.
- Select Subsequent.
- Select Subsequent.
- Select Create.
- For Title, enter
- After the information supply is created, you can be within the
collectionsinformation supply web page, select Run. This can import metadata and create the Amazon SageMaker Catalog asset. - Within the
collectionsinformation supply, on the Knowledge supply runs tab, you’ll discover your run marked as Accomplished and thetimberasset Efficiently created, as proven within the following picture: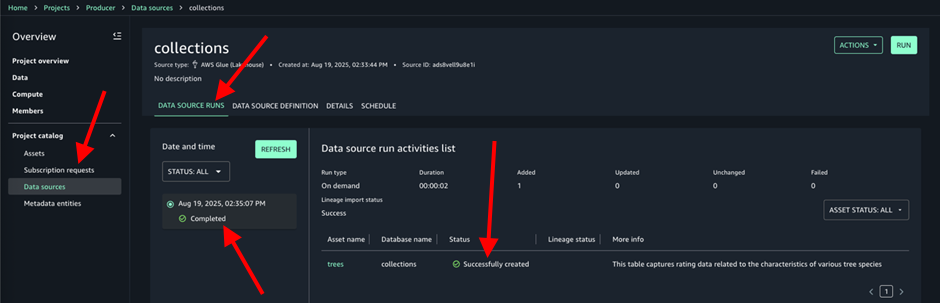
Publish the information asset within the Amazon SageMaker Catalog
Publishing a knowledge asset manually is a one-time operation that that you must carry out to permit others to entry the information asset via the catalog:
- Entry the Amazon SageMaker Unified Studio portal.
- Select the Choose a challenge dropdown listing and select the
Producerchallenge. - On the challenge web page beneath Venture catalog, select Belongings.
- Choose your
timberinformation asset that’s out there on the Stock tab. The next picture is proven for reference.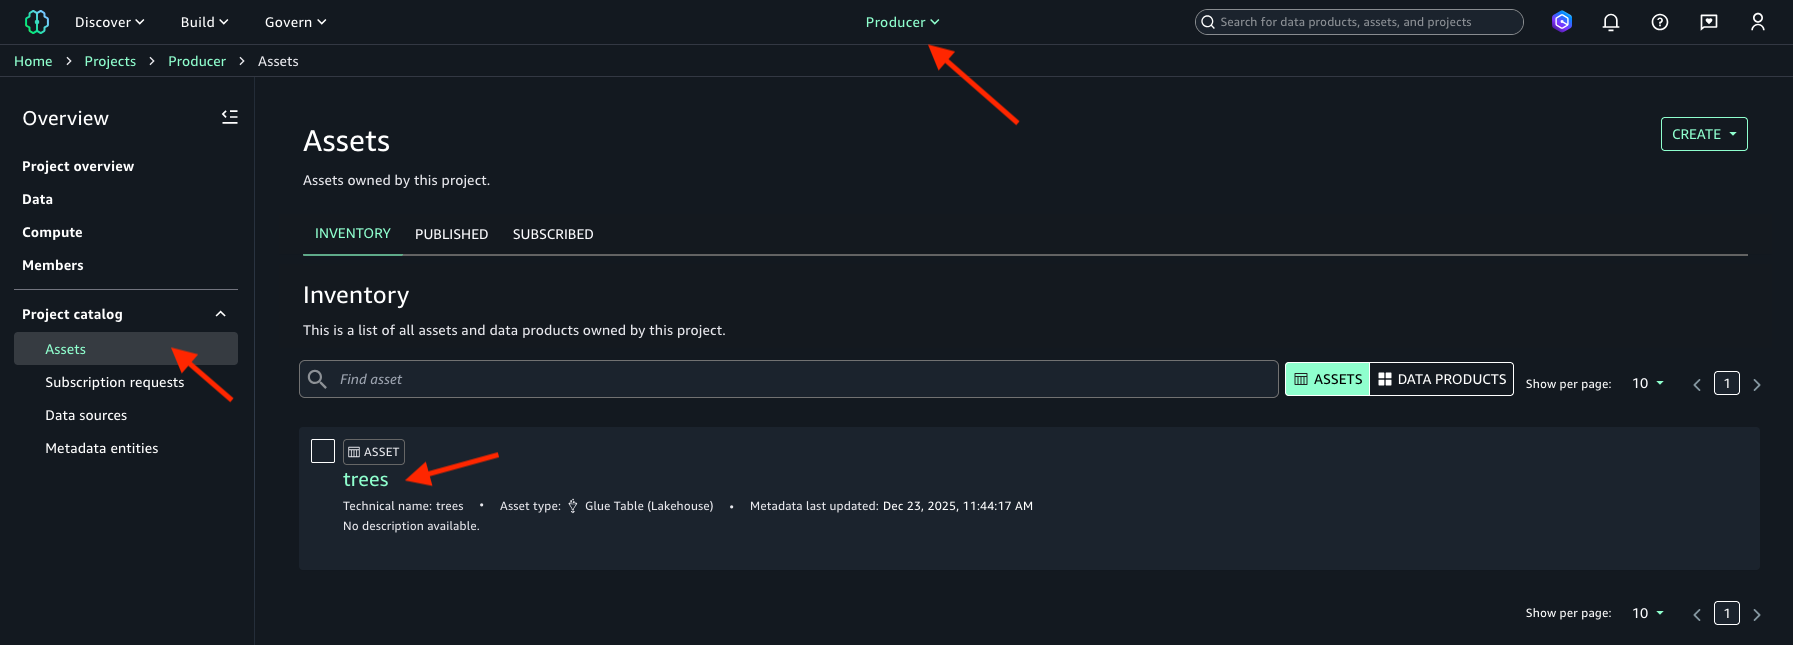
- (Non-compulsory) If automated metadata technology is enabled when the information supply is created, metadata for belongings (such because the asset enterprise title) is out there to overview and settle for or reject. You may both select Settle for All or Reject All within the Automated Metadata Technology banner.
- Select Publish Asset. The next picture is proven for reference.
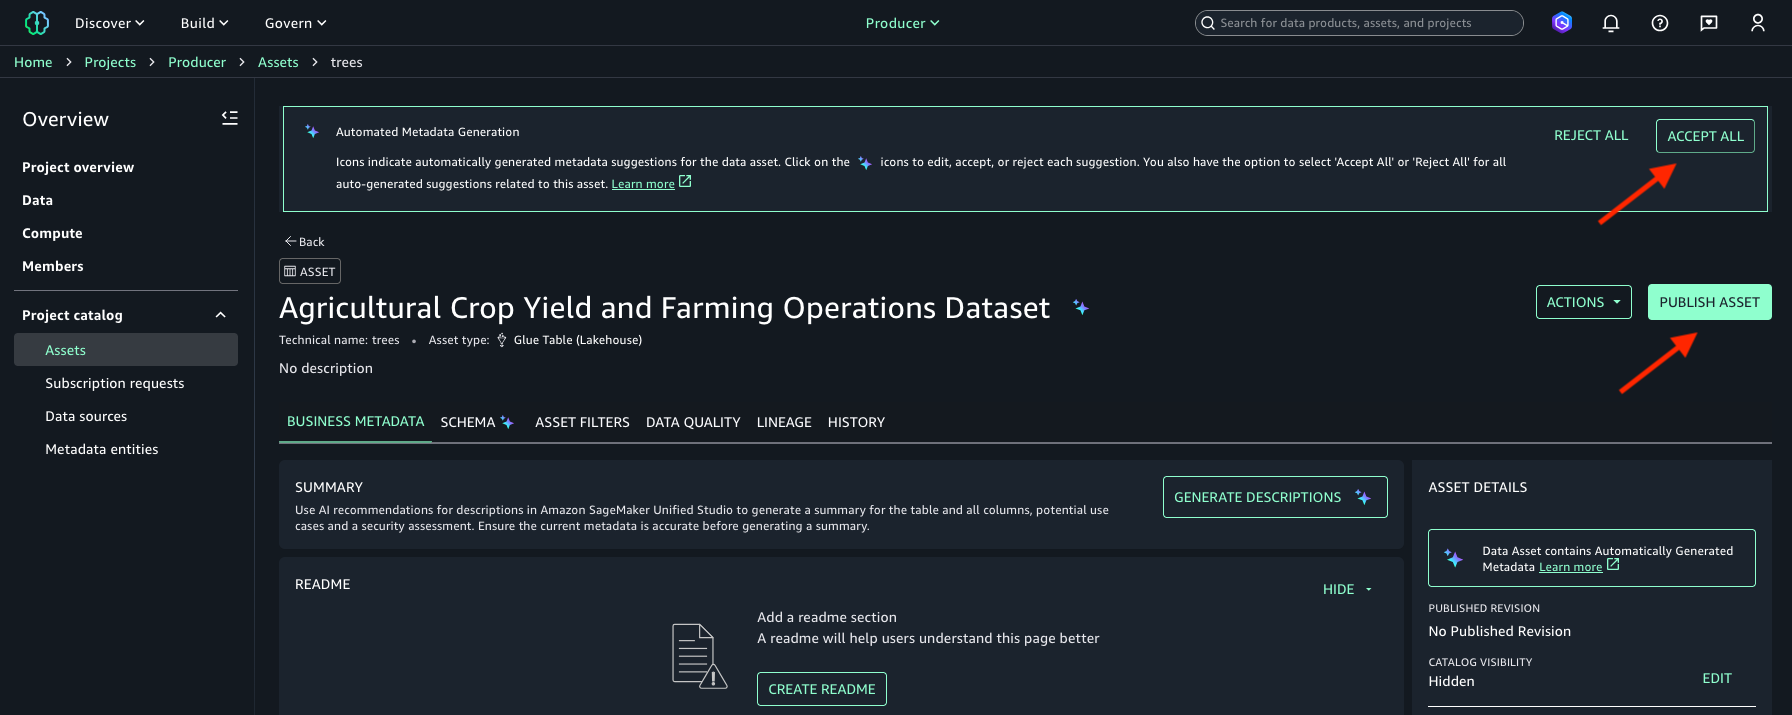
- Select Publish Asset.
Subscribe to the information asset within the Amazon SageMaker Catalog
To devour information belongings within the Client challenge, subscribe to the information asset by making a subscription request:
- Entry the Amazon SageMaker Unified Studio portal.
- Select the Choose a challenge dropdown listing and select
Clientchallenge. - On the Uncover menu, select Catalog.
- Enter
timberwithin the search field after which choose the information asset returned from the search. If in step 7 “Publish the information asset within the Amazon SageMaker Catalog” you selected Settle for All within the Automated Metadata Technology banner, your information asset may have a distinct enterprise title generated by the automated metadata suggestions characteristic. The information asset technical title istimber. For reference, seek advice from the next picture.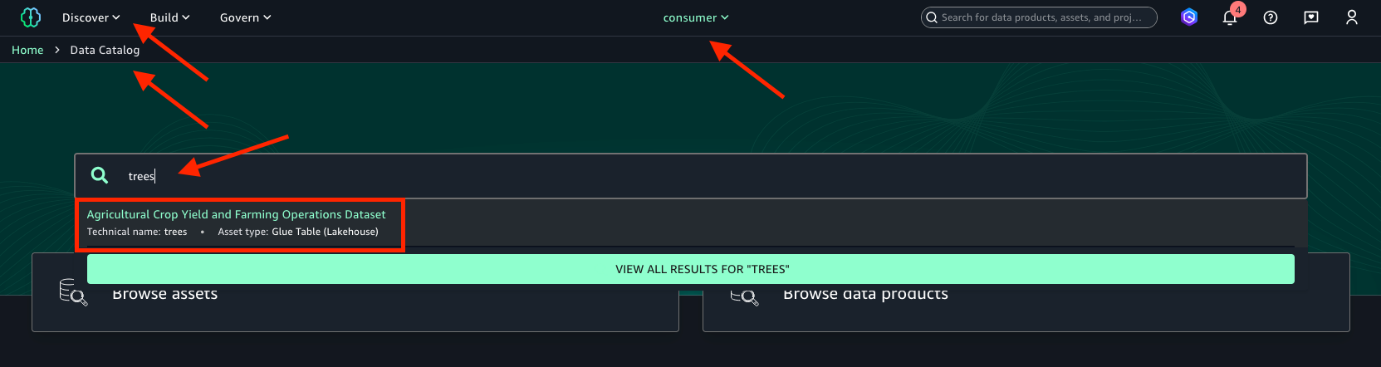
- Select Subscribe.
- For Remark, enter a justification comparable to
This information asset is required for mannequin coaching functions. - Select Subscribe once more.
By default, asset subscription requests require guide approval by a knowledge proprietor. Nonetheless, if the requester within the Client challenge can be a member of the Producer challenge, the subscription request is robotically accredited. For details about approving subscription requests, seek advice from Approve or reject a subscription request in Amazon SageMaker Unified Studio.
Configure your Lambda IAM position to entry the subscribed information entry
To allow your Lambda perform entry to the subscribed information asset, that you must enable the Lambda perform to imagine the Client challenge position. To do that, edit the Client challenge’s IAM position belief relationship:
- Navigate to the IAM console within the client account.
- Within the navigation pane beneath Entry administration, select Roles.
- Choose the
Clientchallenge’s IAM position. That is the string beginning withdatazone_usr_role_that’s a part of theClientchallenge position ARN that you simply famous in step 3 “Create SageMaker Unified Studio producer and client tasks”. - Beneath the Belief relationships tab, select Edit belief coverage.
- For backup causes, make a duplicate of the prevailing belief coverage in a textual content file.
- Within the Edit belief coverage window, add the next assertion to the prevailing belief coverage with out eradicating or overwriting different current statements within the belief coverage. Make sure you exchange the placeholder
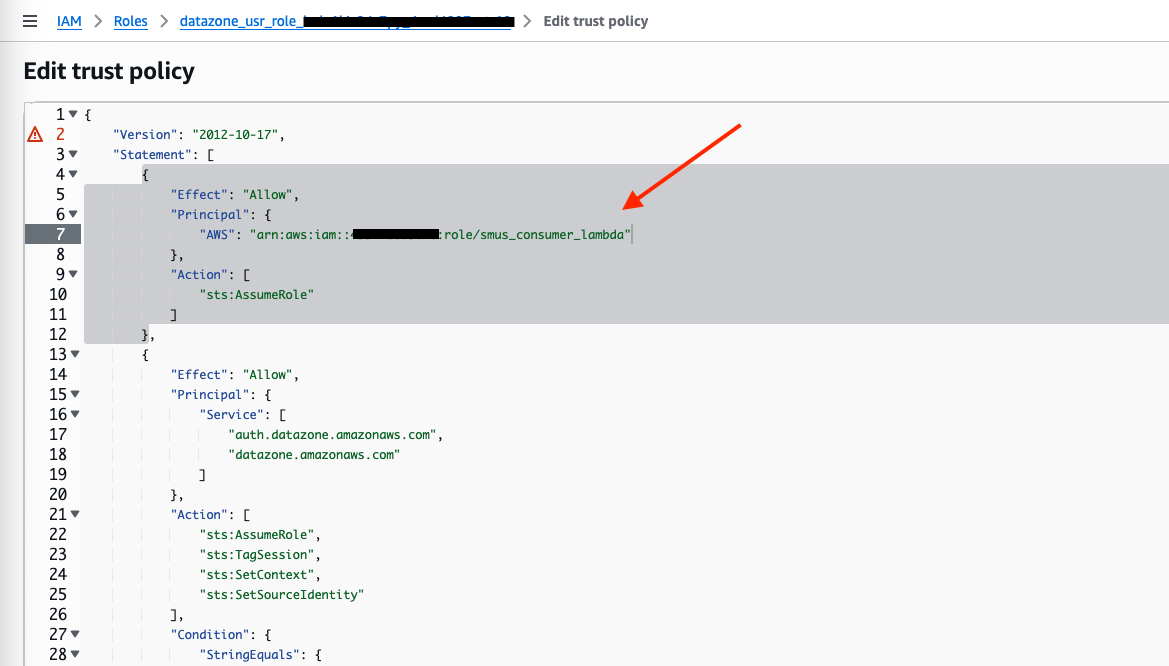
- Select Replace coverage.
Take a look at the Lambda perform’s entry to the subscribed information asset
Earlier than you possibly can take a look at your Lambda perform, that you must exchange placeholders within the perform code and within the IAM coverage. There are three placeholders to get replaced: Client challenge’s position ARN that you simply famous in step 3 “Create SageMaker Unified Studio producer and client tasks”. The following sections present directions to retrieve values for the opposite placeholders.
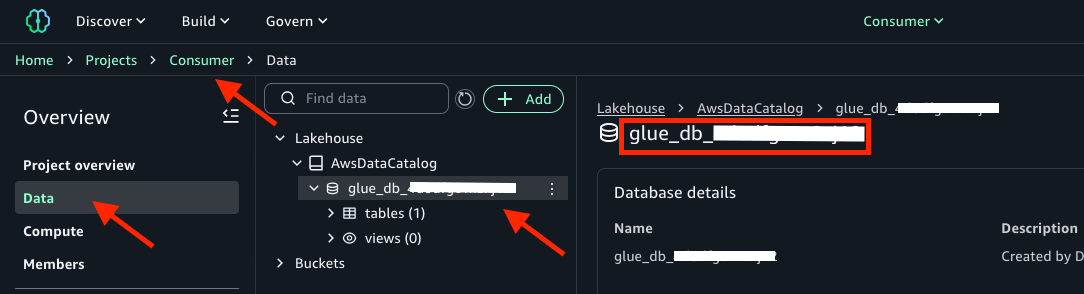
Retrieve the AWS Glue Knowledge Catalog database title
You might want to discover the title of the AWS Glue Knowledge Catalog database that was created together with the Client challenge. You’ll then use this worth to exchange the consumer_function Lambda perform code. To retrieve the AWS Glue Knowledge Catalog database title, comply with these directions:
- Entry the Amazon SageMaker Unified Studio portal.
- Select the Choose a challenge dropdown listing and select
Clientchallenge. - On the challenge web page, beneath Overview, select Knowledge.
- Select Lakehouse.
- Select AwsDataCatalog.
- Copy the title of the database. It must be an alphanumerical string beginning with
glue_db, as within the following picture:
Retrieve the Athena workgroup ID
You might want to discover the ID of the Athena workgroup that was created together with the Client challenge. You’ll then use this worth to exchange the consumer_function Lambda perform code and within the smus_consumer_athena_execution IAM coverage. Use the next directions to retrieve the Athena workgroup ID:
- Entry the Amazon SageMaker Unified Studio portal.
- Select the Choose a challenge dropdown listing and select
Clientchallenge. - On the challenge web page, beneath Overview, select Compute.
- Beneath the SQL analytics tab, choose challenge.athena, as within the following picture:
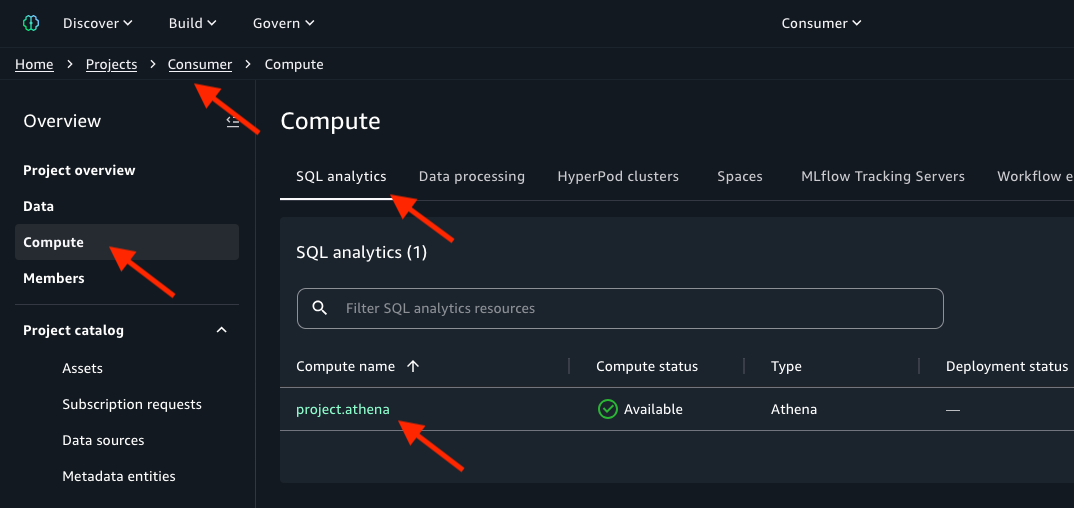
- Copy the Workgroup ARN and save to a textual content file. The Athena workgroup ID is the string that follows
arn:aws:athena:within the Workgroup ARN.: :workgroup/
Substitute placeholder within the smus_consumer_athena_execution IAM coverage
To switch the smus_consumer_athena_execution IAM coverage, use the next process:
- Entry the IAM console within the client account.
- Within the navigation pane, select Insurance policies.
- Within the search discipline enter
smus_consumer_athena_execution. - Choose the
smus_consumer_athena_executioncoverage. - Select Edit.
- Substitute
- Select Subsequent.
- Select Save adjustments.
Substitute placeholders within the Lambda perform code and take a look at it
On this part, you’ll exchange the consumer_function Lambda perform code, after which you possibly can take a look at the perform means to entry information of the timber desk.
- Entry the Lambda console within the client account.
- Within the navigation pane, select Features.
- Choose
consumer_function. - Beneath the Code tab, exchange
- Select Deploy.
- Beneath the Take a look at tab, for Occasion title, enter
mytest. - Select Take a look at.
- Select Particulars within the inexperienced banner titled Executing perform that seems after the execution is accomplished.
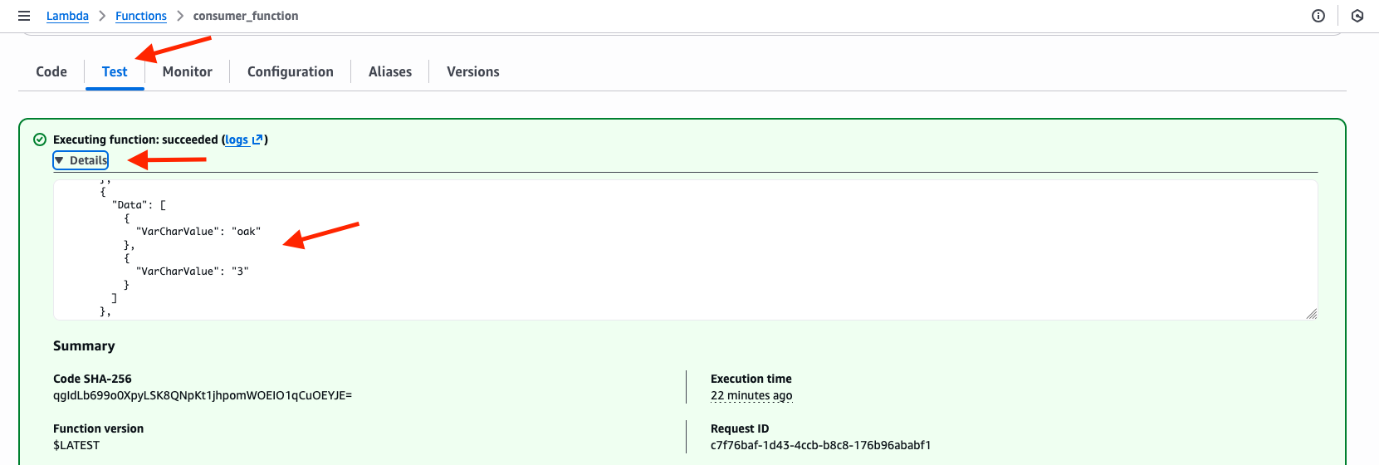
- The execution log experiences the
timberdesk content material, as proven within the following picture:
In case your Lambda perform execution fails on account of timeout, change the perform timeout setting as follows:
- Entry the Lambda console within the client account.
- Within the navigation pane, select Features.
- Choose
consumer_function. - Beneath the Configuration tab, select Edit.
- For Timeout, enter 15 sec or a larger worth.
- Select Save.
After growing the timeout, take a look at the perform once more.
Clear up
In the event you not want the sources you created as you adopted this put up, delete them to forestall incurring extra prices. Begin by deleting your Amazon SageMaker Unified Studio area within the governance account. For extra data, seek advice from Delete domains.
To take away the AWS Glue collections database from the producer account, comply with these steps:
- Entry the Glue console within the producer account.
- Within the navigation pane beneath Knowledge Catalog, select Databases.
- Choose the
collectionsdatabase. - Select Delete.
- Select Delete.
To take away the S3 bucket from the producer account, empty the bucket after which you possibly can delete the bucket. For details about emptying the bucket, seek advice from Emptying a common objective bucket. For details about deleting the bucket, seek advice from Deleting a common objective bucket.
To take away the Lambda perform from the buyer account, comply with these steps:
- Entry the Lambda console within the client account.
- Within the navigation pane, select Features.
- Choose the
consumer_functionLambda perform. - Select the Actions menu after which select Delete perform.
- Enter
verify. - Select Delete.
To finish the cleanup, delete the IAM position named smus_consumer_lambda, then delete the IAM coverage named smus_consumer_athena_execution within the client account. For details about eradicating a IAM position, seek advice from Delete roles or occasion profiles. For details about eradicating an IAM coverage, seek advice from Delete IAM insurance policies.
Conclusion
On this put up, we coated adopting Amazon SageMaker Catalog for information governance with out rearchitecting your current purposes and information repositories. We walked via tips on how to onboard current information in Amazon SageMaker Unified Studio, then publish it in a catalog, after which subscribe and devour the information from sources deployed outdoors the context of an Amazon SageMaker Unified Studio challenge. This resolution may also help you speed up your implementation of a knowledge mesh sample with Amazon SageMaker Catalog to publish, discover, and entry information securely in your group.
For extra data, seek advice from What’s Amazon SageMaker? and work via the Amazon SageMaker Workshop to strive the unified expertise for information, analytics, and AI.
Concerning the authors
