
Ever since Google dropped Nano Banana, the web hasn’t stopped buzzing with AI-generated edits. From the 3D figurine pattern to retro Bollywood saree transformations, new kinds pop up every single day, and other people can’t appear to get sufficient of it. Once I first dug into the mannequin’s configuration, I used to be struck by its precision: the way in which it blends pictures, matches lighting, and creates natural-looking outputs. That’s after I had an thought – why not use this energy to construct a enjoyable Nano Banana app? On this weblog, I’ll stroll you thru how I constructed Selfie with a Celeb, an AI app that permits you to generate a sensible photograph along with your favourite actor, musician, or public determine. I’ll use Google’s Nano Banana (Gemini 2.5 Flash Picture) mannequin because the engine, pair it with Gradio for a easy internet interface, and deploy it on Hugging Face Areas so anybody can attempt it out.
In case you don’t know what Nano Banana is, checkout these blogs:
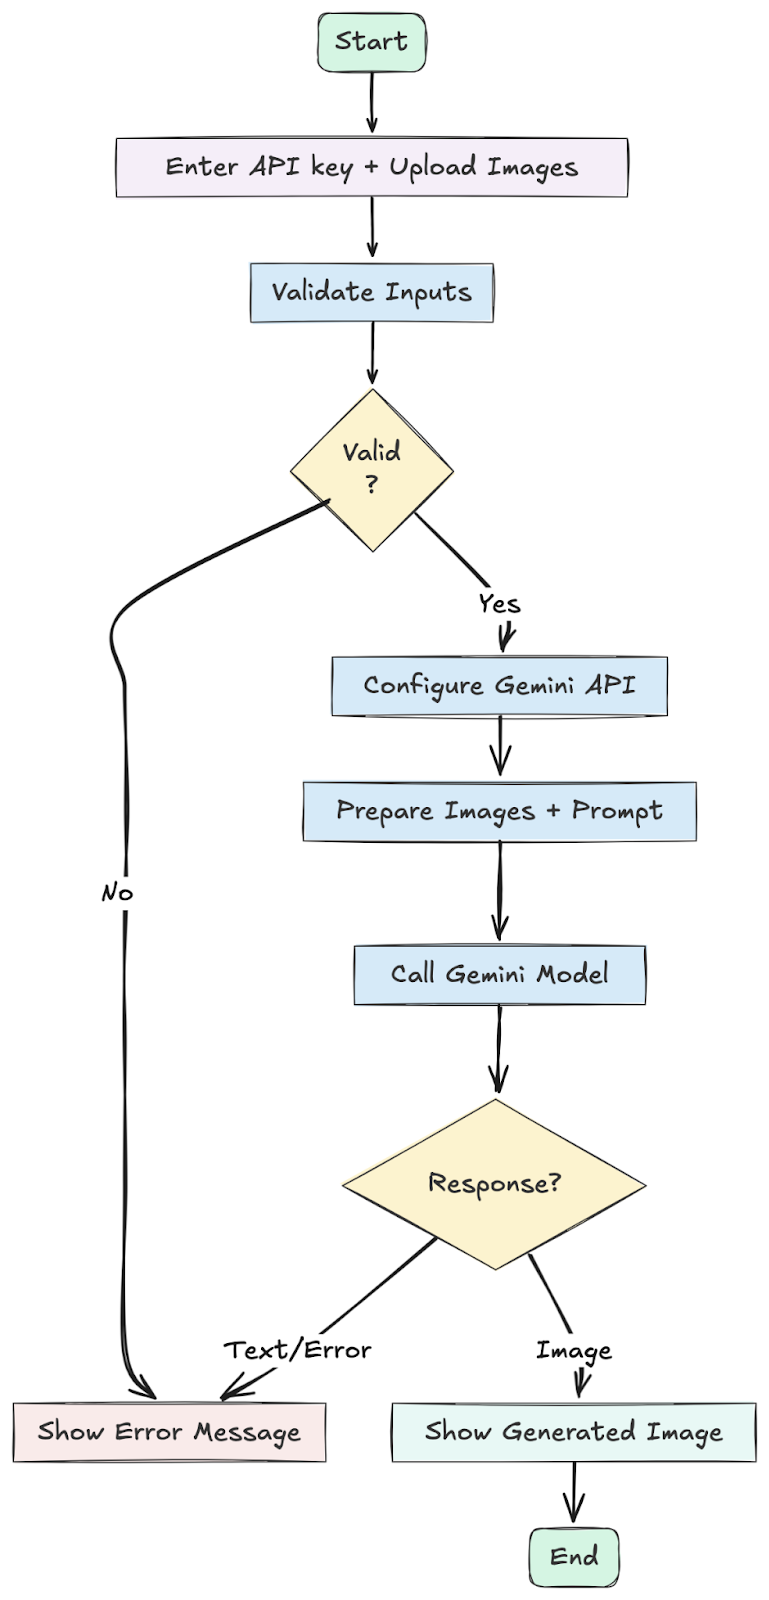
Mission Overview
The purpose of this venture is to construct a easy however enjoyable AI picture app known as Selfie with a Celeb. The app permits a person to:
- Add their very own photograph.
- Add a photograph of their favourite celeb.
- Generate a reasonable composite picture the place each seem collectively, as if photographed in the identical scene.
To attain this, the venture makes use of:
- Google’s Nano Banana (Gemini 2.5 Flash Picture) because the AI mannequin that performs picture mixing, lighting changes, and background technology.
- Gradio because the framework for making a user-friendly internet interface the place customers can add pictures and consider outcomes.
- Hugging Face Areas because the internet hosting platform totally free, public deployment so anybody can entry and check the app.
The tip result’s a shareable AI-generated photograph that appears pure, constant, and interesting. As a result of it’s powered by personalization (you plus your chosen celeb), it faucets into what makes content material go viral: individuals take pleasure in seeing themselves in artistic new contexts.
Let’s begin constructing our Nano Banana app:
Step 1: Set Up Your Mission
First, create a brand new folder in your venture. Inside that folder, create a file named necessities.txt and add the libraries we want.
necessities.txt
gradio

google-generativeai

pillow
Set up these dependencies by operating this command in your terminal:
pip set up -r necessities.txtOur app.py script might sound lengthy, nevertheless it’s organized into logical sections that deal with the whole lot from speaking to the AI to constructing the person interface. Let’s stroll by means of it.
Step 2: Imports and Preliminary Setup
On the very high of the file, we import all the required libraries and outline some constants:
import os

import io

import time

import base64

from PIL import Picture

import gradio as gr

import google.generativeai as genai

from google.api_core.exceptions import ResourceExhausted, InvalidArgument, GoogleAPICallError

APP_TITLE = "Take a Image with Your Favorite Celeb!"

MODEL_NAME = "fashions/gemini-2.5-flash-image-preview"- Commonplace Libraries: We import os, io, time, and base64 for primary operations like dealing with recordsdata, information streams, and delays. PIL (Pillow) is essential for picture processing.
- Core Elements: gradio is for constructing the net UI, and google.generativeai is the official Google library for interacting with the Gemini mannequin.
- Constants: We outline APP_TITLE and MODEL_NAME on the high. This makes it simple to vary the app’s title or replace the mannequin model later with out looking out by means of the code.
Step 3: Helper Features for Sturdy API Interplay
This group of features makes our software dependable. They deal with the advanced API responses and potential community points gracefully:
# Helper features
def _iter_parts(resp):
    if hasattr(resp, "elements") and resp.elements:
        for p in resp.elements:
            yield p
    if hasattr(resp, "candidates") and resp.candidates:
        for c in resp.candidates:
            content material = getattr(c, "content material", None)
            if content material and getattr(content material, "elements", None):
                for p in content material.elements:
                    yield p

def _find_first_image_part(resp):
    for p in _iter_parts(resp):
        inline = getattr(p, "inline_data", None)
        if inline and getattr(inline, "information", None):
            mime = getattr(inline, "mime_type", "") or ""
            if mime.startswith("picture/"):
                return p
    return None

def _collect_text(resp, restrict=2):
    msgs = []
    for p in _iter_parts(resp):
        if hasattr(p, "textual content") and isinstance(p.textual content, str) and p.textual content.strip():
            msgs.append(p.textual content.strip())
            if len(msgs) >= restrict:
                break
    return msgs

def _format_candidate_reasons(resp):
    infos = []
    cands = getattr(resp, "candidates", None)
    if not cands:
        return ""
    for i, c in enumerate(cands):
        fr = getattr(c, "finish_reason", None)
        if fr:
            infos.append(f"candidate[{i}].finish_reason={fr}")
        security = getattr(c, "safety_ratings", None) or getattr(c, "safetyRatings", None)
        if security:
            infos.append(f"candidate[{i}].safety_ratings={security}")
    return "n".be part of(infos)

def _preprocess_image(pil_img, max_side=512):
    # Smaller enter to scale back token/depend value
    pil_img = pil_img.convert("RGB")
    w, h = pil_img.dimension
    m = max(w, h)
if m - Response Parsers (_iter_parts, _find_first_image_part, _collect_text, _format_candidate_reasons): The Gemini API can return a posh response with a number of elements. These features safely search by means of the response to search out the vital bits: the generated picture information, any textual content messages, or error/security data.
- _preprocess_image: To avoid wasting on API prices and pace up technology, this perform takes the uploaded pictures and resizes them if they’re too massive. It maintains the facet ratio whereas guaranteeing the longest facet is not more than 512 pixels.
- _call_with_backoff: This can be a crucial perform for reliability. If the Google API is busy and tells us to decelerate (a “quota exceeded” error), this perform robotically waits for a second after which tries once more. It will increase the ready time with every failed try, stopping the app from crashing.
Step 4: The Primary Technology Logic
That is the guts of our software. The generate_image_with_celeb perform orchestrates the whole course of, from validating person enter to returning the ultimate picture.
# Primary perform
def generate_image_with_celeb(api_key, user_image, celeb_image, progress=gr.Progress()):
    if not api_key:
        return None, "🔐 Authentication Error: Please present your Google AI API key."

    if user_image is None or celeb_image is None:
        return None, "📥 Please add each your photograph and the celeb photograph."

    progress(0.05, desc="Configuring API...")
    attempt:
        genai.configure(api_key=api_key)
    besides Exception as e:
        return None, f"❌ API key configuration failed: {e}"

    # Verify mannequin visibility
    attempt:
        fashions = [getattr(m, "name", "") for m in genai.list_models()]
    besides Exception as e:
        # Presumably SDK model not supporting list_models
        fashions = []
        print(f"[DEBUG] list_models failed: {e}")

    if MODEL_NAME not in fashions:
        return None, (
            f"🚫 Mannequin `{MODEL_NAME}` not out there below this API key. "
            "Please guarantee your venture is enabled for picture preview mannequin and billing is energetic."
        )

    progress(0.15, desc="Getting ready pictures...")
    attempt:
        user_pil = Picture.fromarray(user_image)
        celeb_pil = Picture.fromarray(celeb_image)
        user_pil = _preprocess_image(user_pil, max_side=512)
        celeb_pil = _preprocess_image(celeb_pil, max_side=512)
    besides Exception as e:
        return None, f"❌ Did not course of pictures: {e}"

    immediate = (
        "Analyze these two pictures. Your process is to create a single, new, photorealistic picture the place the individual from the primary picture "
        "is standing subsequent to the celeb from the second picture."
        "Key necessities for the output picture:"
        "1. **Seamless Integration:** Each people should seem like they're in the identical bodily house."
        "2. **Computerized Background:** Generate an acceptable and natural-looking background (e.g., a crimson carpet occasion, an off-the-cuff avenue, a studio)."
        "3. **Constant Lighting:** The lighting, shadows, and coloration tones on each people have to be completely matched and in keeping with the generated background."
        "4. **Pure Poses:** The poses and interactions ought to seem pure and plausible."
        "5. **Excessive-High quality Output:** The ultimate picture needs to be high-resolution and freed from apparent digital artifacts."
    )

    contents = [user_pil, celeb_pil, prompt]

    progress(0.35, desc="Sending request...")
    response = None
    attempt:
        mannequin = genai.GenerativeModel(MODEL_NAME)
        response = _call_with_backoff(mannequin, contents, max_retries=4)
    besides Exception as e:
        err = str(e)
        if "429" in err or "quota" in err.decrease():
            return None, (
                "❌ You’ve exceeded your quota for picture preview mannequin. "
                "Await quota reset or improve billing / permissions."
            )
        return None, f"❌ API name failed: {err}"

    progress(0.65, desc="Parsing response...")
    if not response:
        return None, "❌ No response from mannequin."

    img_part = _find_first_image_part(response)
    if img_part:
        attempt:
            mime = getattr(img_part.inline_data, "mime_type", "") or "picture/unknown"
            data_b64 = img_part.inline_data.information
            image_bytes = base64.b64decode(data_b64)
            img = Picture.open(io.BytesIO(image_bytes))
            progress(0.95, desc="Rendering...")
            return img, f"✅ Picture generated ({mime})."
        besides Exception as e:
            particulars = _format_candidate_reasons(response)
            return None, f"❌ Picture information discovered however did not decode: {e}nn{particulars}"

    # No picture half → get textual content
    texts = _collect_text(response, restrict=2)
    causes = _format_candidate_reasons(response)
    steerage = (
        "nTo get picture output you want entry to the preview picture mannequin "
        "and adequate free-tier quota or a billed venture."
    )
    txt_msg = texts[0] if texts else "No textual content message."
    debug = f"n[Debug info] {causes}" if causes else ""
return None, f"⚠️ Mannequin returned textual content: {txt_msg}{steerage}{debug}"- Enter Validation: It first checks if the person supplied an API key and each pictures. If not, it returns an error message instantly.
- API Configuration: It makes use of the genai.configure() perform to arrange the connection to Google’s servers with the person’s private API key.
- Picture Preparation: It converts the photographs uploaded through Gradio right into a format the API understands (PIL Pictures) and makes use of our _preprocess_image helper to resize them.
- Immediate and API Name: It constructs the ultimate immediate, combining the 2 pictures and our textual content directions. It then calls the Gemini mannequin utilizing our dependable _call_with_backoff perform.
- Response Dealing with: After getting a response, it makes use of our helper features to search out the picture information. If a picture is discovered, it decodes it and returns it to the UI. If not, it finds any textual content messages and returns these as a substitute, so the person is aware of what occurred.
Step 5: Constructing the Person Interface with Gradio
The ultimate part of the code makes use of gradio to construct the interactive internet web page:
# Gradio UI

custom_css = """
.gradio-container { border-radius: 20px !vital; box-shadow: 0 4px 20px rgba(0,0,0,0.05); }
#title { text-align: heart; font-family: 'Helvetica Neue', sans-serif; font-weight: 700; font-size: 2.0rem; }
#subtitle { text-align: heart; font-size: 1.0rem; margin-bottom: 1.0rem; }
.gr-button { font-weight: 600 !vital; border-radius: 8px !vital; padding: 12px 10px !vital; }
#output_header { text-align: heart; font-weight: daring; font-size: 1.2rem; }
footer { show: none !vital; }
"""

with gr.Blocks(theme=gr.themes.Delicate(), css=custom_css) as demo:
    gr.Markdown(f"# {APP_TITLE}", elem_id="title")
    gr.Markdown(
        "Makes use of Google Gemini 2.5 Flash Picture Preview mannequin. Present your API key from a billed venture with entry.",
        elem_id="subtitle"
    )

    with gr.Accordion("Step 1: Enter Your Google AI API Key", open=True):
        api_key_box = gr.Textbox(
            label="API Key",
            placeholder="Paste your Google AI API key right here...",
            kind="password",
            information="Guarantee the secret's from a venture with billing and picture preview entry.",
            interactive=True
        )

    with gr.Row(variant="panel"):
        user_image = gr.Picture(kind="numpy", label="Add your image", top=350)
        celeb_image = gr.Picture(kind="numpy", label="Add celeb image", top=350)

    generate_btn = gr.Button("Generate Picture", variant="main")

    gr.Markdown("### Output", elem_id="output_header")
    output_image = gr.Picture(label="Generated Picture", top=500, interactive=False)
    output_text = gr.Markdown(label="Standing / Message")

    generate_btn.click on(
        fn=generate_image_with_celeb,
        inputs=[api_key_box, user_image, celeb_image],
        outputs=[output_image, output_text]
    )

if __name__ == "__main__":
    if not os.path.exists("./examples"):
        os.makedirs("./examples")
demo.launch(debug=True)- Format (gr.Blocks): We use gr.Blocks to create a customized format. We additionally cross in our custom_css string to type the elements.
- Elements: Every aspect on the web page—just like the title (gr.Markdown), the API key enter discipline (gr.Textbox), and the picture add packing containers (gr.Picture)—is created as a Gradio part.
- Association: Elements like the 2 picture add packing containers are positioned inside a gr.Row to look side-by-side. The API key discipline is inside a collapsible gr.Accordion.
- Button and Outputs: We outline the “Generate” button (gr.Button) and the elements the place the outcomes might be displayed (output_image and output_text).
- Occasion Dealing with (.click on()): That is the magic that connects the UI to our Python logic. This line tells Gradio: “When generate_btn is clicked, run the generate_image_with_celeb perform. Take the values from api_key_box, user_image, and celeb_image as inputs, and place the outcomes into output_image and output_text.”
Go Reside: Easy Gradio App Deployment on Hugging Face
Among the finest elements of this venture is how easy the Gradio app deployment is. We are going to use Hugging Face Areas, a free platform for internet hosting machine studying demos.
- Create a Hugging Face Account: In case you wouldn’t have one, enroll at huggingface.co.
- Create a New House: In your profile, click on “New House”.
- House identify: Give it a novel identify (e.g., celebrity-selfie-generator).
- License: Select a license (e.g., mit).
- Choose the House SDK: Select Gradio.
- {Hardware}: The free “CPU primary” choice is adequate.
- Click on “Create House”.
- Add Your Information:
- In your new House, navigate to the “Information and variations” tab.
- Click on “Add file” after which “Add recordsdata”.
- Choose your app.py and necessities.txt recordsdata and add them.
That’s it! Hugging Face Areas will robotically set up the required libraries and begin your software. In a couple of moments, your app might be dwell for anybody on this planet to make use of. As a result of the app requires every person to enter their very own API key, you do not want to fret about managing server-side secrets and techniques.
Click on right here to checkout the Selfie with a Celeb app!
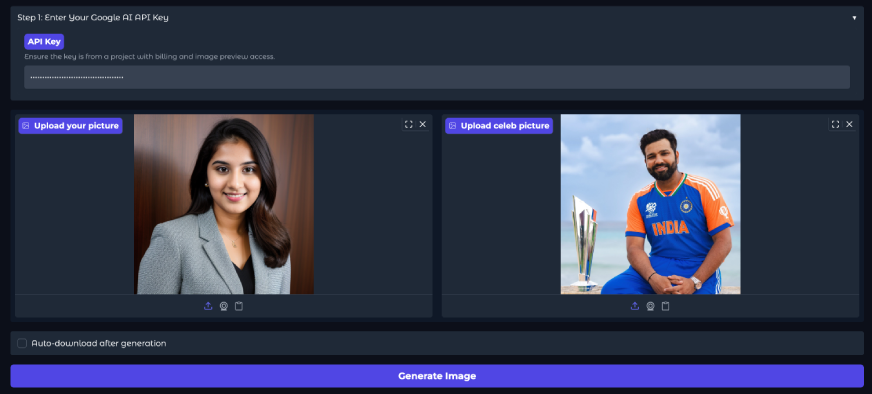
Enter:
Output:
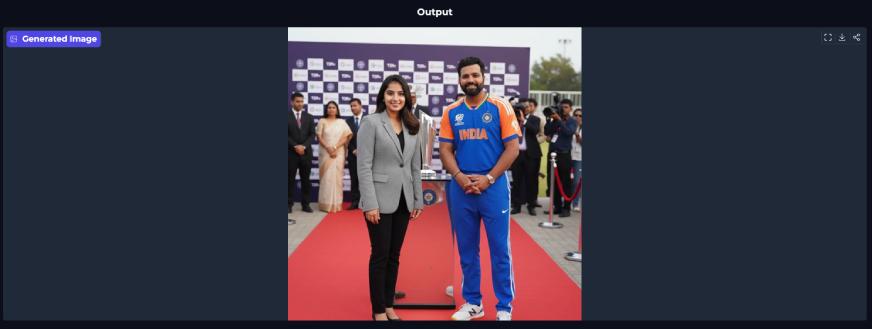
You’ll want to supply your Gemini API key, add your photograph, and add a star picture. When you click on Generate, the app will course of and ship your output in a couple of moments. The outcomes look pure and reasonable, with sturdy consistency between each pictures.
Strive it out with your individual photograph and your favourite celeb utilizing your API key!
Conclusion
You now have a whole blueprint to construct your individual viral AI picture app. We explored how Google’s Nano Bananamodel (Gemini 2.5 Flash Picture) can generate extremely reasonable, constant outputs and the way simple it’s to combine with frameworks like Gradio and Hugging Face Areas. The perfect half is you could customise the immediate, tweak the interface, and even develop the concept into fully new apps. With only a few steps, you may take this venture from idea to actuality and create one thing really shareable.
Which Nano Banana app are you constructing? Let me know within the remark part beneath!
Ceaselessly Requested Questions
A. It’s the inner codename for Google’s Gemini 2.5 Flash Picture, a robust AI mannequin that may perceive and generate content material from each pictures and textual content.
A. The app itself is free to make use of, nevertheless it requires a Google AI API key. Google offers a free tier with utilization limits, after which you’ll must arrange billing.
A. This method permits anybody to make use of the app with out the developer incurring prices for each picture technology, making it sustainable to host publicly.
A. Sure, Hugging Face Areas affords a free tier with neighborhood {hardware} (CPU or restricted GPU entry), which is ideal for many Gradio demos.
A. That is an optimization step. Smaller pictures are processed quicker and eat fewer sources, which might decrease API prices and cut back technology time.
Harsh Mishra is an AI/ML Engineer who spends extra time speaking to Giant Language Fashions than precise people. Keen about GenAI, NLP, and making machines smarter (so that they don’t change him simply but). When not optimizing fashions, he’s in all probability optimizing his espresso consumption. 🚀☕
Login to proceed studying and luxuriate in expert-curated content material.
