
Even for those who all the time simply launch straight into apps on the Mac, you are utilizing the Finder, however this core macOS characteristic is replete with helpful options that get missed — or typically not understood.
Apple has been build up the Finder since 1984 and the unique Mac, so it isn’t a shock that it has very many options. Since that is one space the place Apple hardly ever removes something, it is also maybe not stunning that there are occasions when there are such a lot of choices that it is complicated.
That is additionally a selected space the place essentially the most long-time Mac customers may even be at a slight drawback. That is as a result of Apple has made adjustments the place all the pieces appears to be like the identical, but beneath the hood it is sufficiently completely different that established customers must re-learn easy methods to use the Finder to its full extent.
What precisely is the Finder?
The Finder is a macOS app that runs on a regular basis, from the second you begin the Mac to the second you shut it down. It presents the Desktop to you, and the Dock, and the menubars, plus it supplies Finder home windows.
A Finder window is a view into the place your paperwork are in your Mac, and it is the means by which you’ll be able to open or handle them. It helps you to seek for recordsdata, title and rename them, it helps you to view them as lists or icons, and it has some ways to hurry up your getting to make use of recordsdata and paperwork you want.
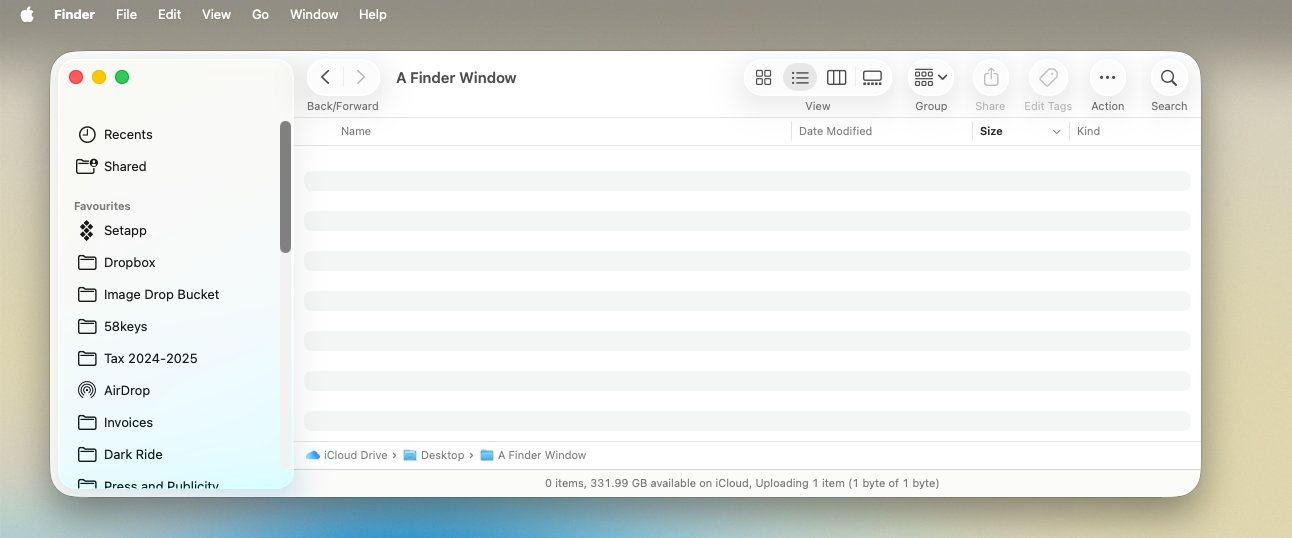
An empty Finder window
It is also how you need to use a number of desktops or Areas or set up what you are engaged on. Then it is the best way that the Mac helps you to litter your desktop with paperwork — and in addition tidy them up once more.
However the chief focus of the Finder is the Finder window, with its enormous vary of choices, together with ones which can be for energy customers, and at the least one which confuses new customers.
Contained in the Finder window
To open a Finder window when there is not already one on the display screen, you first enter the Finder.
- For those who’re in an app, click on on the desktop, or
- Press Command-Tab after which repeat urgent Tab till you choose the Finder icon
- As soon as the menu at prime left of the display screen says Finder, press Command-N, or
- Select the File menu and New Finder Window
- Or click on on the Finder icon within the Dock
You possibly can repeat any of the above besides clicking the Finder icon to make extra home windows. Plus for those who press Command-T, you open one other window — however in a tab subsequent to the present one.
Whichever means you open a Finder window, although, they initially all have the identical format.
It is attainable to vary what a Finder window reveals you, however by default you all the time get:
- Visitors gentle controls at prime left
- Ahead and Again arrows alongside the highest
- The title of the present folder
- View controls
- Group controls for sorting paperwork
- Motion controls for engaged on recordsdata, as an example renaming them
- Search (proven as a magnifying glass icon)
- A listing of areas, exterior drives and extra down the left facet
The visitors gentle icons have all the time clearly represented sure actions. Click on on the pink one and also you shut the window, as an example.
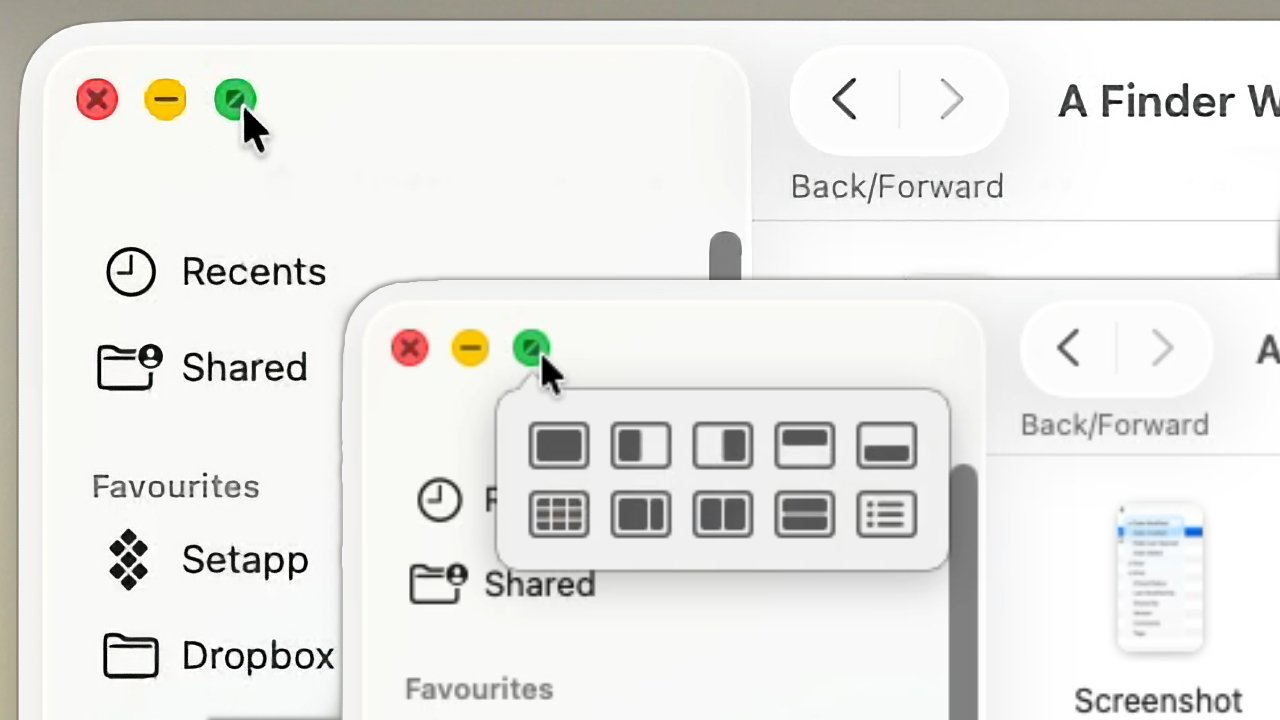
Prime left: clicking the inexperienced visitors gentle to go full display screen. Backside proper: extra controls can be found
Click on on yellow and you do not shut it precisely, you simply squish it out of the best way into your dock. You get it again by clicking on the Finder icon in that dock.
And inexperienced means go, or really go large — it expands the present window to full display screen.
With variations, that is been it on the Mac till 2024’s macOS Sequoia. That added many extra window tiling choices, corresponding to having the window take up half the display screen, which can be found once you click on and maintain on the inexperienced visitors gentle.
Past the visitors lights, there’s nonetheless lots of choices in a small area, however in apply a few of them are duplicated in handier locations. For example, all the Motion choices — rename, duplicate and so forth — are additionally obtainable in a pop-up menu at any time when you choose a file and right-click.
Then there’s the problem that almost all of them are controls you’ll in all probability solely hardly ever need.
A listing and an icon view of the identical folder
For example, the view controls allow you to set whether or not the window shows your paperwork in a listing, as icons, or as a gallery the place one icon is proven enlarged over a row of different icons from the identical window or folder.
There’s additionally, too, a column view obtainable right here. With that, paperwork are proven in a listing, however you possibly can drill down by folders and they’re every proven in a separate column. So you possibly can extra simply drag recordsdata from one place to a different.
The factor with all of those is that you will in all probability have a favourite and by no means suppose to vary it.
Complicated hierarchy
Between the record of drives and areas on the left, although, and the title of the present folder on the prime of the window, Apple has managed to confuse each new and long-time customers.
For brand spanking new folks, it is the record that may show to be an issue. Down the left of each Finder window, you possibly can see sections for:
- Recents
- Shared
- Favorites
- Areas
- Tags
However whereas these headings are there, what you discover is a listing of folders corresponding to Functions, Downloads and Paperwork, or the Desktop. These are simply very handy one-click jumps to these locations, however they are often mistaken for really being these locations.
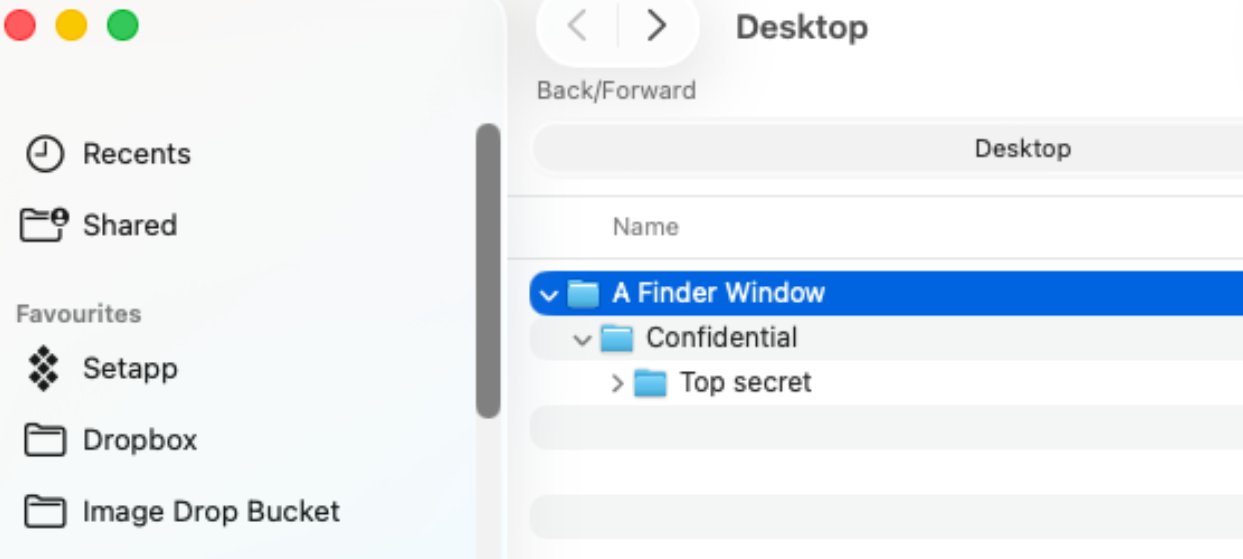
A hierarchy of folders
So AppleInsider has seen new customers panic in the event that they by accident drag one out of the record and it disappears. Or in the event that they click on on the disclosure triangle icon that opens and closes the record — however is handily utterly invisible till your cursor is over it.
It is value discovering that disclosure triangle if solely to cover Tags. Apple presumably expects folks to create just some tags — like labels, corresponding to “pressing” — as a result of each one among them will get proven on this sidebar and it turns into so lengthy a listing as to be ineffective.
However with the way more helpful Favorites, we have seen folks attempt to drag, say, their Paperwork folder from that record to an exterior drive. All that does is take away it from the record, however generally they’ve believed they’ve simply backed up their work.
This record is nice when what it actually does, however you possibly can select to cover it without end. Within the Finder, select the View menu and choose Conceal Sidebar.
That is a superb menu choice to know as a result of for those who set up new software program, it typically opens up your Functions folder — with out this sidebar. In that case, you possibly can go to the View menu and choose Present Sidebar.
Or simply shut the window.
Additionally handy is how each window reveals the title of the folder whose contents it’s displaying. This title is up at prime left, simply the Again and Ahead arrows.
Solely, Apple would not inform you you could proper click on on that title. For those who do, a pop up menu seems itemizing that folder, and the folder it is likely to be in, and the folder that is likely to be in, and so forth.
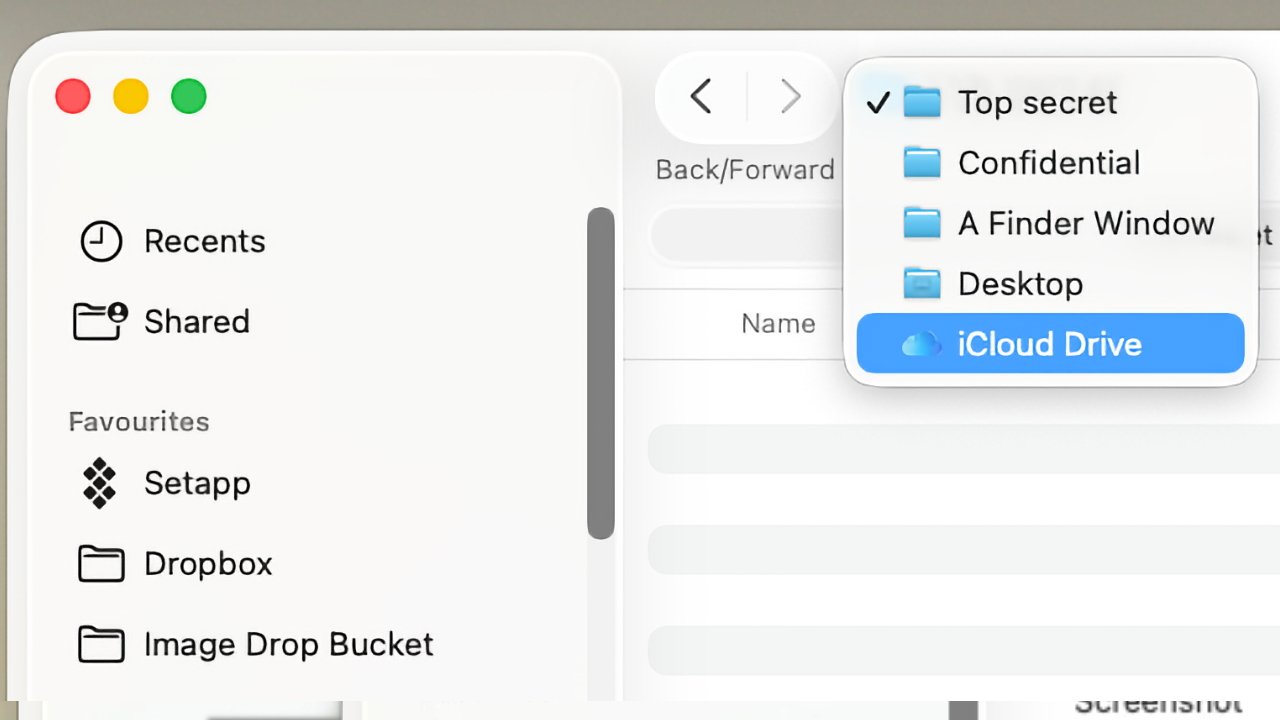
Positively a hidden characteristic — you possibly can click on on the title of an icon to see all of its enclosing folders
So when you’ve got drilled down, opening folder after folder, and now simply need to rapidly get again to the primary one, you need to use this record. It is maybe notably helpful if what you have accomplished is exploit the Finder’s spring-loaded folders.
That is the fairly little-known characteristic the place for those who drag a file to a folder and anticipate a second with out letting go of your mouse or trackpad, that folder opens. And you’ll carry on dragging over one other folder in there, which then opens too.
It is all about folders inside folders and also you get so used to it as a result of it is what you utilize on a regular basis, but often it’s worthwhile to give it some thought extra due to the opposite potential space of confusion.
The place recordsdata are in your Mac
A very long time in the past now, it was that you just had the desktop and on it there was a folder representing your onerous drive. However in some unspecified time in the future Apple determined that every one Macs should be multi-user ones.
Even for those who by no means let anybody else contact your Mac, you would, and so the Mac can embrace an entire different set of folders for that individual to have their very own profile with their very own Desktop, Paperwork, and so forth.
So the hierarchy really grew to become your Mac and its inner drive on the prime, then a Customers folder inside these. Then there’s your individual folder, plus individually one for every of another individuals who use the Mac.
Inside your person folder, it was once that you just had different folders together with one referred to as Desktop. So if you end up sitting at your Mac and the desktop is entrance of you, something you save or drag to there, you are actually dragging to a folder inside your person folder.
Then Apple went and added iCloud. So now your Desktop folder could be in your iCloud folder.
Wherever it’s, although, Desktop may also be within the sidebar of each Finder window.
So that is the sidebar on the left, the controls throughout the highest, and whether or not the contents are proven as icons or a listing. There’s nonetheless much more to know and exploit in regards to the Finder.
Columns, sorting, sizes, and paths
By default, the record view in a Mac Finder window reveals you the title of every doc in there, plus another particulars. That is so customizable that the second you have personalized it, you overlook what it initially appears to be like like.
You have to maintain the title of the doc seen, however apart from you could select to point out or disguise:
- Date modified
- Date created
- Date Final Opened
- Date Added
- Dimension
- Form (corresponding to doc or picture)
- iCloud Standing
- Final Modified By
- Shared By
- Model
- Feedback
- Tags
So you possibly can see nearly any element of any doc, besides what’s really inside it. The Finder has you coated even for that, although, as you possibly can choose a doc and press the House Bar to get a Fast Have a look at its contents.
The factor of all these choices, although, is that they’re introduced in columns you could regulate. Not solely do you resolve which to point out, however you possibly can drag them into any order — and you can also make each wider or narrower as you want.
And you’ll type by them.
Click on on Date Modified, as an example, and each doc in that window will instantly be sorted by that date. Click on once more, and they’re all re-sorted by that date — in reverse chronological order.
You possibly can click on on Dimension to see what’s taking on a lot of your space for storing, too.
Or simply click on on Form, so that every one your Phrase paperwork are collectively, and your whole PNG recordsdata. It is immensely helpful for very quickly discovering what you want in a folder that would have 1000’s of paperwork in it.
Typically, although, it is the folder itself you need to discover, slightly than what’s in it. Maybe you need to drag that entire folder over to a backup, or possibly you need to right-click and select Compress to make a zipper archive.
You possibly can right-click on the folder title at prime left and select the enclosing folder from the record. Or you possibly can select the View menu and choose Present Path Bar.
You are able to do fairly elaborate doc searches proper from the Finder window
With that chosen, the very backside of your Finder window reveals a horizontal hierarchy folders. It’s going to sometimes abbreviate the names in order that it may present each folder inside a folder, however you possibly can click on on any of them to go straight to that.
Discovering recordsdata
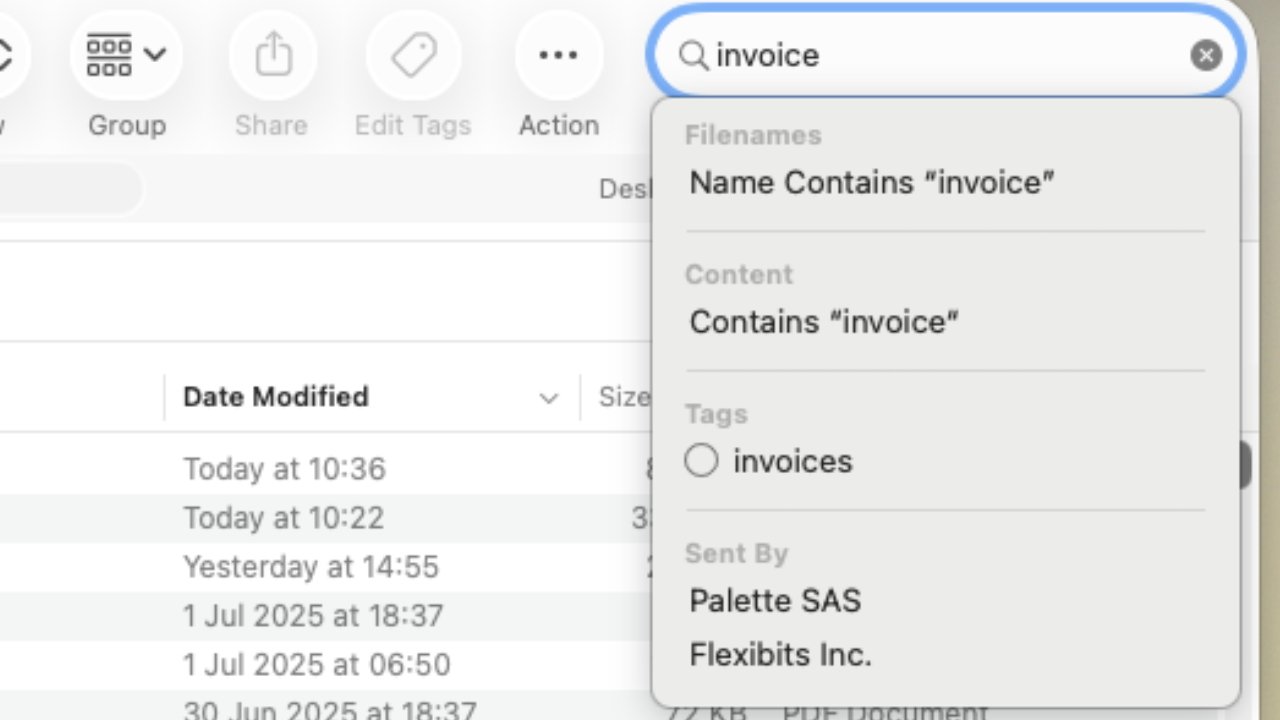
Typically, although, it’s worthwhile to discover a doc and you do not even know which folder it is inside. Open any Finder window, click on on the magnifying glass at prime proper, and begin typing a search time period.
As soon as you have entered a couple of letters and, importantly, pressed the area bar, the Finder affords you choices corresponding to trying to find recordsdata with that within the title. Or recordsdata with these letters of their contents.
There may also an possibility the bar slightly below all of the window controls, that units the place you search. The default is to look the present folder, however you possibly can click on on This Mac to broaden it.
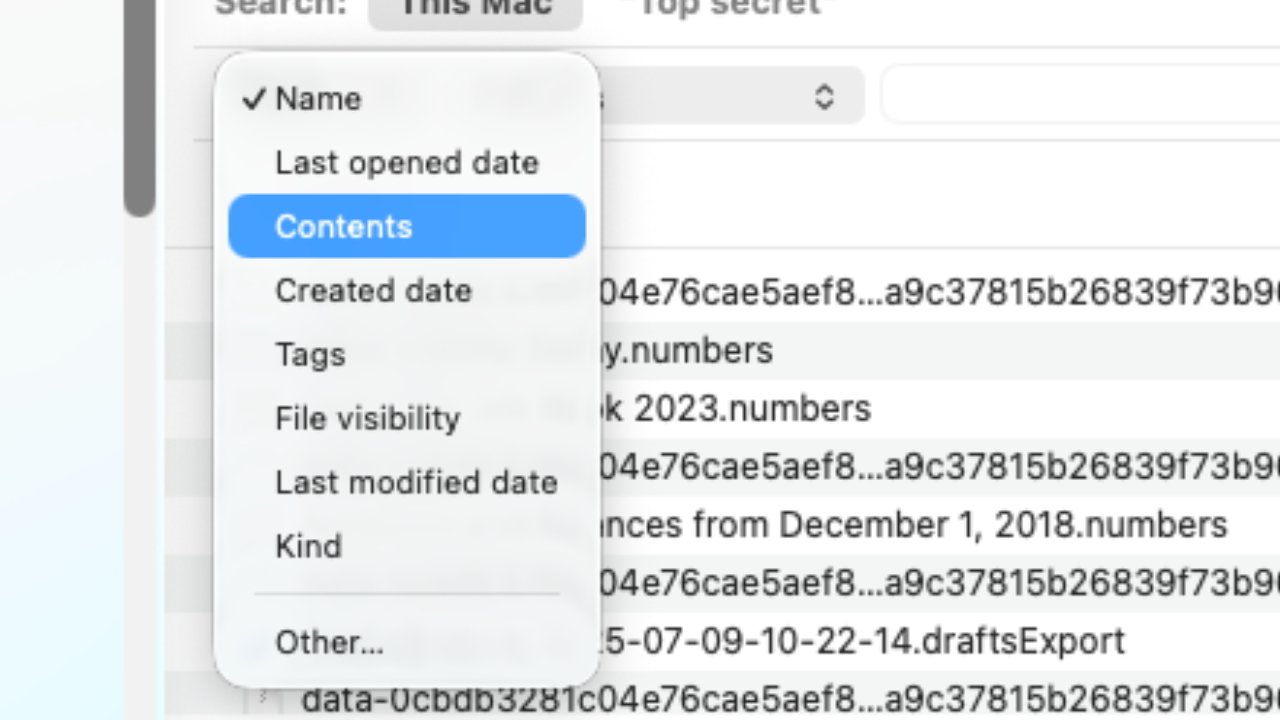
Search outcomes can then be filtered
After you have looked for one thing and the Finder has returned a listing of outcomes, the window could have grown nonetheless two extra controls. It’s going to have a Save button towards the highest proper, and a plus signal subsequent to that.
For those who’re doing a search you may repeat typically, click on Save.
But it surely’s the plus signal that’s the most helpful. Click on on that and you’re including search phrases to your unique one.
So in addition to, say, the title of the doc, you possibly can right here specify that it is received to be a file you created this month however not within the final ten days. You possibly can say it must be an audio file or a folder.
And for those who select Form, you may get much more exact. As an alternative of simply audio, film, doc, and so forth, you possibly can specify that you just’re in search of an Excel doc.
All this and also you simply open apps
It is totally attainable to begin your Mac, discover an app in your Dock, launch that and keep in it till your working day is finished. Or bouncing between many apps, no matter you want.
But it surely’s the Finder that does the launching and it is the Finder meaning you possibly can change between operating apps.
And for a Mac characteristic that you could be by no means pay a lot consideration to, the Finder is awash with options that may show you how to and your work enormously.
As soon as they even exist.
