
When your app has a tab bar and also you recompile it utilizing Xcode 26, you’ll mechanically see that your tab bar has a brand new feel and look based mostly on Liquid Glass. On this weblog put up, we’ll discover the brand new tab bar, and which new capabilities we’ve gained with the Liquid Glass redesign. I’ll additionally spend somewhat little bit of time on offering some suggestions round how one can conditionally apply iOS 26 particular view modifiers to your tab bar utilizing Dave DeLong’s “Backport” method.
By the tip of this put up you’ll have a a lot better sense of how Liquid Glass modifications your app’s tab bar, and how one can configure the tab bar to essentially lean into iOS 26’s Liquid Glass design philosophy.
Tab Bar fundamentals in iOS 26
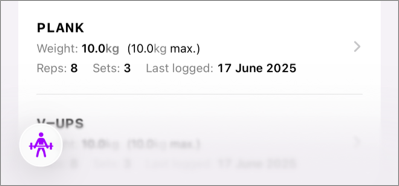
If you happen to’ve adopted iOS 18’s tab bar updates, you’re already in a very great place for adopting the brand new options that we get with Liquid Glass. If you happen to haven’t, right here’s what a quite simple tab bar appears to be like like utilizing TabView and Tab:
TabView {
  Tab("Exercises", systemImage: "dumbbell.fill") {
    WorkoutsView()
  }

  Tab("Workout routines", systemImage: "determine.strengthtraining.conventional") {
    ExercisesView()
  }
}
Whenever you compile your app with Xcode 26, and also you run it on a tool with iOS 18 put in, your tab bar would look a bit like this:

When operating the precise some code on iOS 26, you’ll discover that the tab bar will get a brand new Liquid Glass based mostly design:
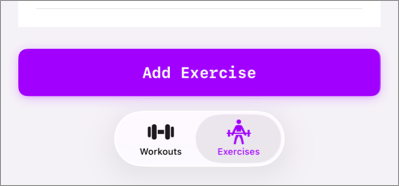
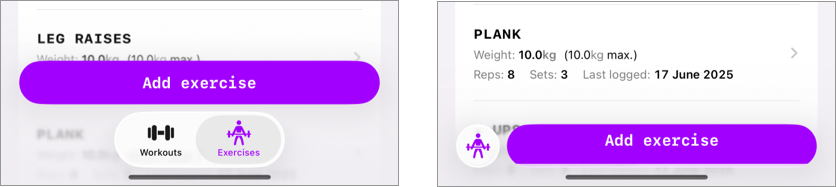
Liquid glass encourages a extra layer method to designing your app, so having this method the place there’s a big button above the tab bar and obscuring content material isn’t very iOS 26-like.
Right here’s what the total display that this tab bar is on appears to be like like:
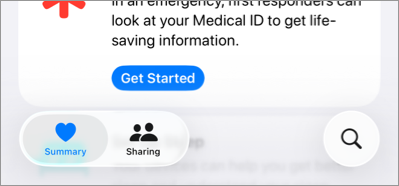
To make this app really feel extra at dwelling on iOS 26, I believe we must always broaden the record’s contents in order that they find yourself beneath the tab bar utilizing a little bit of a blurry overlay. Just like what Apple does for their very own apps:
Discover that this app has a left-aligned tab bar and that there’s a search button on the backside as nicely. Earlier than we speak a bit about methods to obtain that structure, I’d wish to discover the setup the place they’ve content material that expands beneath the tab bar first. After that we’ll take a look at extra superior tab bar options like having a search button and extra.
Understanding the tab bar’s blur impact
If you happen to’ve frolicked with the tab bar already, you’ll know that the blur impact that we see within the well being app is definitely the default impact for a tab bar that sits on prime of a scrollable container.
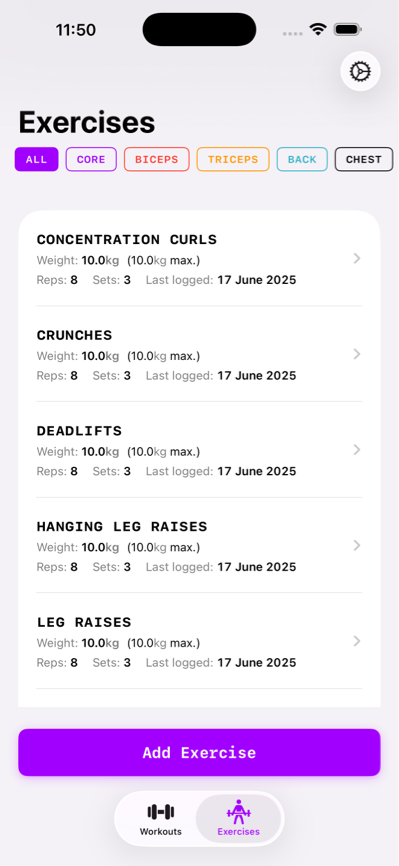
The app we’re taking a look at on this put up has a view structure that appears a bit like this:
VStack {
  ScrollView(.horizontal) { /* filter choices */ }
  Checklist { /* The workouts */ }
  Button { /* The purple button + motion */
}
The ensuing impact is that the tab doesn’t overlay a scrolling container, and we find yourself with a stable coloured background.
If we take away the button for now, we truly get the blurred background habits that we would like:
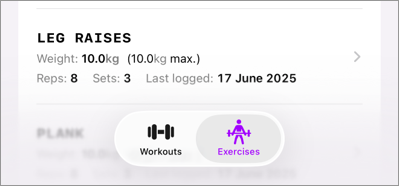
The following goal now’s so as to add that “Add Train” button once more in a manner that blends properly with Liquid Glass, so let’s discover another cool tab view behaviors on iOS 26, and the way we will allow these.
Minimizing a Liquid Glass tab view
Let’s begin with a cool impact that we will apply to a tab bar to make it much less distinguished whereas the person scrolls.
Whereas this impact doesn’t carry our “Add Train” button again, it does opt-in to a function from iOS 26 that I like lots. We will have our tab bar reduce when the person scrolls up or down by making use of a brand new view modifier to our TabView:
TabView {
  /* ... */
}.tabBarMinimizeBehavior(.onScrollDown)
When this view modifier is utilized to your tab view, it can mechanically reduce itself when the content material that’s overlayed by the tab bar will get scrolled. So in our case, the tab bar minimizes when the record of workouts will get scrolled.
Observe that the tab bar doesn’t reduce if we’d apply this view modifier with the outdated design. That’s as a result of the tab bar didn’t overlay any scrolling content material. This makes it much more clear that the outdated design actually doesn’t match nicely in a liquid glass world.
Let’s see how we will add our button on prime of the Liquid Glass TabView in a manner that matches properly with the brand new design.
Including a view above your tab bar on iOS 26
On iOS 26 we’ve gained the flexibility so as to add an adjunct view to our tab bars. This view will likely be positioned above your tab bar on iOS and when your tab bar minimizes the accent view is positioned subsequent to the minimized tab bar button:
Observe that the button appears somewhat lower off within the minimized instance. This appears to be a however within the beta so far as I can inform proper now; if later within the beta cycle it seems that I’m doing one thing flawed right here, I’ll replace the article as wanted.
To put an adjunct view on a tab bar, you apply the tabViewBottomAccessory view modifier to your TabView:
TabView {
  /* ... */
}
.tabBarMinimizeBehavior(.onScrollDown)
.tabViewBottomAccessory {
  Button("Add train") {
    // Motion so as to add an train
  }.purpleButton()
}
Observe that the accent will likely be seen for each tab in your app so our utilization right here may not be the very best method; nevertheless it works. It’s potential to examine the lively tab inside your view modifier to return totally different buttons or views relying on the lively tab:
.tabViewBottomAccessory {
  if activeTab == .exercises {
    Button("Begin exercise") {
      // Motion so as to add an train
    }.purpleButton()
  } else {
    Button("Add train") {
      // Motion so as to add an train
    }.purpleButton()
  }
}
Once more, this works however I’m undecided that is the meant use case for a backside accent. Apple’s personal utilization appears fairly restricted to views which are related for each view within the app. Just like the music app the place they’ve participant controls because the tab view’s accent.
So, whereas this method allow us to add the “Add train” button once more; it looks like this isn’t the way in which to go.
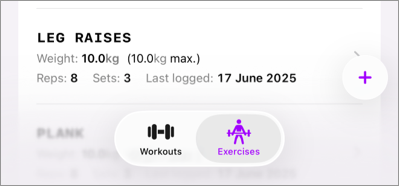
Including a floating button to our view
Within the well being app instance from earlier than, there was a search button within the backside proper aspect of the display. We will add a button of our personal to that location by utilizing a TabItem in our TabView that has a .search function:
Tab("Add", systemImage: "plus", worth: Tabs.workouts, function: .search) {
  /* Your view */
}
Whereas this provides a backside to the underside proper of our view, it’s removed from an answer to changing our view-specific “Add train” button. A Tab that has a search function is separated out of your different tabs however you’re anticipated to current a full display view from this tab. So a search tab actually solely is sensible when your present tab bar accommodates a search web page.
That mentioned, I do assume {that a} floating button is what we want on this Liquid Glass world so let’s add one to our workouts view.
It received’t use the TabView APIs however I do assume it’s necessary to cowl the answer that works nicely for my part.
On condition that Liquid Glass enforces a extra layered design, this sample of getting a big button on the backside of our record simply doesn’t work in addition to it used to.
As an alternative, we will leverage a ZStack and add a button on prime of it so we will have our scrolling content material look the way in which that we like whereas additionally having an “Add Train” button:
ZStack(alignment: .bottomTrailing) {
  // view contents

  Button(motion: {
    // ...
  }) {
    Label("Add Train", systemImage: "plus")
      .daring()
      .labelStyle(.iconOnly)
      .padding()
  }
  .glassEffect(.common.interactive())
  .padding([.bottom, .trailing], 12)
}
The important thing to creating our floating button take a look at house is making use of the glassEffect view modifier. I received’t cowl that modifier in depth however you’ll be able to most likely guess what it does; it makes our button have that Liquid Glass design that we’re on the lookout for:
I’m not 100% offered on this method as a result of I felt like there was one thing good about having that giant purple button in my outdated design. However, it is a new design period. And this feels prefer it’s one thing that may match properly within the iOS 26 design language.
In Abstract
Realizing which choices you might have for customizing iOS 26’s TabView will significantly assist with adopting Liquid Glass. Realizing how one can reduce your tab bar, or when to assign an adjunct view can actually provide help to construct higher experiences in your customers. Including a search tab with the search function will assist SwiftUI place your search function correctly and constantly throughout platforms.
Whereas Liquid Glass is a big change by way of design language, I like these new TabView APIs lots and I’m excited to spend extra time with them.
