
Do it’s worthwhile to create a 301 redirect in your WordPress web site? You’ve come to the appropriate place! We’ll present you the right way to arrange 301 redirects utilizing three strategies. Are you aware if it’s worthwhile to use a redirect or whether or not a 301 redirect is correct? No worries, we’ll clarify that, too.
Redirects in a nutshell
The identify ‘redirect’ says all of it: It sends guests touring from a particular web page to an alternate one as a substitute. Or, if there’s no different, an HTTP header (just like redirects) could make that clear to customers and search engines like google. It’s like registering a change of handle once you transfer home. What if an outdated good friend visits your outdated house to go to you? A redirect is sort of a entrance door observe telling your guests the place you reside now. Any time you alter a URL or delete a web page, it is best to take into consideration redirects.
Totally different redirects serve totally different functions. Since this put up is all about 301 redirects, let’s take a look at some conditions the place you may want to make use of one.
When must you use a 301 redirect?
A 301 redirect ought to be used when:
- You’ve completely deleted a web page in your web site, however you may have one other comparable web page you wish to ship customers to as a substitute
- You’ve modified the URL of a web page that was already revealed
- You’re transferring your web site to a brand new area
- You’re altering your URL construction, e.g. altering from HTTP to HTTPS, or eradicating ‘www’ from the beginning of your URL
These are a number of the extra widespread causes for utilizing a 301 redirect, however different conditions require redirecting, too. And in addition to that, there are different redirects and HTTP headers you need to use in different conditions. For example, for those who completely delete a web page and there’s no appropriate substitute or substitute you’ll be able to ship customers to, then a 410 redirect is what it’s worthwhile to use. We’ve one other put up the place you’ll be able to learn extra about which redirects to make use of during which conditions.
Possibility 1: Create a 301 redirect on the server
To arrange a 301 redirect utilizing .htaccess for the given instance URLs, it’s worthwhile to add a particular line to your web site’s .htaccess file, which is situated within the root listing of your WordPress set up. Right here’s how you are able to do it:
- Entry your server. Entry your web site’s recordsdata utilizing an FTP consumer or your net host’s file supervisor. It’s also possible to entry and edit your .htaccess file from contained in the Yoast search engine optimisation instruments part.
- Find the .htaccess file: The
.htaccessfile is often within the root listing of your WordPress set up. - Edit the .htaccess file: Open the
.htaccessfile with a textual content editor. - Add the redirect rule: Insert the next line on the finish of the file to create the redirect. This rule signifies that requests to
/page-1ought to be completely redirected to/page-2.
Redirect 301 /page-1 /page-2- Save modifications: In the event you use an FTP consumer, save your modifications to the .htaccess file and add them again to your server.
Utilizing this rule, any request to https://instance.com/page-1 can be completely redirected to https://instance.com/page-2. The 301 standing code signifies to search engines like google and browsers that the redirect is everlasting. Observe that this method assumes the URLs comply with the format /page-1 and /page-2 with out further subdirectories. You possibly can modify the trail in case your URLs are totally different.
These configurations can develop into unmaintainable over time, particularly for those who’re an avid blogger making an attempt to enhance your posts’ search engine optimisation. You have to additionally log in to your server over FTP, edit the recordsdata, and re-upload them everytime you add a brand new redirect. That’s why, usually talking, this technique isn’t thought of the way in which to go.
Possibility 2: Create a 301 redirect with Cloudflare
Most of us already use Cloudflare in a single type or one other, so you realize that it presents a wide selection of instruments to assist our web sites carry out. For example, it comes with a Guidelines function the place you’ll be able to set numerous choices associated to your web site cache. It’s also possible to discover numerous redirect choices right here; this can show you how to information up redirects for all the things from HTTP to HTTPS to single redirects for particular person pages.
It’s simple to arrange redirects by means of Cloudflare. Right here’s how that works:
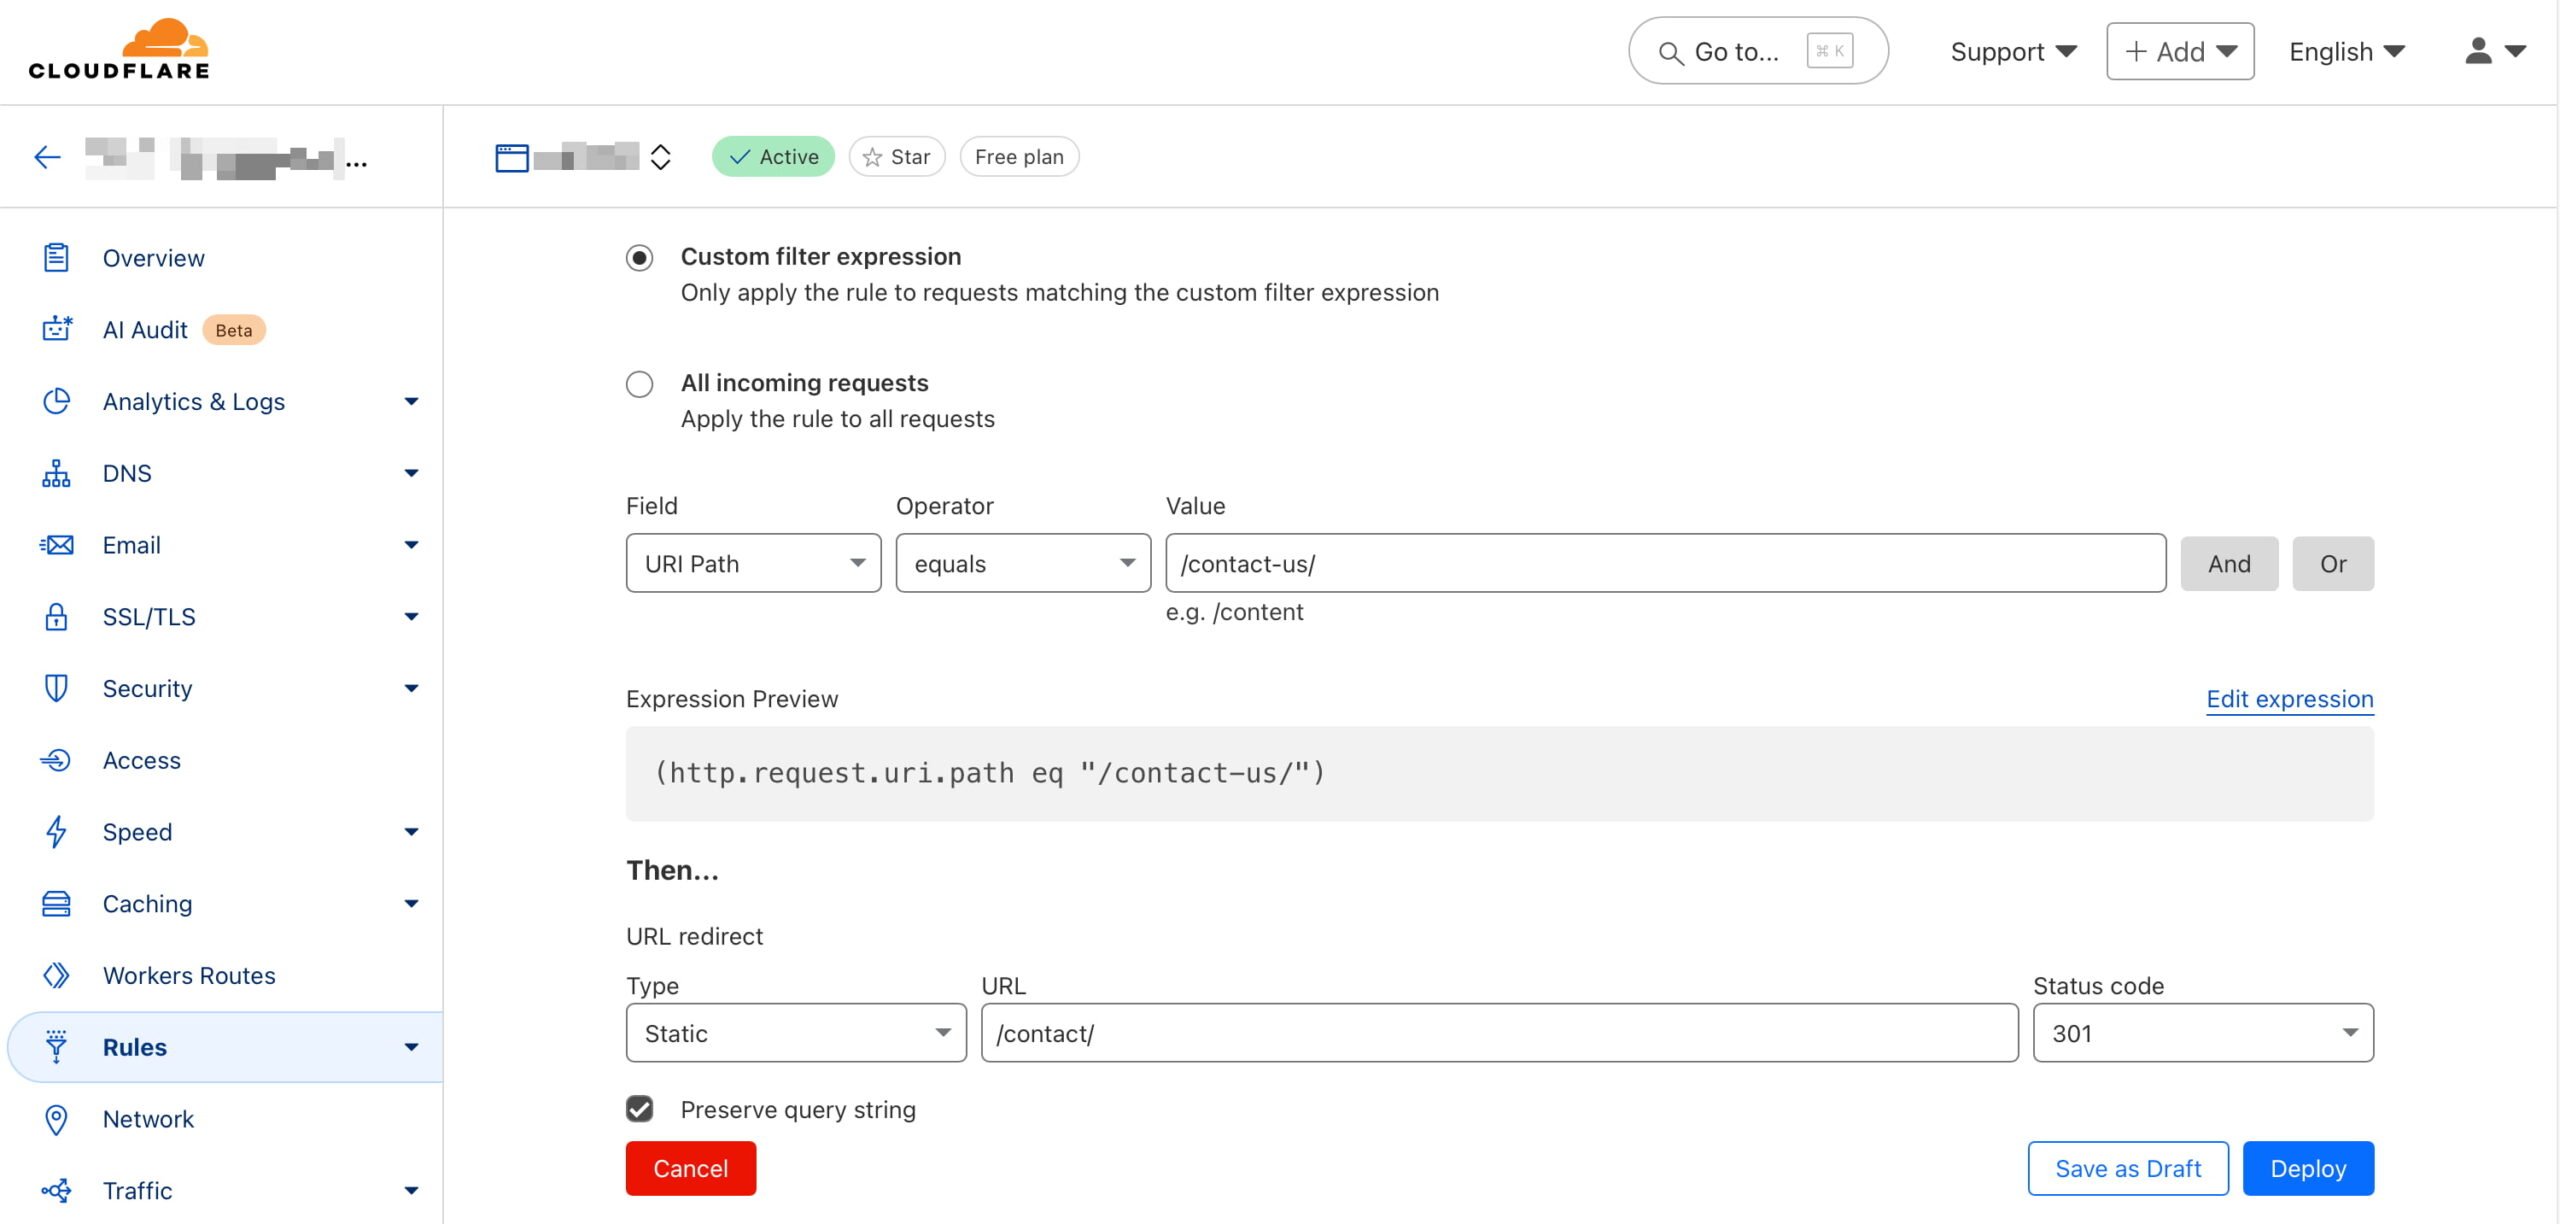
- Log into your Cloudflare account: Go to the Cloudflare dashboard and choose your account and area. Then, choose Guidelines and Overview.
- Create a redirect rule: Choose Create rule after which select Redirect Rule. Within the Rule identify area, you may identify it one thing like
Redirect Web page 1 to Web page 2. - Outline the matching standards: Set a wildcard sample and set the Request URL to
https://instance.com/page-1. This implies any site visitors toinstance.com/page-1can be matched for redirection - Set the redirect parameters:
- Goal URL: Enter
https://instance.com/page-2because the redirect vacation spot. - Standing code: Choose
301to point a everlasting redirect. - Protect question string: Resolve based mostly in your choice; allow this feature if the unique URL’s question string ought to be retained. Whenever you select to protect the question string in a redirect, you retain any further parameters that could be included within the authentic URL when redirecting to the brand new URL. Preserving the question string is commonly helpful for monitoring functions, like retaining analytics or promoting parameters, guaranteeing that helpful knowledge isn’t misplaced throughout redirection.
- Goal URL: Enter
- Deploy the rule:
Click on Deploy to save lots of and activate the redirect.
Now, each time somebody visits https://instance.com/page-1, they are going to be redirected to https://instance.com/page-2 with a 301 standing code, indicating a everlasting transfer.
You possibly can effectively handle site visitors with out touching your server configuration by establishing redirects through Cloudflare. It supplies flexibility for utilizing easy patterns or extra advanced URL constructions.
Possibility 3: Create a 301 redirect the straightforward method with Yoast search engine optimisation
Our Yoast search engine optimisation Premium plugin presents you a serving to hand on the subject of creating these redirects. Our built-in redirect supervisor assists you everytime you change the URL of a put up, web page, or any taxonomies that will lead to a attainable 404 for those who don’t correctly redirect guests. As well as, we additionally give you an interface to edit or take away these redirects at a later time limit. The plugin additionally tells you once you’re about to create a redirect that may lead to a redirect loop. This looping is one thing you wish to keep away from in any respect prices.
Right here’s how one can arrange a 301 redirect utilizing Yoast search engine optimisation Premium in WordPress:
- Entry the Yoast search engine optimisation settings: Log into your WordPress admin space and navigate to the Yoast search engine optimisation part.
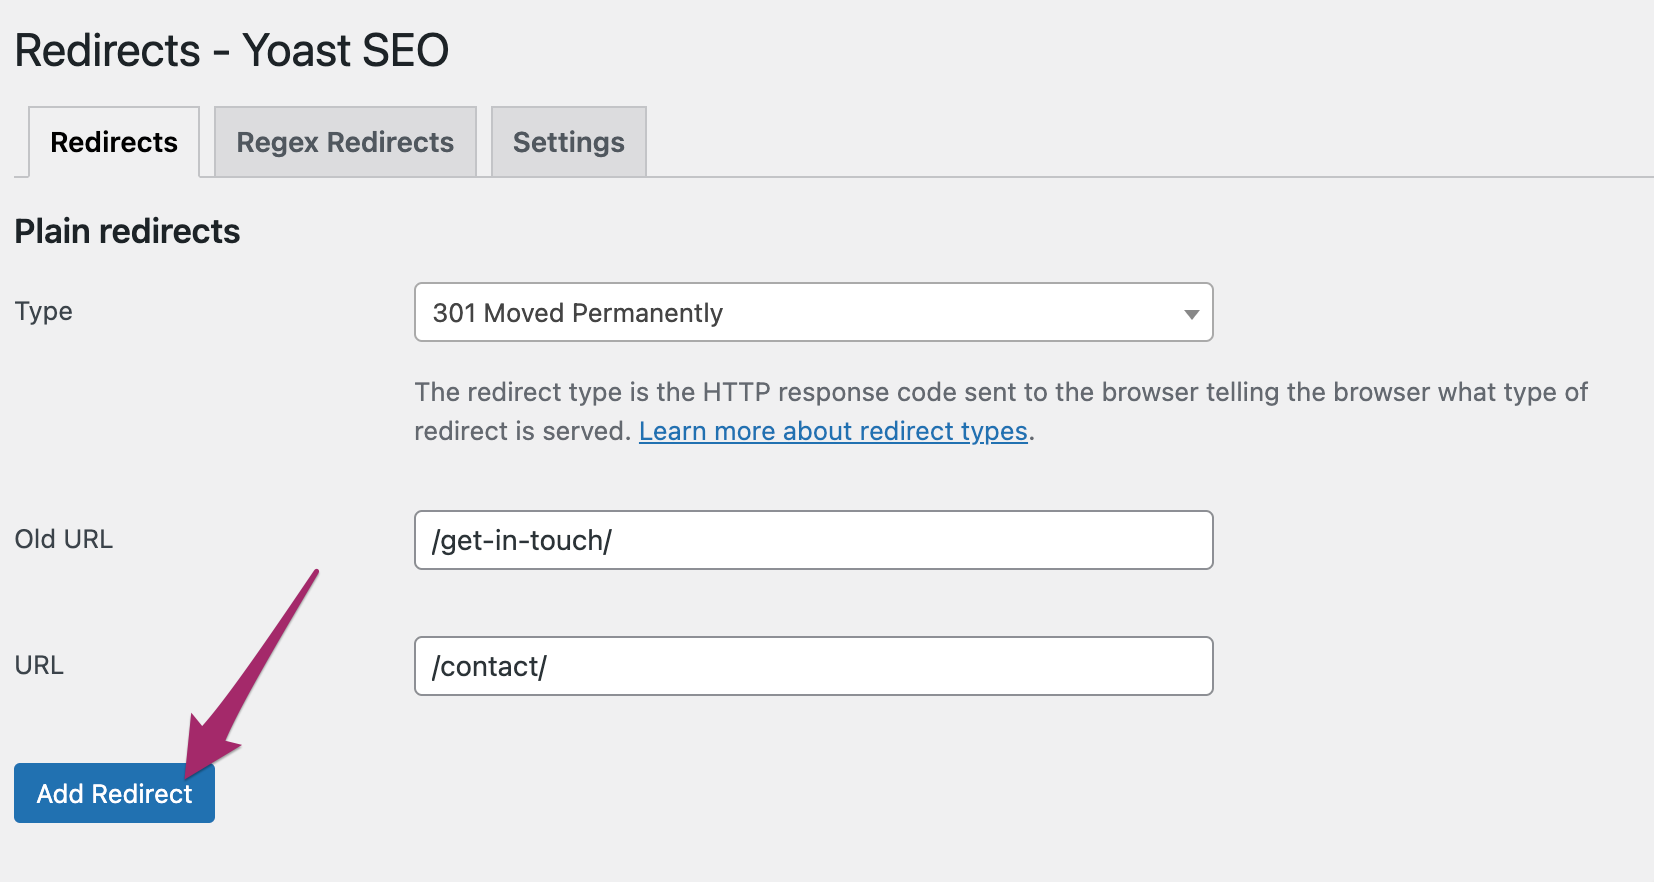
- Open the Redirect Supervisor: Go to the Redirects function in Yoast search engine optimisation Premium.
- Add a brand new redirect: Observe the steps beneath to create a brand new rule.
- Within the Previous URL area, enter
/page-1because the supply path. - Within the New URL area, enter the vacation spot
/page-2as the whole new URL. - Select a 301 (Moved Completely) from the checklist of redirect sorts.
- Within the Previous URL area, enter
- Save the Redirect: Click on Add redirect, and Yoast search engine optimisation will deal with the redirection.
Yoast search engine optimisation Premium additionally presents an choice to robotically redirect deleted content material. Whenever you delete a web page or put up, Yoast search engine optimisation prompts you to arrange a redirect to keep away from damaged hyperlinks. This ensures guests and search engines like google gained’t encounter 404 errors and are easily directed to a related web page.
These options are a part of Yoast search engine optimisation Premium, designed to make managing redirects easy with out manually altering code or server settings. They hold your web site user-friendly and assist keep search engine optimisation efficiency by stopping lifeless hyperlinks.
Conclusion
Understanding the right way to arrange 301 redirects is important for sustaining your web site’s integrity and consumer expertise. Whether or not you select Cloudflare, Yoast search engine optimisation Premium, or the .htaccess technique, every method presents a easy resolution to information guests to the appropriate place, stopping 404 errors and holding your search engine optimisation rankings intact. Easily transitioning site visitors from outdated hyperlinks to new ones enhances usability and search visibility. Select the very best technique that fits your wants and retains your web site working easily.
Learn extra: correctly delete pages out of your web site »

