
Whereas serving to our prospects construct techniques on AWS, we came upon that a lot of enterprise prospects who pay nice consideration to information safety and compliance, reminiscent of B2C FinTech enterprises, construct data-sensitive purposes on premises and use different purposes on AWS to take benefit AWS managed companies. Utilizing AWS managed companies can enormously simplify day by day operation and upkeep, in addition to assist you obtain optimized useful resource utilization and efficiency.
This publish discusses a decoupled strategy of constructing a serverless information lakehouse utilizing AWS Cloud-centered companies, together with Amazon EMR Serverless, Amazon Athena, Amazon Easy Storage Service (Amazon S3), Apache DolphinScheduler (an open supply information job scheduler) in addition to PingCAP TiDB, a third-party information warehouse product that may be deployed both on premises or on the cloud or by a software program as a service (SaaS).
Answer overview
For our use case, an enterprise information warehouse with enterprise information is hosted on an on-premises TiDB platform, an AWS World Companion that can be accessible on AWS by AWS Market.
The information is then processed by an Amazon EMR Serverless Job to realize information lakehouse tiering logic. Completely different tiering information are saved in separate S3 buckets or separate S3 prefixes below the identical S3 bucket. Sometimes, there are 4 layers by way of information warehouse design.
- Operational information retailer layer (ODS) – This layer shops uncooked information of the info warehouse
- Knowledge warehouse stage layer (DWS) – This layer is a brief staging space throughout the information warehousing structure the place information from numerous sources is loaded, cleaned, reworked, and ready earlier than being loaded into the info warehouse database layer;
- Knowledge warehouse database layer (DWD) – This layer is the central repository in a knowledge warehousing atmosphere the place information from numerous sources is built-in, reworked, and saved in a structured format for analytical functions;
- Analytical information retailer (ADS) – This layer is a subset of the info warehousing that’s particularly designed and optimized for a specific enterprise operate, division, or analytical function.
For this publish, we solely use ODS and ADS layers to exhibit the technical feasibility.
The schema of this information is managed by the AWS Glue Knowledge Catalog, and might be queried utilizing Athena. The EMR Serverless Jobs are orchestrated utilizing Apache DolphinScheduler deployed in cluster mode on Amazon Elasctic Compute Cloud (Amazon EC2) situations, with meta information saved in an Amazon Relational Database Service (Amazon RDS) for MySQL occasion.
Utilizing DolphinScheduler as the info lakehouse job orchestrator affords the next benefits:
- Its distributed structure permits for higher scalability, and the visible DAG designer makes workflow creation extra intuitive for group members with various technical experience
- It supplies extra granular task-level controls and helps a wider vary of activity varieties out-of-the-box, together with Spark, Flink, and machine studying (ML) workflows, with out requiring further plugin installations;
- Its multi-tenancy characteristic allows higher useful resource isolation and entry management throughout totally different groups inside a company.
Nonetheless, DolphinScheduler requires extra preliminary setup and upkeep effort, making it extra appropriate for organizations with robust DevOps capabilities and a want for full management over their workflow infrastructure.
The next diagram illustrates the answer structure.

Stipulations
It’s essential create an AWS account and arrange an AWS Identification and Entry Administration (IAM) consumer as a prerequisite for the next implementation. Full the next steps:
For AWS account signing up, please comply with up the actions guided per web page hyperlink.
- Create an AWS account.
- Check in to the account utilizing the basis consumer for the primary time.
- One the IAM console, create an IAM consumer with
AdministratorAccessCoverage. - Use this IAM consumer to log in AWS Administration Console somewhat the basis consumer.
- On the IAM console, select Customers within the navigation pane.
- Navigate to your consumer, and on the Safety credentials tab, create an entry key.
- Retailer the entry key and secret key in a safe place and use them for additional API entry of the assets of this AWS account.
Arrange DolphinScheduler, IAM configuration, and the TiDB Cloud desk
On this part, we stroll by the steps to put in DolphinScheduler, full further IAM configurations to allow the EMR Serverless job, and provision the TiDB Cloud desk.
Set up DolphinScheduler on an EC2 occasion with an RDS for MySQL occasion storing DolphinScheduler metadata. The manufacturing deployment mode of DolphinScheduler is cluster mode. On this weblog, we use pseudo cluster mode which has the identical set up steps as cluster mode, and will obtain useful resource economic system. We title the EC2 occasion ds-pseudo.
Ensure the inbound rule of the safety group hooked up to the EC2 occasion permits port 12345’s TCP site visitors. Then full the next steps:
- Log in to Amazon EC2 as the basis consumer, and set up
jvm:sudo dnf set up java-1.8.0-amazon-corretto java -version
- Change to
dir /usr/native/src:cd /usr/native/src - Set up Apache Zookeeper:
wget https://archive.apache.org/dist/zookeeper/zookeeper-3.8.0/apache-zookeeper-3.8.0-bin.tar.gz
tar -zxvf apache-zookeeper-3.8.0-bin.tar.gz
cd apache-zookeeper-3.8.0-bin/conf
cp zoo_sample.cfg zoo.cfg
cd ..
nohup bin/zkServer.sh start-foreground &> nohup_zk.out &
bin/zkServer.sh standing
- Test the Python model:
python3 --versionThe model must be 3.9 or above. It’s endorsed that you simply use Amazon Linux 2023 or later because the Amazon EC2 working system (OS); Python model 3.9 meets the requirement. For element info, seek advice from Python in AL2023.

- Set up Dolphinscheduler
- Obtain the
dolphinschedulerbundle:cd /usr/native/src wget https://dlcdn.apache.org/dolphinscheduler/3.1.9/apache-dolphinscheduler-3.1.9-bin.tar.gz tar -zxvf apache-dolphinscheduler-3.1.9-bin.tar.gz mv apache-dolphinscheduler-3.1.9-bin apache-dolphinscheduler - Obtain the
mysqlconnector bundle:wget https://downloads.mysql.com/archives/get/p/3/file/mysql-connector-j-8.0.31.tar.gz tar -zxvf mysql-connector-j-8.0.31.tar.gz - Copy particular
mysqlconnector JAR file to the next locations:cp mysql-connector-j-8.0.31/mysql-connector-j-8.0.31.jar ./apache-dolphinscheduler/api-server/libs/ cp mysql-connector-j-8.0.31/mysql-connector-j-8.0.31.jar ./apache-dolphinscheduler/alert-server/libs/ cp mysql-connector-j-8.0.31/mysql-connector-j-8.0.31.jar ./apache-dolphinscheduler/master-server/libs/ cp mysql-connector-j-8.0.31/mysql-connector-j-8.0.31.jar ./apache-dolphinscheduler/worker-server/libs/ cp mysql-connector-j-8.0.31/mysql-connector-j-8.0.31.jar ./apache-dolphinscheduler/instruments/libs/ - Add the consumer
dolphinscheduler, and ensure the listingapache-dolphinschedulerand the information below it are owned by the consumerdolphinscheduler:useradd dolphinscheduler echo "dolphinscheduler" | passwd --stdin dolphinscheduler sed -i '$adolphinscheduler ALL=(ALL) NOPASSWD: NOPASSWD: ALL' /and many others/sudoers sed -i 's/Defaults requirett/#Defaults requirett/g' /and many others/sudoers chown -R dolphinscheduler:dolphinscheduler apache-dolphinscheduler
- Obtain the
- Set up the
mysqlshopper:sudo dnf replace -y sudo dnf set up mariadb105 - On the Amazon RDS console, provision an RDS for MySQL occasion with the next configurations:
- For Database Creation Methodology, choose Customary create.
- For Engine choices, select MySQL.
- For Version: select MySQL 8.0.35.
- For Templates: choose Dev/Take a look at.
- For Availability and sturdiness, choose Single DB occasion.
- For Credentials administration, choose Self-managed.
- For Connectivity, choose Hook up with an EC2 compute useful resource, and select the EC2 occasion created earlier.
- For Database Authentication: select Password Authentication.
- Navigate to the
ds- mysqldatabase particulars web page, and below Connectivity & safety, copy the RDS for MySQL endpoint.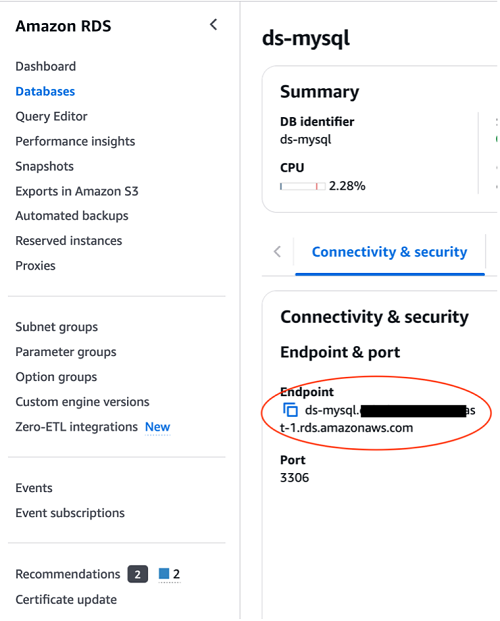
- Configure the intance:
mysql -h-u admin -p mysql> CREATE DATABASE dolphinscheduler DEFAULT CHARACTER SET utf8 DEFAULT COLLATE utf8_general_ci; mysql> exit; - Configure the
dolphinschedulerconfiguration file:cd /usr/native/src/apache-dolphinscheduler/ - Revise
dolphinscheduler_env.sh:vim bin/env/dolphinscheduler_env.sh export DATABASE=${DATABASE:-mysql} export SPRING_PROFILES_ACTIVE=${DATABASE} export SPRING_DATASOURCE_URL="jdbc:mysql://ds-mysql.cq**********.us-east-1.rds.amazonaws.com/dolphinscheduler?useUnicode=true&characterEncoding=UTF-8&useSSL=false" export SPRING_DATASOURCE_USERNAME="admin" export SPRING_DATASOURCE_PASSWORD="" - On the Amazon EC2 console, navigate to the occasion particulars web page and duplicate the non-public IP deal with.

- Revise
install_env.sh:vim bin/env/install_env.sh ips=${ips:-""} masters=${masters:-" "} employees=${employees:-" non-public ip deal with of ds-pseudo EC2 occasion:default"} alertServer=${alertServer:-" non-public ip deal with of ds-pseudo EC2 occasion "} apiServers=${apiServers:-" non-public ip deal with of ds-pseudo EC2 occasion "} installPath=${installPath:-"~/dolphinscheduler"} export JAVA_HOME=${JAVA_HOME:-/usr/lib/jvm/jre-1.8.0-openjdk} export PYTHON_HOME=${PYTHON_HOME:-/bin/python3} - Configure the
dolphinschedulerconfiguration file:cd /usr/native/src/apache-dolphinscheduler/ bash instruments/bin/upgrade-schema.sh - Set up DolphinScheduler:
cd /usr/native/src/apache-dolphinscheduler/ su dolphinscheduler bash ./bin/set up.sh - Begin DolphinScheduler after set up:
cd /usr/native/src/apache-dolphinscheduler/ su dolphinscheduler bash ./bin/start-all.sh - Open the DolphinScheduler console:
http://:12345/dolphinscheduler/ui/login 
After enter the preliminary username and password, press Login button to enter into the dashboard proven as beneath.
preliminary consumer/password admin/dolphinscheduler123
Configure IAM function to allow the EMR serverless job
The EMR serverless job function must have permission to entry a selected S3 bucket to learn job scripts and doubtlessly write outcomes, and still have permission to entry AWS Glue to learn the Knowledge Catalog which shops the tables’ meta information. For detailed steering, please seek advice from Grant permission to make use of EMR Serverless or EMR Serverless Samples.
The next screenshot exhibits the IAM function configured with the belief coverage hooked up.

The IAM function ought to have the next permissions insurance policies hooked up, as proven within the following screenshot.
Provision the TiDB Cloud desk
- To provision the TiDB Cloud desk, full the next steps:
- Register for TiDB Cloud.
- Create a serverless cluster, as proven within the following screenshot. For this publish, we title the cluster
Cluster0.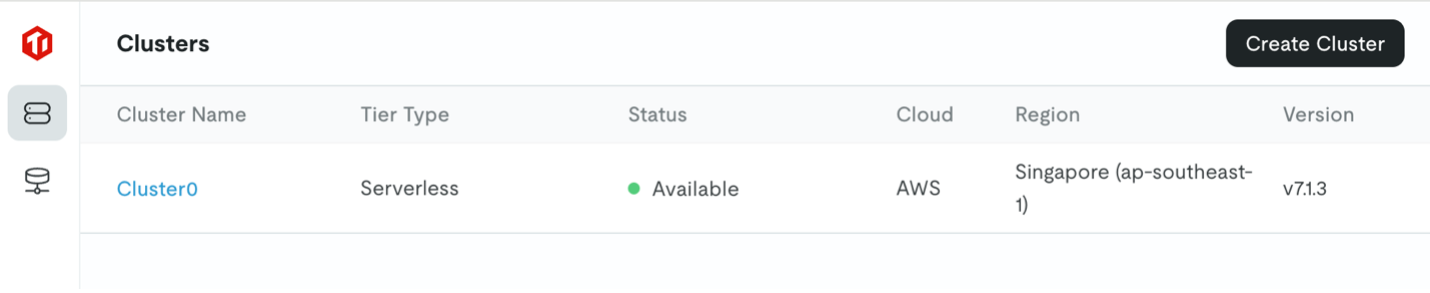
- Select
Cluster0, then select SQL Editor to create a database namedtake a look at:create desk testtable (id varchar(255)); insert into testtable values (1); insert into testtable values (2); insert into testtable values (3);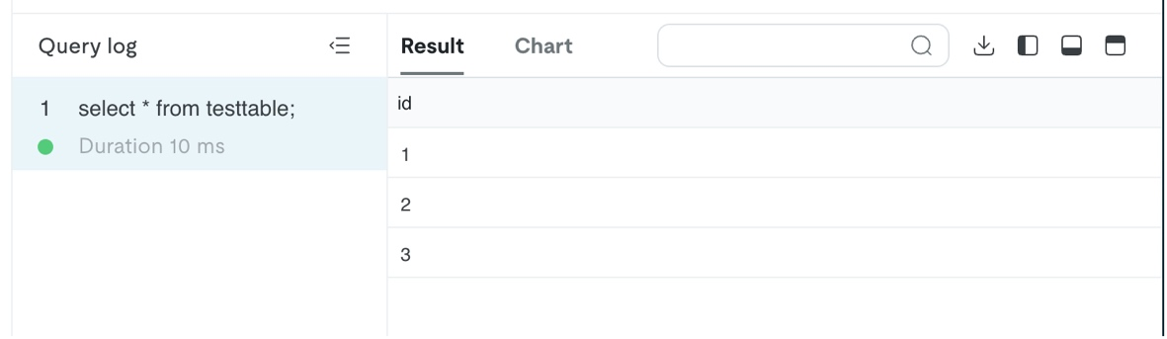
Synchronize information between on-premises TiDB and AWS
On this part, we focus on the best way to synchronize historic information in addition to incremental information between TiDB and AWS.
Use TiDB Dumpling to sync historic information from TiDB to Amazon S3
Use the instructions on this part to dump information saved in TiDB as CSV information right into a S3 bucket. For full particulars on the best way to obtain a knowledge sync from on-premises TiDB to Amazon S3, see Export information to Amazon S3 cloud storage. For this publish, we use TiDB device Dumpling. Full the next steps:
- Log in to the EC2 occasion created earlier as root.
- Run the next command to put in TiUP:
curl --proto '=https' --tlsv1.2 -sSf https://tiup-mirrors.pingcap.com/set up.sh | sh

cd /root
supply .bash_profile

tiup --version
- Run the next command to put in Dumpling:
tiup set up dumpling - Run the next command to realize goal database desk dumpling to the precise S3 bucket.
tiup dumpling -u-P 4000 -h -r 200000 -o "s3:// " --sql "choose * from . " --ca "/and many others/pki/tls/certs/ca-bundle.crt" --password - To accumulate the TiDB serverless connection info, navigate to the TiDB Cloud console and select Join.

You may acquire the precise connection info of take a look at database from the next screenshot.

Yan can view the info saved within the S3 bucket on the Amazon S3 console.

You should utilize Amazon S3 Choose to question the info and get outcomes much like the next screenshot, confirming that the info has been ingested into testtable.

Use TiDB Dumpling with a self-managed checkpoint to sync incremental information from TiDB to Amazon S3
To realize incremental information synchronization utilizing TiDB Dumpling, it’s important to self-manage the examine level of the goal synchronized information. One really useful manner is to retailer the ID of the ultimate ingested file right into a sure media (reminiscent of Amazon ElastiCache for Redis, Amazon DynamoDB) to realize a self-managing checkpoint when working the shell/Python job that trigges TiDB Dumpling. The prerequisite for implementing that is that the goal desk has a monotonically growing id area as its main key.
You should utilize the next TiDB Dumpling command to filter the exported information:
tiup dumpling -u . the place id > 2" --ca "/and many others/pki/tls/certs/ca-bundle.crt" --password Use the TiDB CDC connector to sync incremental information from TiDB to Amazon S3
The benefit of utilizing TiDB CDC connector to realize incremental information synchronization from TiDB to Amazon S3 is that there’s built-in change information seize (CDC) mechanism, and since the backend engine is Flink, the efficiency is quick. Nonetheless, there may be one trade-off: it’s worthwhile to create a number of Flink tables to map the ODS tables on AWS.
For directions to implement the TiDB CDC connector, seek advice from TiDB CDC.
Use an EMR serverless job to sync historic and incremental information from a Knowledge Catalog desk to the TiDB desk
Knowledge often flows from on premises to the AWS Cloud. Nonetheless, in some circumstances, the info would possibly movement from the AWS Cloud to your on-premises database.
After touchdown on AWS, the info can be wrapped up and managed by the Knowledge Catalog by created Athena tables with the precise tables’ schema. The desk DDL script is as follows:
CREATE EXTERNAL TABLE IF NOT EXISTS `testtable`(
`id` string
)
ROW FORMAT SERDE 'org.apache.hadoop.hive.serde2.OpenCSVSerde'
LOCATION 's3:/// /'; The screenshot beneath showcases the DDL working consequence utilizing Athena console.

The information saved in testtable desk is queried utilizing choose * from testable SQL. The question result’s proven as follows:

On this case, an EMR serverless spark job can accomplish the work of synchronizing information from an AWS Glue desk to your on premises desk.
If the Spark job is written in Scala, the pattern code is as beneath:
bundle com.instance
import org.apache.spark.sql.{DataFrame, SparkSession}
object Predominant {
def predominant(args: Array[String]): Unit = {
val spark = SparkSession.builder()
.appName("")
.enableHiveSupport()
.getOrCreate()
spark.sql("present databases").present()
spark.sql("use default")
var df=spark.sql("choose * from testtable")
df.write
.format("jdbc")
.choice("driver","com.mysql.cj.jdbc.Driver")
.choice("url", "jdbc:mysql:// You may purchase the TiDB serverless endpoint connection info on the TiDB console by selecting Join, as proven earlier on this publish.
After you may have wrapped the Scala code as JAR file utilizing SBT, you may submit the job to EMR Serverless with the next AWS Command Line Interface (AWS CLI) command:
export applicationId=00fev6mdk***

export job_role_arn=arn:aws:iam:::function/emr-serverless-job-role

aws emr-serverless start-job-run
    --application-id $applicationId
    --execution-role-arn $job_role_arn
    --job-driver '{
        "sparkSubmit": {
            "entryPoint": "",
            "sparkSubmitParameters": "--conf spark.hadoop.hive.metastore.shopper.manufacturing unit.class=com.amazonaws.glue.catalog.metastore.AWSGlueDataCatalogHiveClientFactory --conf spark.driver.cores=1 --conf spark.driver.reminiscence=3g --conf spark.executor.cores=4 --conf spark.executor.reminiscence=3g --jars s3://spark-sql-test-nov23rd/mysql-connector-j-8.2.0.jar"
        }
    }'
If the Spark job is written in PySpark, the pattern code is as follows:
import os
import sys
import pyspark.sql.features as F
from pyspark.sql import SparkSession

if __name__ == "__main__":

    spark = SparkSession
        .builder
        .appName("app1")
        .enableHiveSupport()
        .getOrCreate()

    df=spark.sql(f"choose * from {str(sys.argv[1])}")

    df.write.format("jdbc").choices(
        driver="com.mysql.cj.jdbc.Driver",
        url="jdbc:mysql://tidbcloud_endpoint:4000/namespace ",
        dbtable="table_name",
        consumer="use_name",
        password="password_string").save()

    spark.cease()
You may submit the job to EMR Serverless utilizing the next AWS CLI command:
export applicationId=00fev6mdk***

export job_role_arn=arn:aws:iam:::function/emr-serverless-job-role

aws emr-serverless start-job-run
    --application-id $applicationId
    --execution-role-arn $job_role_arn
    --job-driver '{
        "sparkSubmit": {
            "entryPoint": "",
            "entryPointArguments": ["testspark"],
            "sparkSubmitParameters": "--conf spark.hadoop.hive.metastore.shopper.manufacturing unit.class=com.amazonaws.glue.catalog.metastore.AWSGlueDataCatalogHiveClientFactory --conf spark.driver.cores=1 --conf spark.driver.reminiscence=3g --conf spark.executor.cores=4 --conf spark.executor.reminiscence=3g --jars s3://spark-sql-test-nov23rd/mysql-connector-j-8.2.0.jar"
        }
    }'
The previous PySpark code and AWS CLI command achieves outbound parameter enter as effectively: the desk title (particularly testspark) is ingested into the SQL sentence when submitting the job.
EMR Serverless job pperation necessities
An EMR Serverless utility is a useful resource pool idea. An utility holds a sure capability of compute, reminiscence, and storage assets for jobs working on it to make use of. You may configure the useful resource capability utilizing AWS CLI or the console. As a result of it’s a useful resource pool, EMR Serverless utility creation is often a one-time motion with the preliminary capability and most capability being configured.
An EMR Serverless job is a working unit that truly processes the compute activity. To ensure that a job to work, it’s worthwhile to set the EMR Serverless utility ID, the execution IAM function (mentioned beforehand), and the precise utility configuration (the assets the job is planning to make use of). Though you may create the EMR Serverless job on the console, it’s really useful to create the EMR Serverless job utilizing the AWS CLI for additional integration with the scheduler and scripts.
For extra particulars on EMR Serverless utility creation and EMR Serverless job provisioning, seek advice from EMR Serverless Hive question or EMR Serverless PySpark job
DolphinScheduler integration and job orchestration
DolphinScheduler is a contemporary information orchestration platform. It’s agile to create high- efficiency workflows with low code. It additionally supplies a robust UI, devoted to fixing complicated activity dependencies within the information pipeline and offering numerous kinds of jobs out of the field.
DolphinScheduler is developed and maintained by WhaleOps, and accessible in AWS Market as WhaleStudio.
DolphinScheduler has been natively built-in with Hadoop: DolphinScheduler cluster mode is by default really useful to be deployed on a Hadoop cluster (often on HDFS information nodes), and the HQL scripts uploaded to DolphinScheduler Useful resource Supervisor are saved by default on HDFS, and might be orchestrated utilizing the next native Hive shell command:
Hive -f instance.sqlFurthermore, for particular case by which the orchestration DAGs are fairly sophisticated, every DAG consists of a number of jobs (for instance, greater than 300), and nearly all the roles are HQL scripts saved in DolphinScheduler Useful resource Supervisor.
Full the steps listed on this part to realize a seamless integration between DolphinScheduler and EMR Serverless.
Change the storage layer of DolphinScheduler Useful resource Heart from HDFS to Amazon S3
Edit the frequent.properties information below directories /usr/native/src/apache-dolphinscheduler/api-server/ and listing /usr/native/src/apache-dolphinscheduler/worker-server/conf. The next code snippet exhibits the a part of the file that must be revised:
# useful resource storage sort: HDFS, S3, OSS, NONE
#useful resource.storage.sort=NONE
useful resource.storage.sort=S3
# useful resource retailer on HDFS/S3 path, useful resource file will retailer to this base path, self configuration, please be sure the listing exists on hdfs and have learn write permissions. "/dolphinscheduler" is really useful
useful resource.storage.add.base.path=/dolphinscheduler

# The AWS entry key. if useful resource.storage.sort=S3 or use EMR-Activity, This configuration is required
useful resource.aws.entry.key.id=AKIA************
# The AWS secret entry key. if useful resource.storage.sort=S3 or use EMR-Activity, This configuration is required
useful resource.aws.secret.entry.key=lAm8R2TQzt*************
# The AWS Area to make use of. if useful resource.storage.sort=S3 or use EMR-Activity, This configuration is required
useful resource.aws.area=us-east-1
# The title of the bucket. It's essential create them by your self. In any other case, the system can not begin. All buckets in Amazon S3 share a single namespace; make sure the bucket is given a novel title.
useful resource.aws.s3.bucket.title=dolphinscheduler-shiyang
# It's essential set this parameter when non-public cloud s3. If S3 makes use of public cloud, you solely must set useful resource.aws.area or set to the endpoint of a public cloud reminiscent of S3.cn-north-1.amazonaws.com.cn
useful resource.aws.s3.endpoint=s3.us-east-1.amazonaws.com
After enhancing and saving the 2 information, restart the api-server and worker-server by working the next instructions, below folder path /usr/native/src/apache-dolphinscheduler/
bash ./bin/stop-all.sh
bash ./bin/start-all.sh
bash ./bin/status-all.sh
You may validate whether or not switching the storage layer to Amazon S3 was profitable by importing a script utilizing DolphinScheduler Useful resource Heart Console, examine if the file seems in related S3 bucket folder.
Earlier than verifying that Amazon S3 is now the storage location of DolphinScheduler, it’s worthwhile to create a tenant on the DolphinScheduler console and bundle the admin consumer with the tenant, as illustrated within the following screenshots:


After that, you may create a folder on the DolphinScheduler console, and examine whether or not the folder is seen on the Amazon S3 console.


Ensure the job scripts uploaded from Amazon S3 can be found within the DolphinScheduler Useful resource Heart
After engaging in the primary activity, you may add the scripts from the DolphinScheduler Useful resource Heart console, and ensure that the scripts are saved in Amazon S3. Nonetheless, in apply, it’s worthwhile to migrate all scripts on to Amazon S3. You’ll find and modify the scripts saved in Amazon S3 utilizing DolphinScheduler Useful resource Heart console. To take action, you may revise the metadata desk t_ds_resources by inserting all of the scripts’ metadata. The desk schema of desk t_ds_resources is proven within the following screenshot.

The insert command is as follows:
insert into t_ds_resources values(6, 'rely.java', ' rely.java','',1,1,0,'2024-11-09 04:46:44', '2024-11-09 04:46:44', -1, 'rely.java',0);Now there are two information within the desk t_ds_resoruces.

You may entry related information on the DolphinScheduler console.

The next screenshot exhibits the information on the Amazon S3 console.

Make the DolphinScheduler DAG orchestrator conscious of the roles’ standing so the DAG can transfer ahead or take related actions
As talked about earlier, DolphinScheduler is natively built-in with the Hadoop ecosystem, and the HQL scripts might be orchestrated by the DolphinScheduler DAG orchestrator by way of Hive -f xxx.sql command. Because of this, when the scripts modified to shell scripts or Python scripts (EMR Severless jobs must be orchestrated by way of shell scripts or Python scripts somewhat than the easy Hive command), the DAG orchestrator can begin the job, however can’t get the true time standing of the job, and due to this fact can’t proceed the workflow to additional steps. As a result of the DAGs on this case are very sophisticated, it’s not possible to amend the DAGs; as an alternative we comply with a lift-and-shift technique.
We use the next scripts to seize jobs’ standing and take applicable actions.
Persist the appliance ID listing with the next code:
var=$(cat applicationlist.txt|grep appid1)
applicationId=${var#* }
echo $applicationId
Allow the DolphinScheduler step standing auto-check utilizing a Linux shell:
app_state
 jq -r '.utility')
  state=$(echo $utility

job_state
 jq -r '.state')
  echo $JOB_STATE


state=$(job_state)

whereas [ $state != "SUCCESS" ]; do
  case $state in
    RUNNING)
         state=$(job_state)
         ;;
    SCHEDULED)
         state=$(job_state)
         ;;
    PENDING)
         state=$(job_state)
         ;;
    FAILED)
         break
         ;;
   esac
finished

if [ $state == "FAILED" ]
then
  false
else
  true
fi
Clear up
To scrub up your assets, we advocate utilizing APIs by the next steps:
- Delete the EC2 occasion:
- Discover the occasion utilizing the next command:
aws ec2 describe-instances - Delete the occasion utilizing the next command:
aws ec2 terminate-instances –instance-ids
- Discover the occasion utilizing the next command:
- Delete the RDS occasion:
- Discover the occasion utilizing the next command:
aws rds describe-db-instances - Delete the occasion utilizing the next command:
aws rds delete-db-instances –db-instance-identifier
- Discover the occasion utilizing the next command:
- Delete the EMR Serverless utility
- Discover the EMR Serverless utility utilizing the next command:
aws emr-serverless list-applications - Delete the EMR Serverless utility utilizing the next command:
aws emr-serverless delete-application –application-id
- Discover the EMR Serverless utility utilizing the next command:
Conclusion
On this publish, we mentioned how EMR Serverless, as AWS managed serverless huge information compute engine, integrates with widespread OSS merchandise like TiDB and DolphinScheduler. We mentioned the best way to obtain information synchronization between TiDB and the AWS Cloud, and the best way to use DolphineScheduler to orchestrate EMR Serverless jobs.
Check out the answer with your personal use case, and share your suggestions within the feedback.
In regards to the Creator
 Shiyang Wei is Senior Options Architect at Amazon Net Providers. He’s specializing in cloud system structure and resolution design for the monetary business. Notably, he targeted on huge information and machine studying purposes in finance, in addition to the influence of regulatory compliance on cloud structure design within the monetary sector. He has over 10 years of expertise in information area growth and architectural design.
