
Automation of knowledge processing and knowledge integration duties is important for knowledge engineers and analysts to keep up up-to-date knowledge pipelines and reviews. Amazon SageMaker Unified Studio is a single knowledge and AI growth atmosphere the place you will discover and entry the information in your group and act on it utilizing the best instruments on your use case. SageMaker Unified Studio provides a number of methods to combine with knowledge by means of its editorial instruments, together with Visible ETL, Question Editor, and JupyterLab builders.
Not too long ago, AWS launched the visible workflow expertise in SageMaker Unified Studio IAM-based domains. With visible workflows, you don’t must code Python DAGs manually or have deep experience in Apache Airflow. As an alternative, you’ll be able to visually outline orchestration workflows by means of an intuitive drag-and-drop interface in SageMaker Unified Studio. The visible definition is mechanically transformed to workflow definitions that leverage Amazon Managed Workflows for Apache Airflow (Amazon MWAA) Serverless, offering enterprise-grade orchestration capabilities with a simplified person expertise.
On this publish, we present the best way to use the brand new visible workflow expertise in SageMaker Unified Studio IAM-based domains to orchestrate an end-to-end machine studying workflow. The workflow ingests climate knowledge, applies transformations, and generates predictions—all by means of a single, intuitive interface, with out writing any orchestration code.
For extra particulars on Amazon MWAA Serverless, see Introducing Amazon MWAA Serverless.
Instance use case
To reveal how SageMaker Unified Studio simplifies end-to-end workflow orchestration, let’s stroll by means of a real-world state of affairs from agricultural analytics. The next diagram reveals a climate knowledge processing workflow that we are going to orchestrate utilizing the visible workflow expertise in SageMaker Unified Studio.
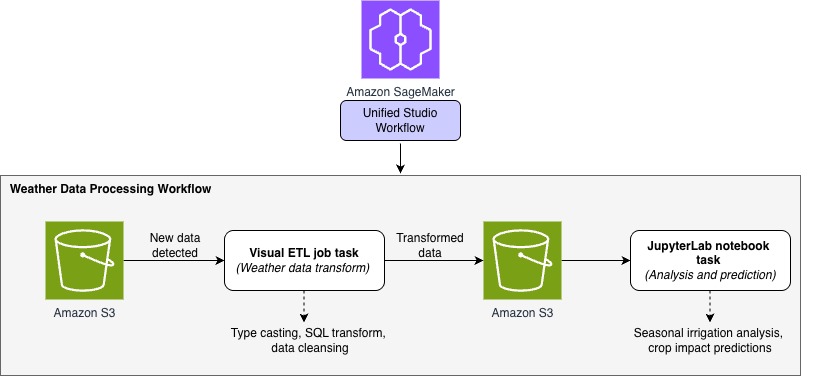
A regional agricultural extension workplace collects hourly climate knowledge from a number of stations throughout farming communities. Their aim is to research this knowledge and supply farmers with actionable insights into climate patterns and their influence on crop situations. To realize this, the crew constructed a ML–powered analytics workflow utilizing SageMaker Unified Studio to automate the processing of incoming climate knowledge and predict irrigation wants.
On this walkthrough, we reveal how the visible workflow expertise in Unified Studio can orchestrate an end-to-end knowledge pipeline that:
- Displays and ingests hourly climate knowledge from Amazon Easy Storage Service (Amazon S3)
- Transforms uncooked climate measurements utilizing Visible ETL jobs (sort casting, SQL operations, and knowledge cleaning)
- Generates seasonal irrigation predictions and crop influence insights utilizing JupyterLab notebooks
Each time new climate knowledge arrives, the workflow mechanically routes it by means of a collection of transformation steps, and produces ready-to-use insights—all visually orchestrated in SageMaker Unified Studio with no customized orchestration code required.
Stipulations
Earlier than you start, full the next steps:
- Signup for an AWS account and create a person with administrative entry utilizing the setup information.
- Setup your SageMaker Unified Studio IAM-based area:
- Navigate to the Amazon SageMaker console and use the Area selector within the prime navigation bar to decide on the suitable AWS Area.
- On the Amazon SageMaker house web page, select Get began.
- For Mission knowledge entry, select to Auto-create a brand new function with admin permissions.
- Choose the checkbox for S3 desk integration with AWS Analytics providers, for Knowledge encryption select Use AWS owned key, after which Arrange.

- Return to the Amazon SageMaker house web page and select Open to entry the SageMaker Unified Studio expertise.

- From the SageMaker Studio UI you’ll be able to entry the challenge within the SageMaker Unified Studio IAM-based area. This challenge curates all property accessible by means of the designated Execution IAM function.
Workflow implementation steps
On this part, we use Amazon SageMaker Studio to create an end-to-end visible workflow in IAM-based area.
Step 1: Arrange knowledge storage and import climate dataset
First, we’ll put together the Amazon S3 storage places for uncooked and processed knowledge:
- Obtain this climate dataset file to your native atmosphere.
- From the left menu of the challenge, select Information. Below Shared, create two new folders raw_data and processed_data.
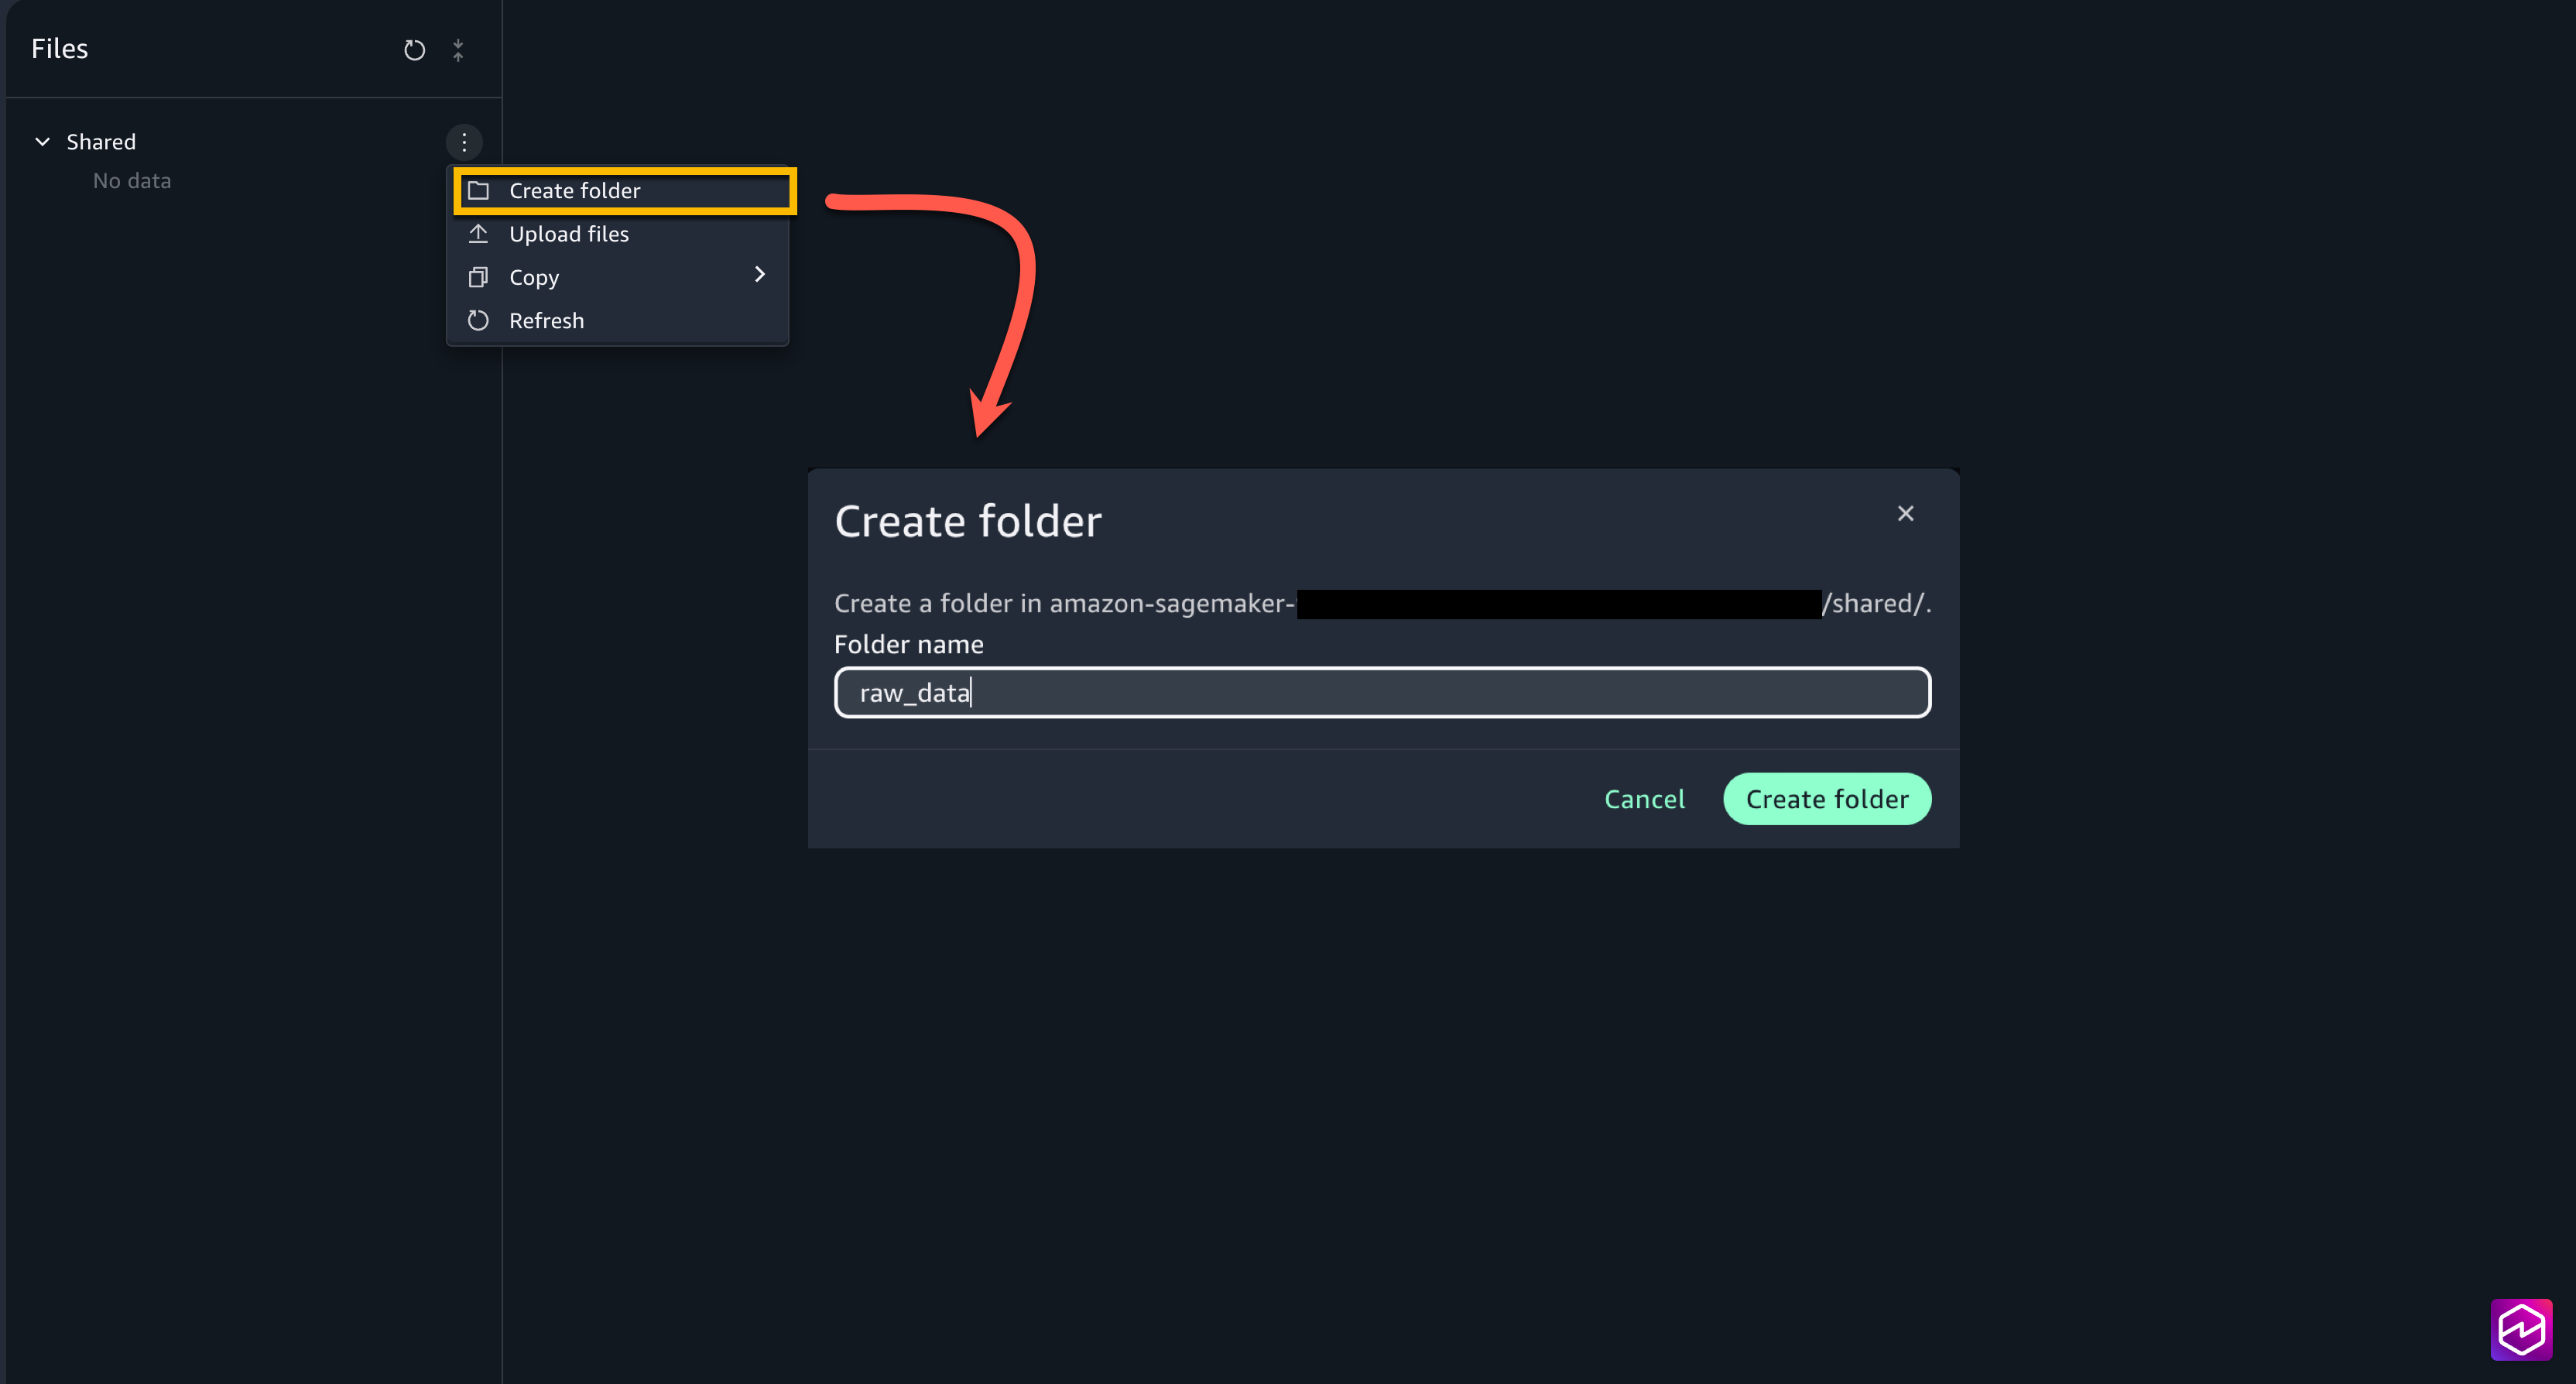
- Add the climate dataset file downloaded regionally into
raw_datafolder.

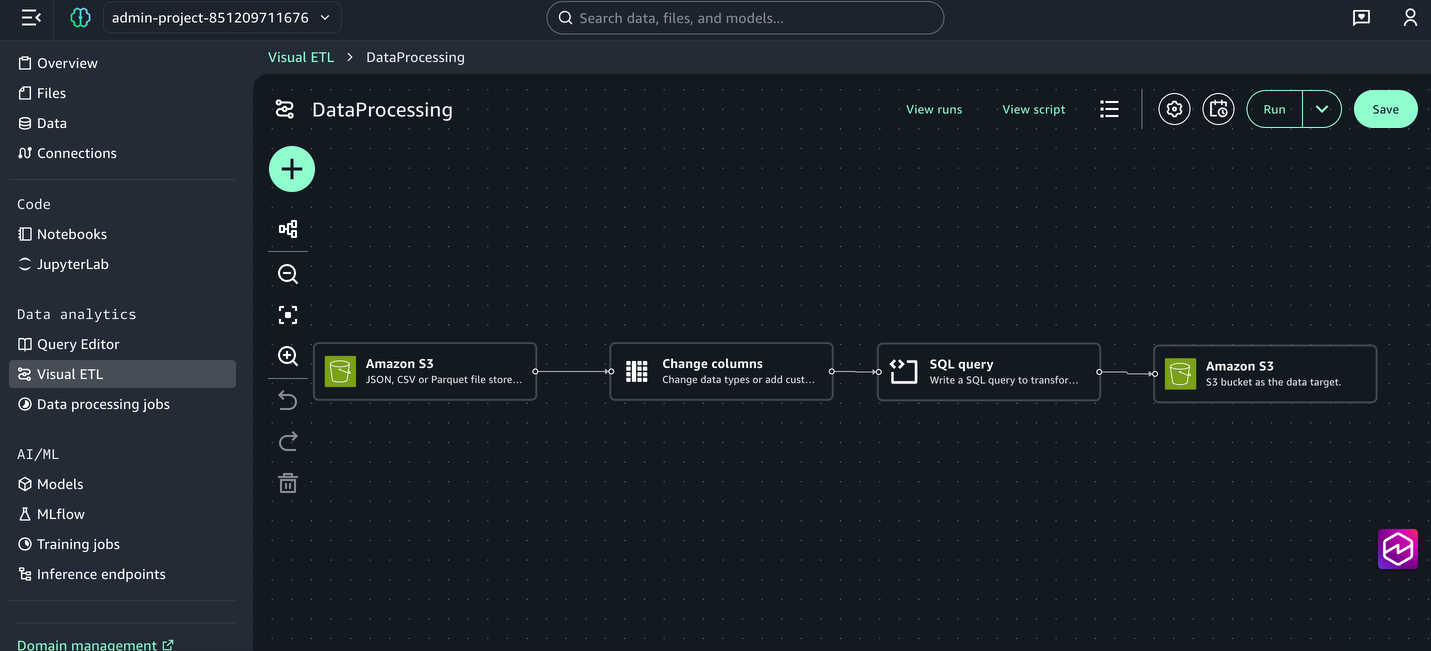
Step 2: Create the climate knowledge transformation job utilizing Visible ETL
Subsequent, create a Visible ETL job to rework the uncooked climate knowledge by means of sort casting, SQL transformations, and knowledge cleaning:
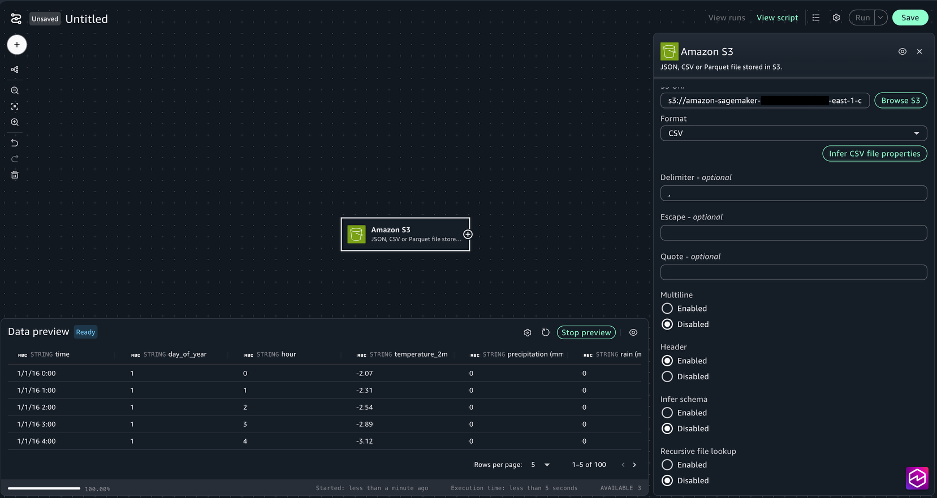
- From the left menu, underneath Knowledge Analytics, select Visible ETL and Create Visible Job.
- Select the + signal, and underneath Knowledge sources, select Amazon S3.
- For the Amazon S3 node settings, select the next:
- S3 URI: Select Browse S3 and Choose
- Delimiter: ,
- Multiline: Disabled
- Header: Enabled
- Infer schema: Disabled
- Recursive file lookup: Disabled
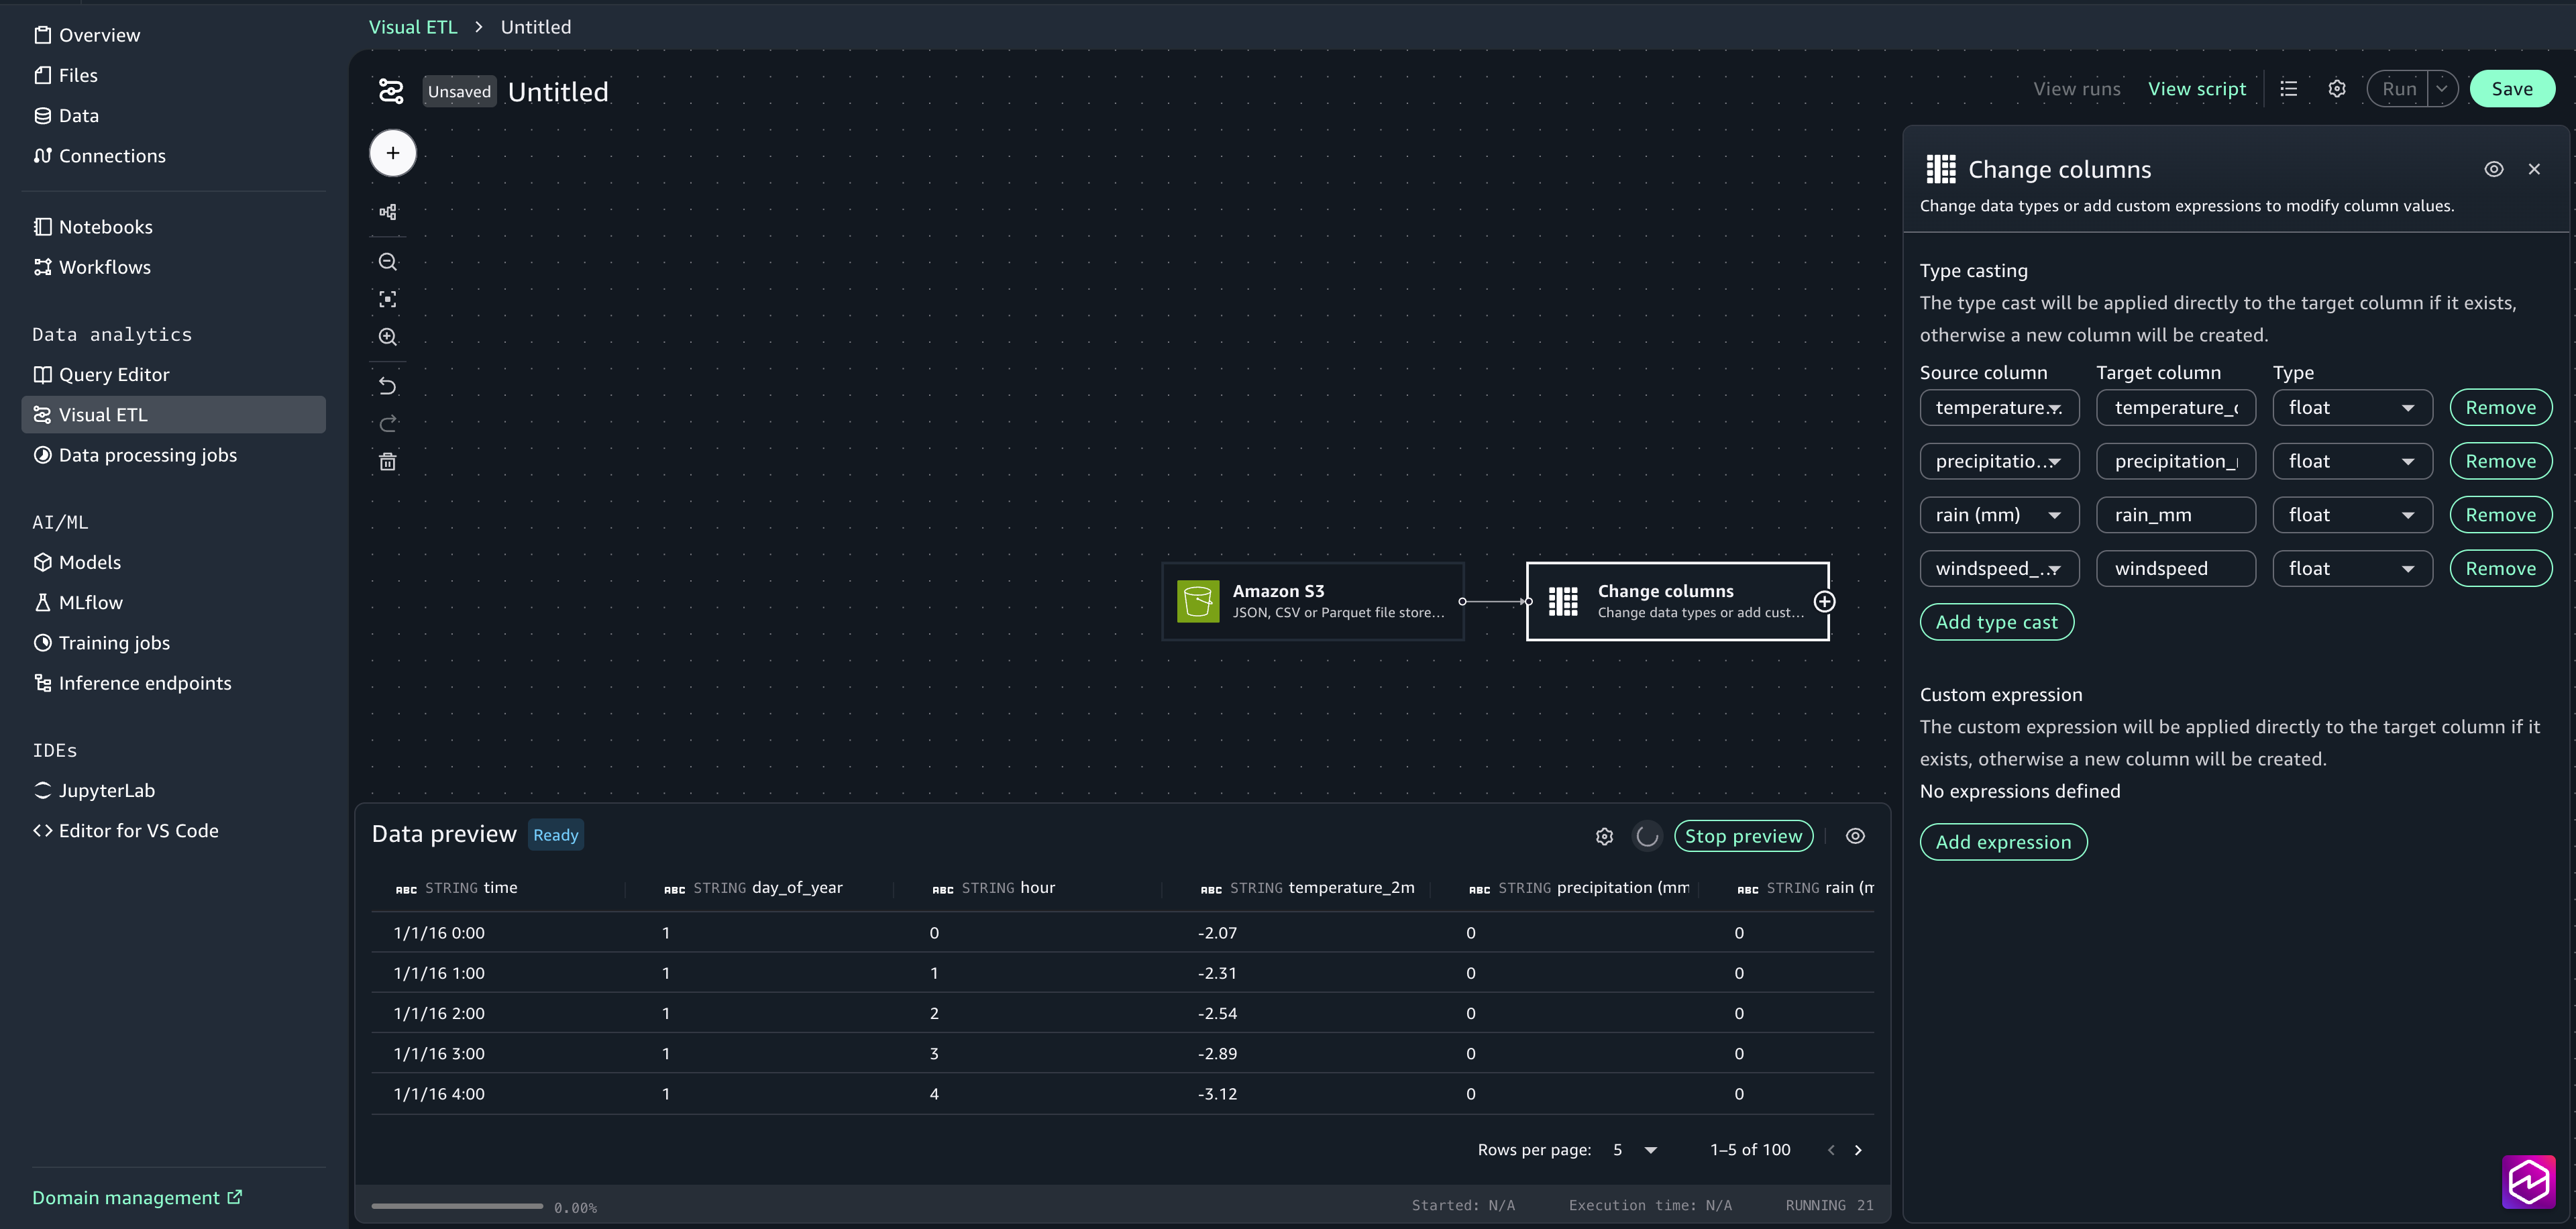
- Select the + signal subsequent to the Amazon S3 field so as to add one other node, underneath Transforms choose Change columns.
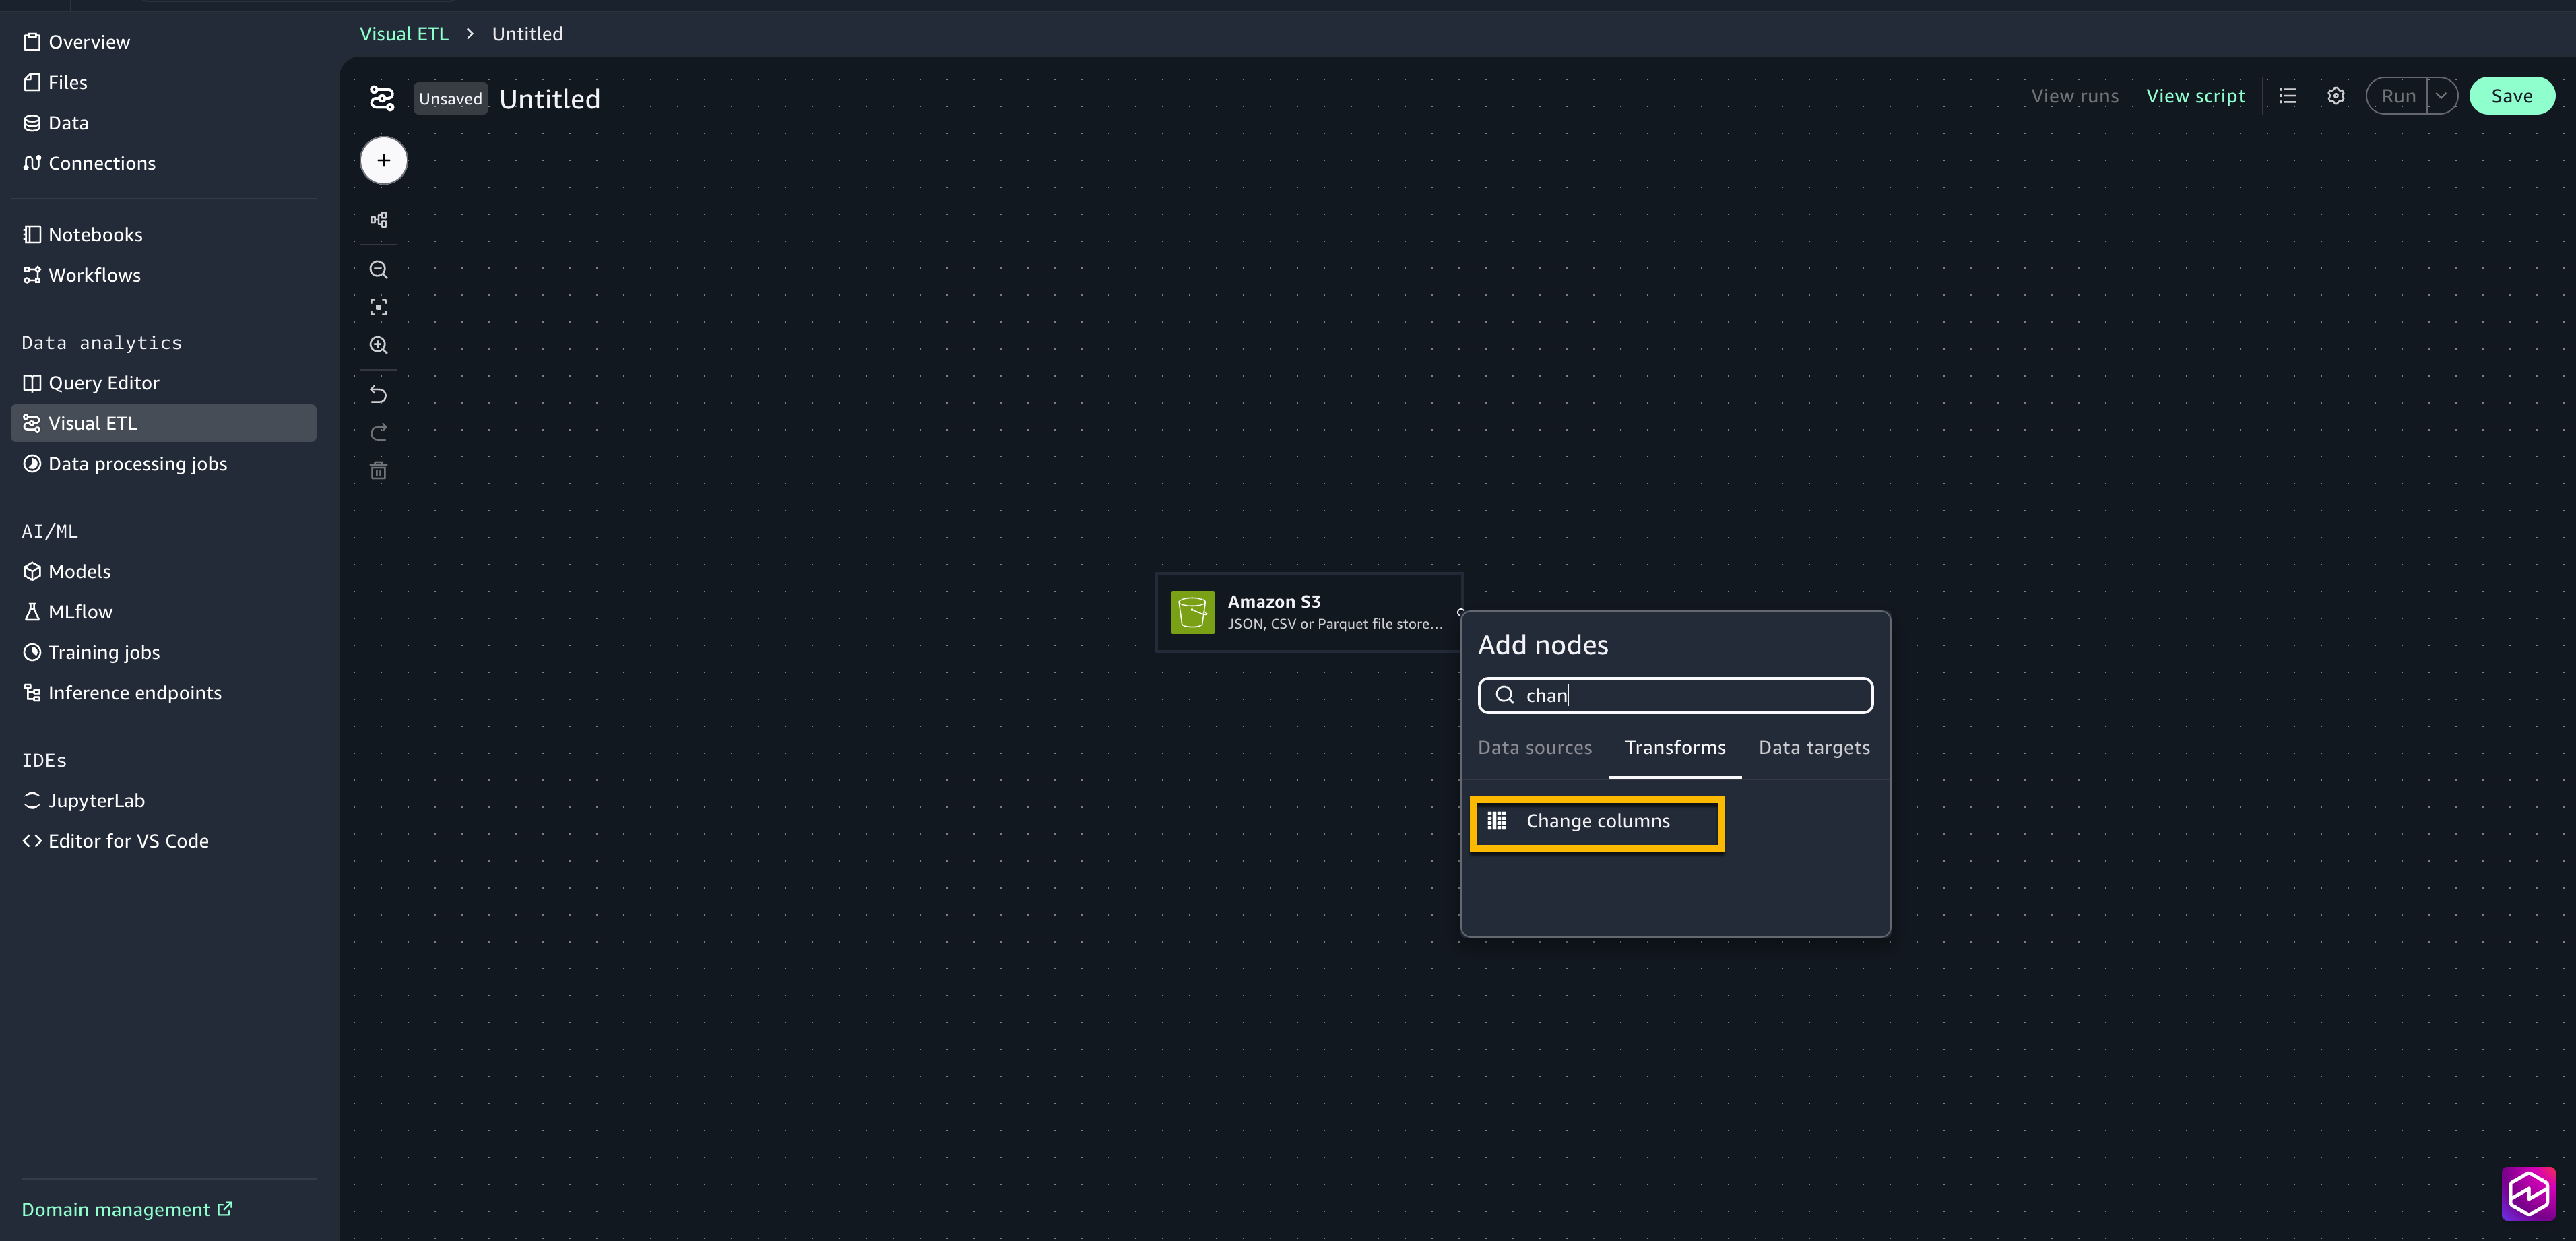
- Join the Amazon S3 node to the change columns node.
- Choose the Change columns node to open the configuration window.
- Select Add sort forged. Choose temperature_2m (°C) because the supply column and add temperature_celsius because the goal column. Choose float because the Kind.
- Choose precipitation (mm) because the supply column and add Precipitation_mm because the goal column. Choose float because the Kind.
- Choose rain (mm) because the supply column and add Rain_mm because the goal column. Choose float because the Kind.
- Choose windspeed_10m (km/h) because the supply column and add windspeed because the goal column. Choose float because the Kind.
- Shut the configuration window.
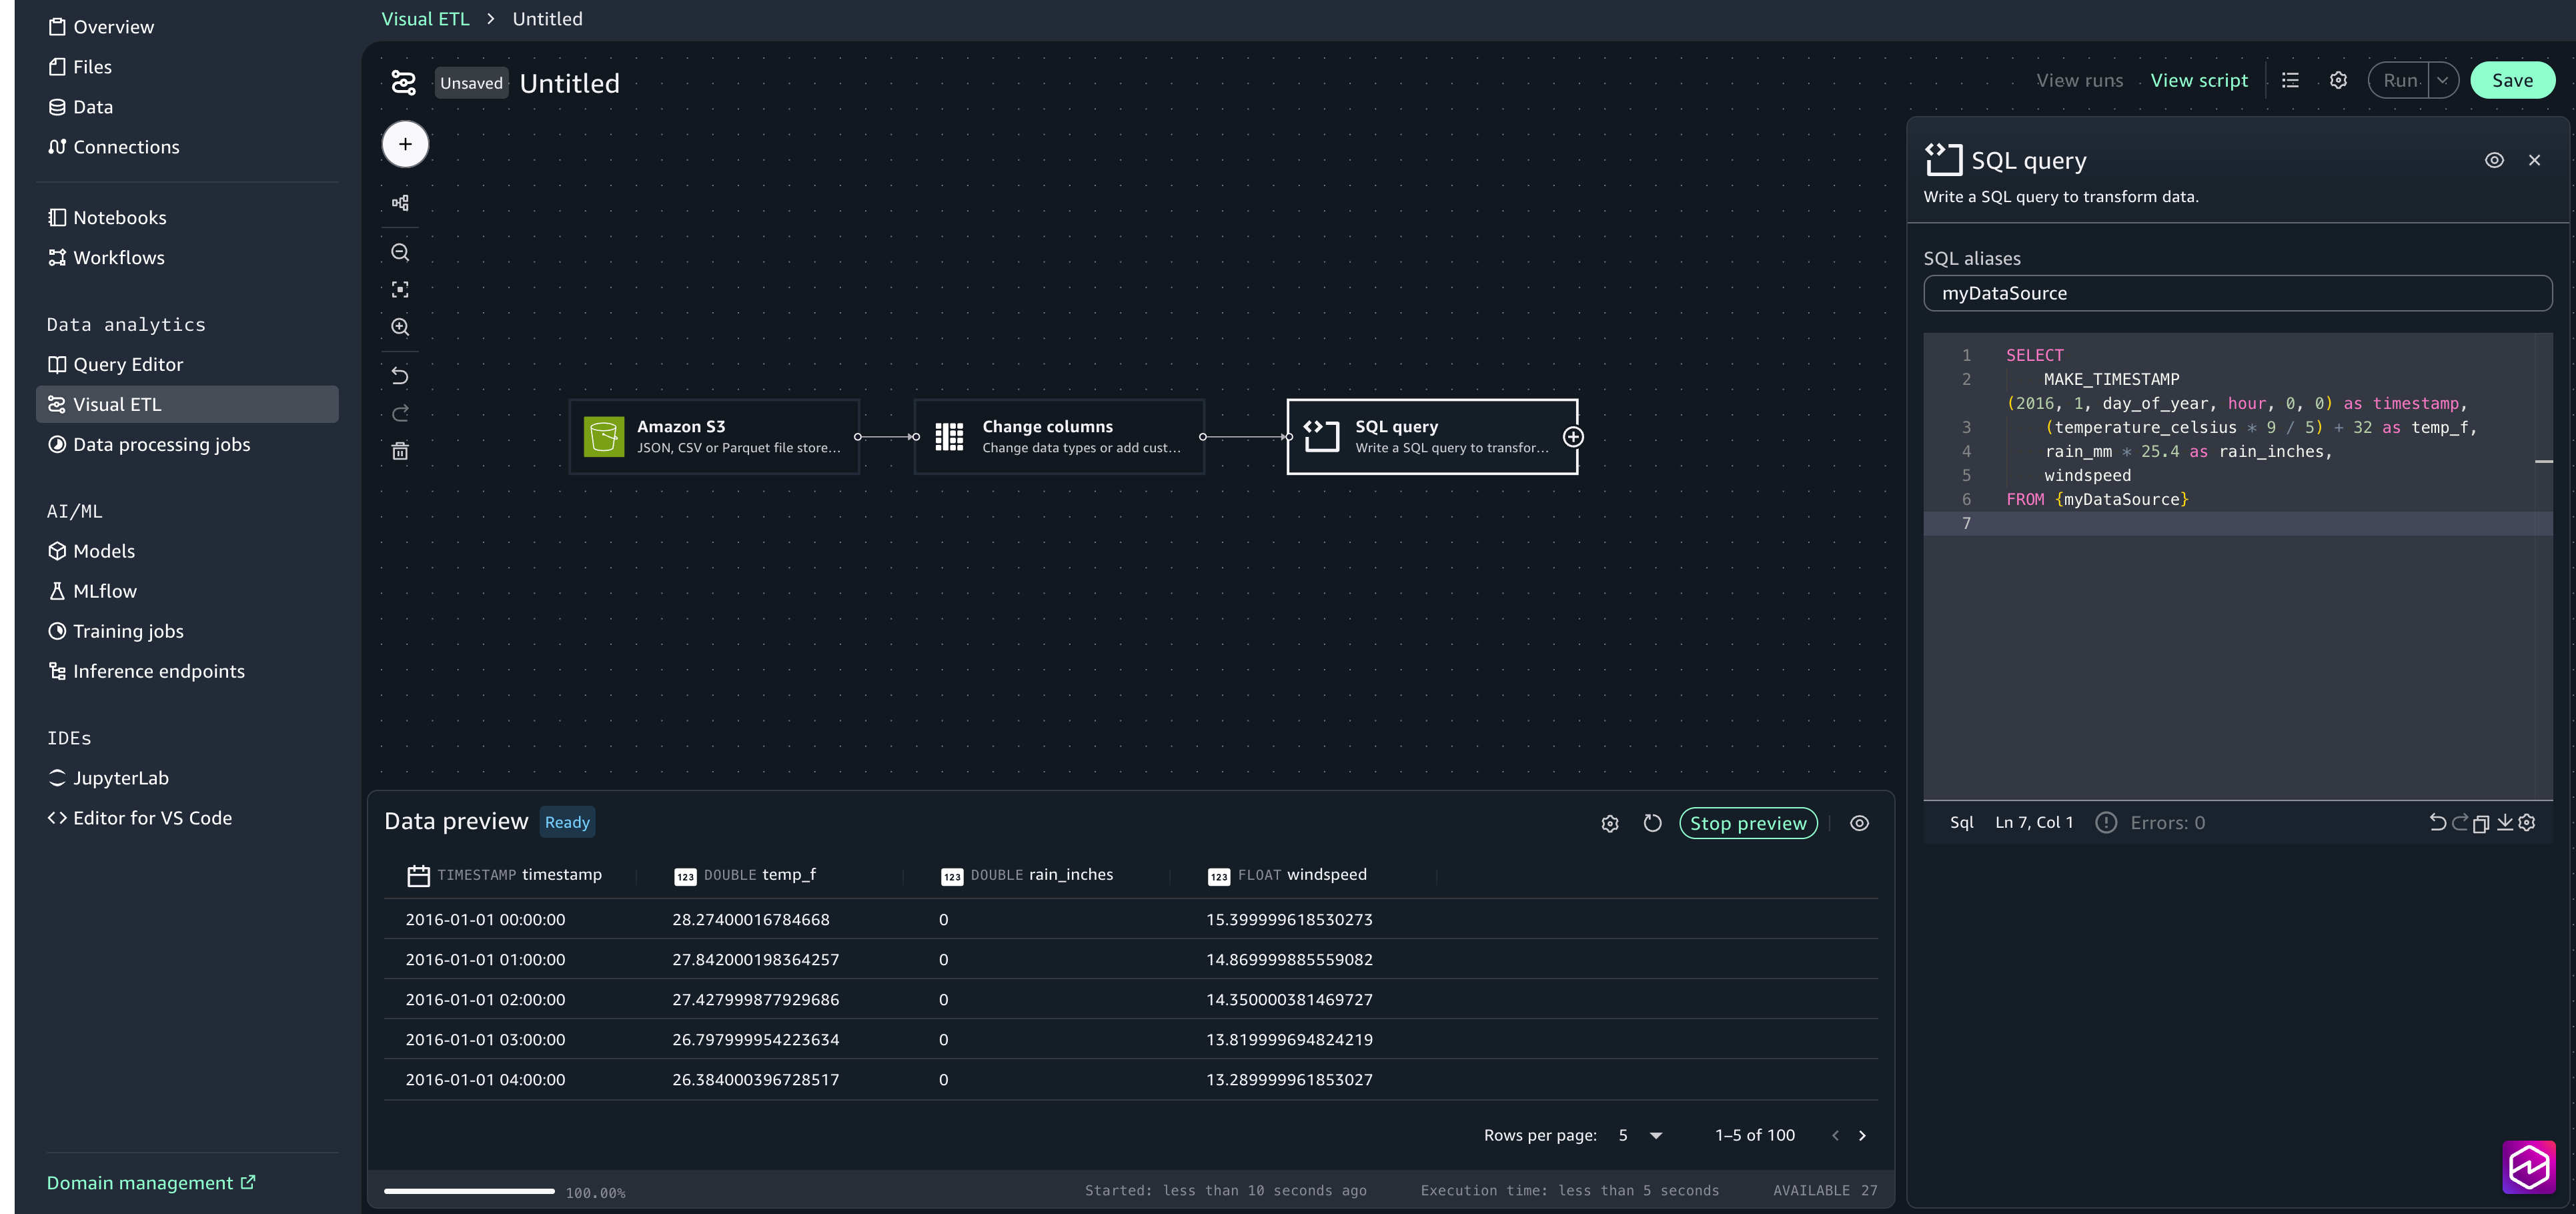
- Select the + signal so as to add one other node, underneath Transforms choose SQL question . Within the configuration window, paste within the following SQL assertion:
- Select the + signal so as to add one other node, underneath Knowledge targets, select Amazon S3 and supply the next choices:
- S3 URI: Select Browse S3 and choose the processed_data folder created in Step 1.
- Format: CSV
- Replace catalog: true
- Database: sagemaker_sample_db
- Desk: weather_data
- Embody header: true
- Ouput to a single file: false
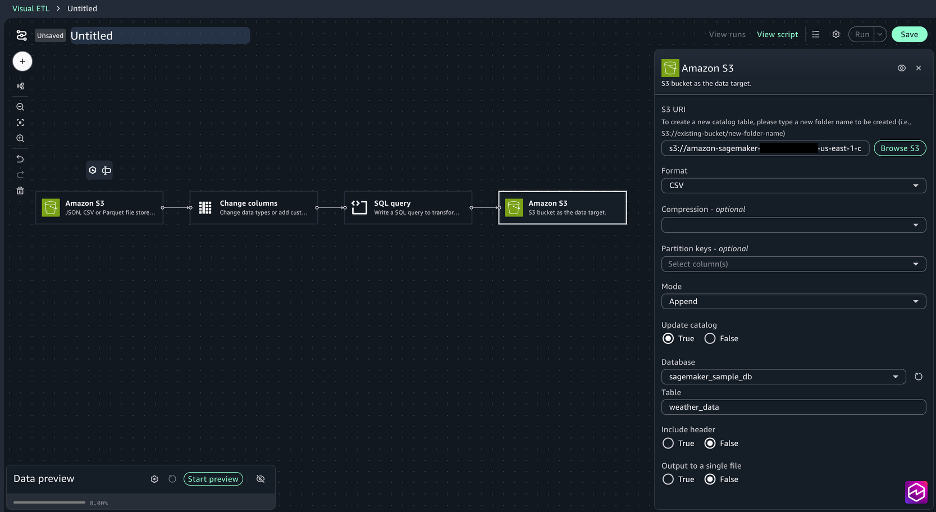
- Join the nodes to create a whole job.
- Save the Visible ETL and identify it DataProcessing.
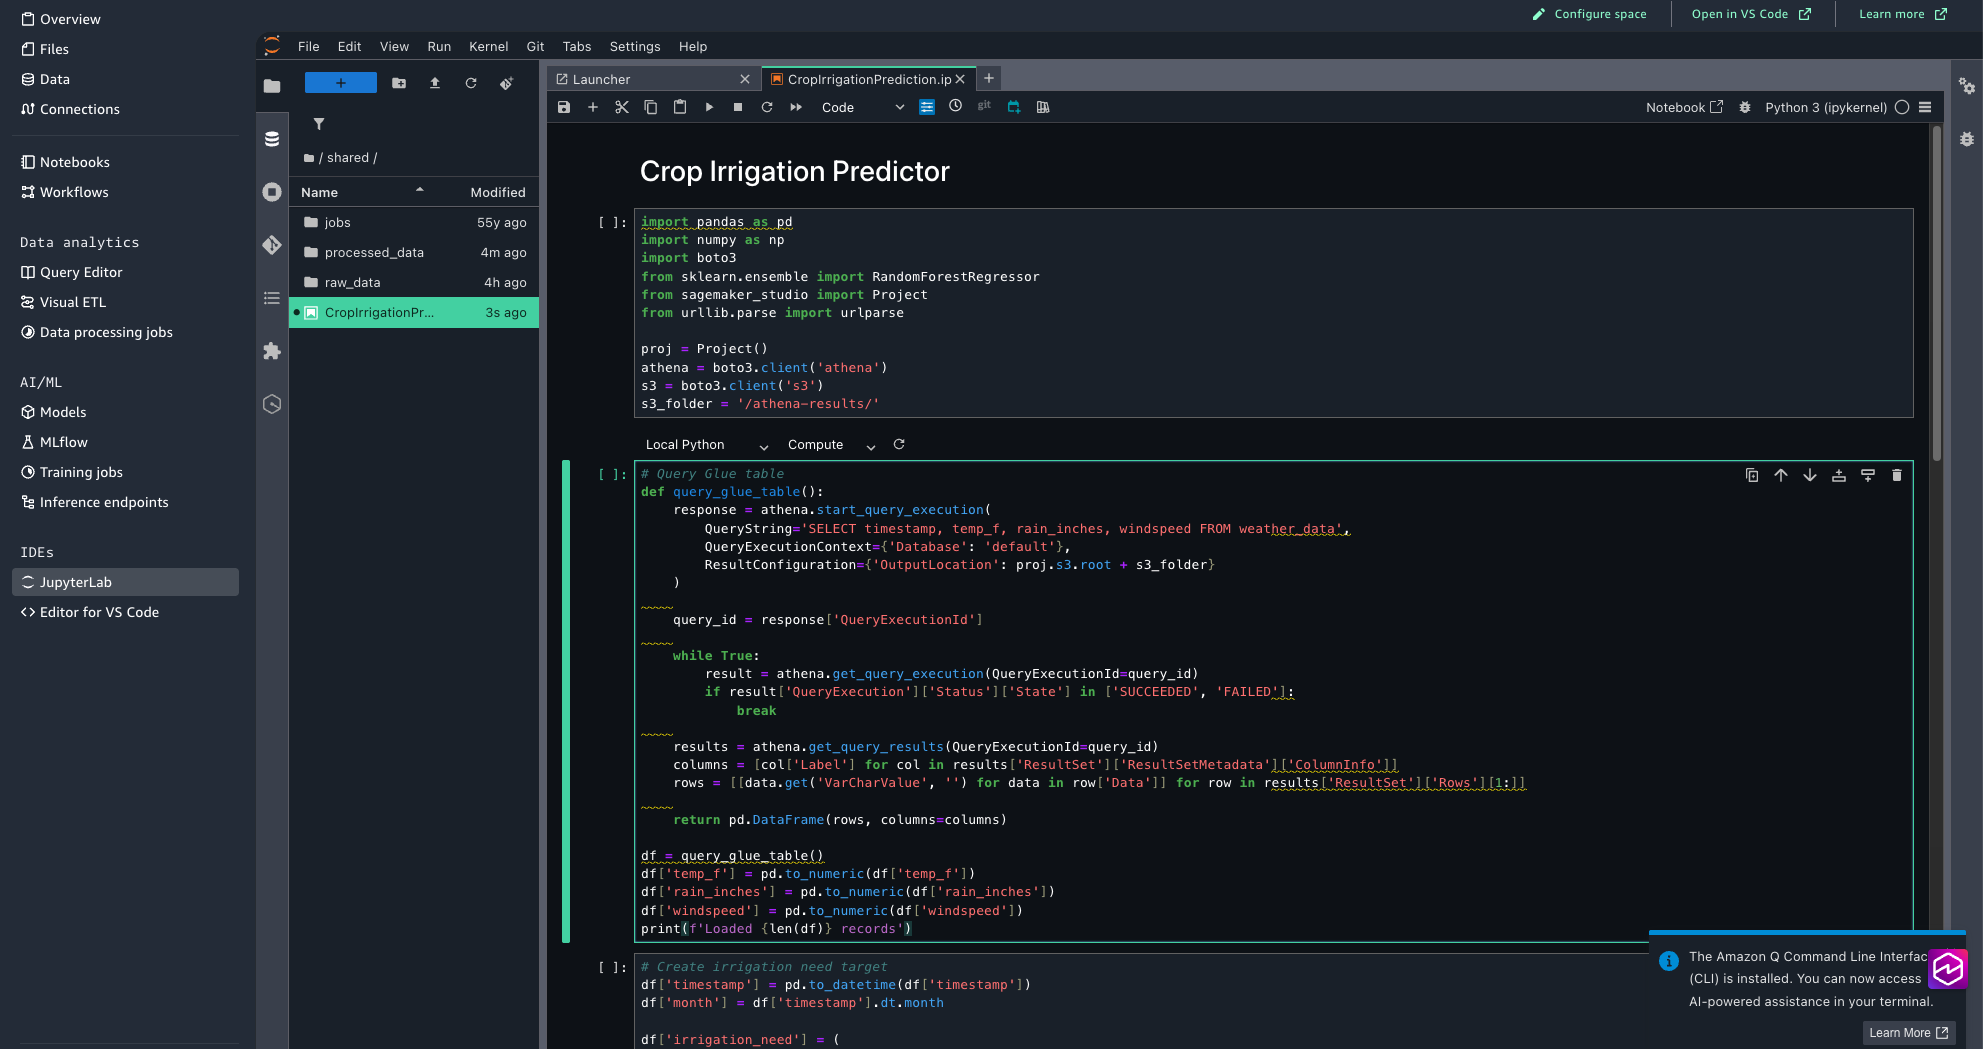
Step 3: Create the evaluation and prediction pocket book utilizing JupyterLab
Now, we’ll arrange the JupyterLab pocket book that performs seasonal irrigation evaluation and crop influence predictions primarily based on temperature, rainfall, and wind velocity patterns.Full the next steps:
- Obtain the Crop Irrigation Prediction Python pocket book to your native atmosphere.
- Within the SageMaker Unified Studio, from the left menu, select JupyterLab. Watch for just a few seconds for JupyterLab to be arrange in case you are making an attempt for the primary time.
- Add CropIrrigationPrediction.ipynb utilizing the add recordsdata possibility.

- Overview the pocket book code to grasp the way it processes the climate knowledge and generates irrigation predictions.
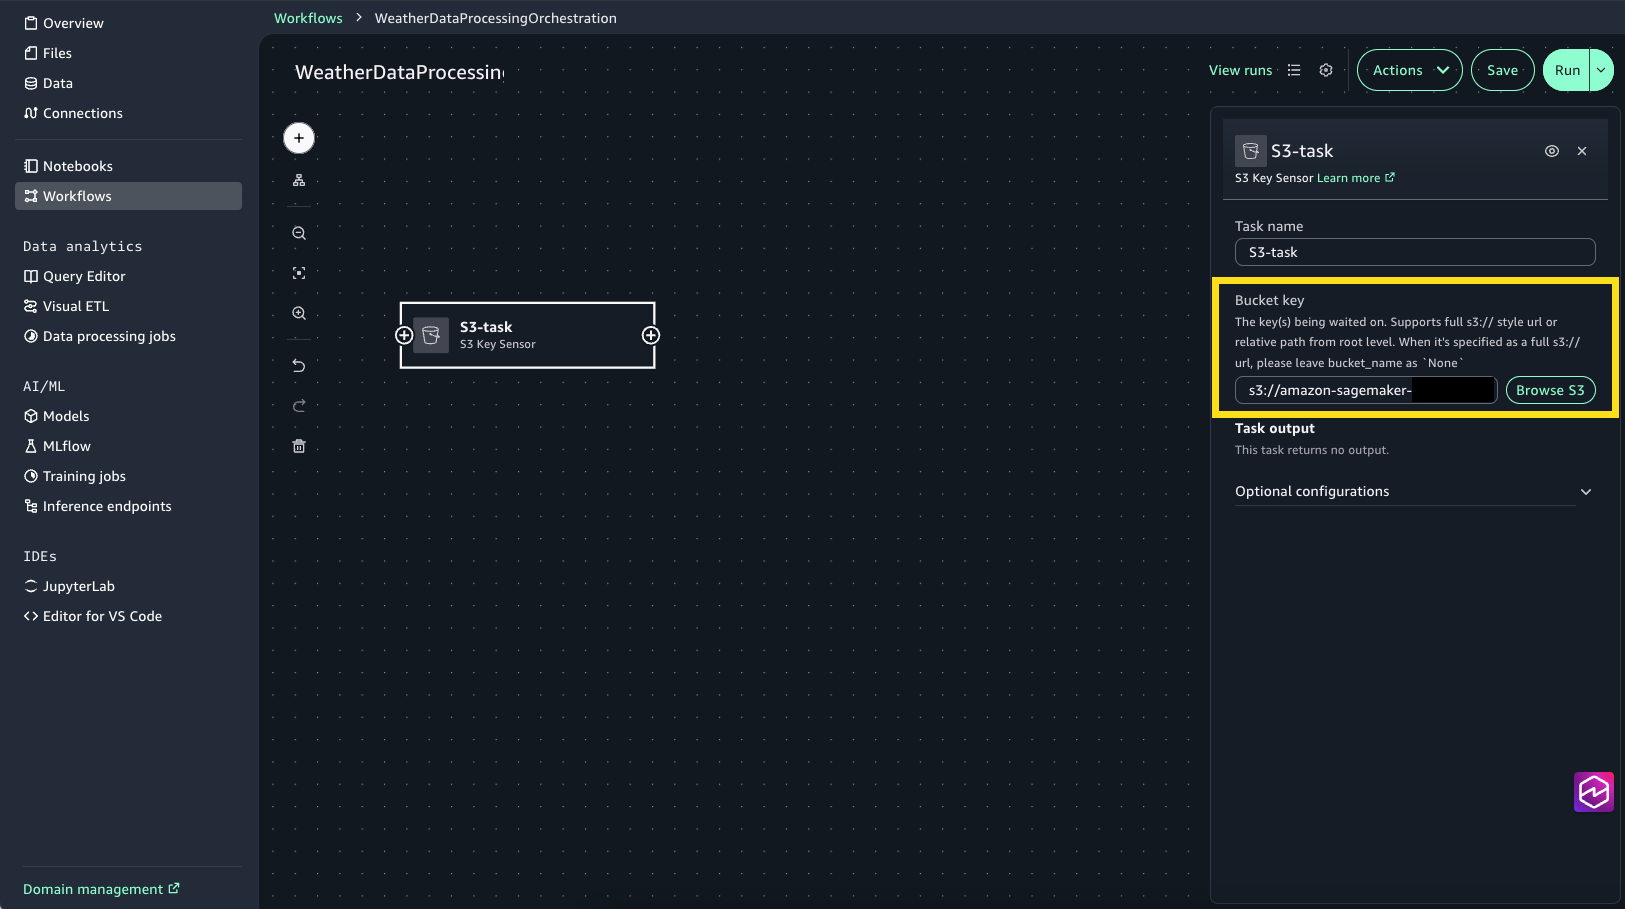
Step 4: Orchestrate the workflow
Lastly, we’ll use the visible workflow to orchestrate duties. With visible workflows, you’ll be able to outline a set of duties organized as a directed acyclic graph (DAG) that may run on a user-defined schedule.
- Select Workflows from the left menu.
- Select Create new Workflow.
- Rename the workflow to WeatherDataProcessingOrchestration.
- Create S3 activity for monitoring and ingesting uncooked climate knowledge:
- Select the + signal, then select S3 Key Sensor.
- Choose S3-task to open the configuration window.
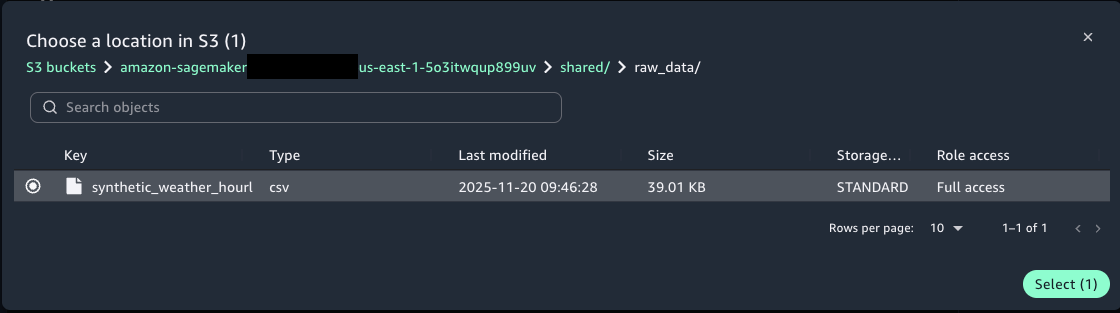
- For Bucket key select Browse S3 and select the synthetic_weather_hourly_data.csv file from the shared/raw_data S3 folder.

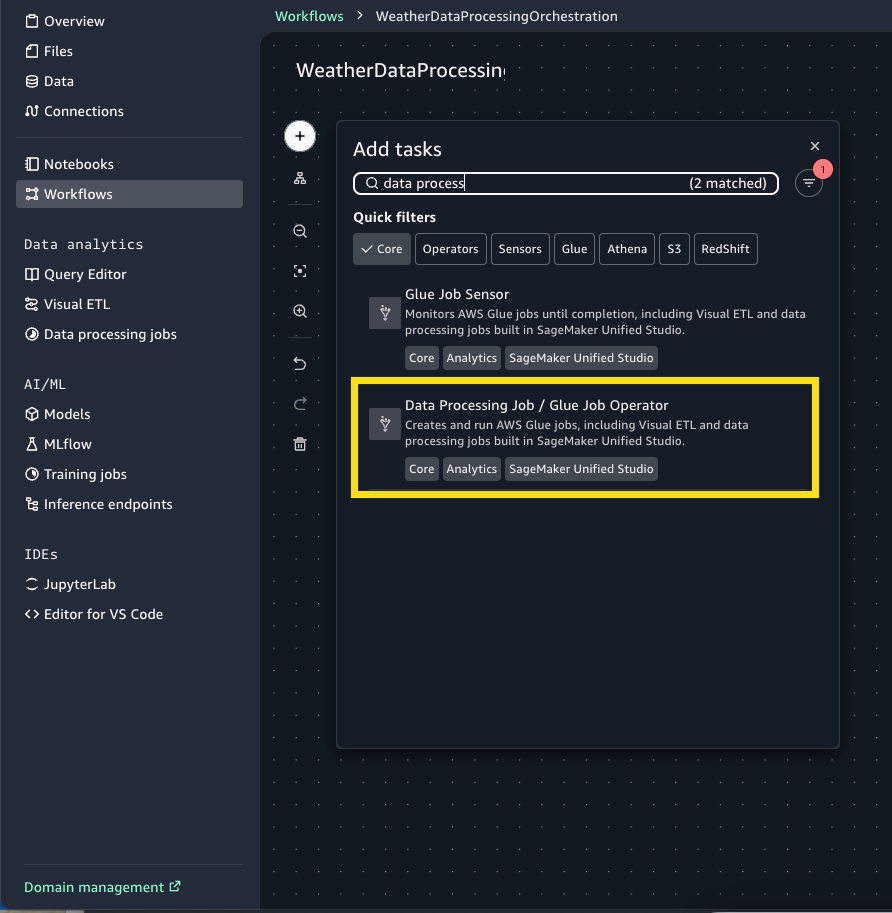
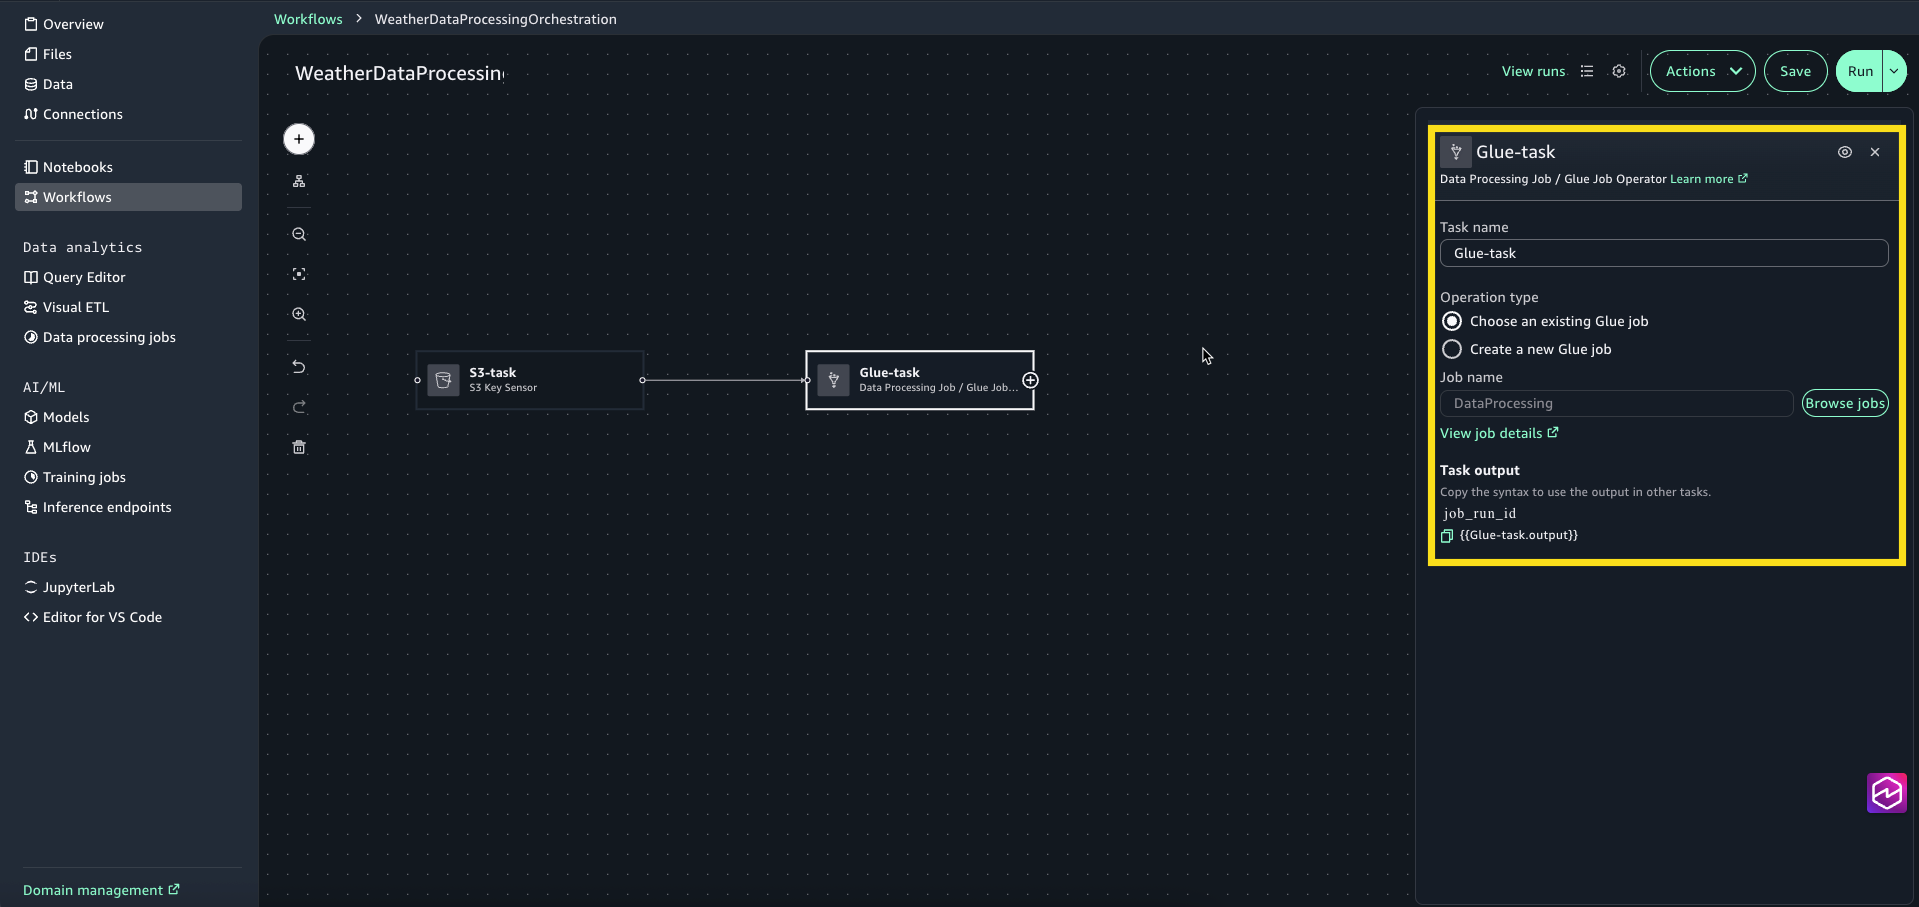
- Create a Glue activity to rework the climate knowledge:
- Select the + Signal and add Knowledge Processing Job / Glue Job Operator.
- Choose Glue-task node to open the configuration window. For Operation sort choose Select an current Glue job.
- For Job identify, select Browse Jobs and choose DataProcessing (that is the visible ETL job we created within the earlier step.
- Select the + signal and add SageMaker Unified Studio Jupyter Pocket book Operator.
- Choose the Pocket book-task to open the configuration window. For Supply, select Browse Information and select CropIrrigationPrediction.ipynb.

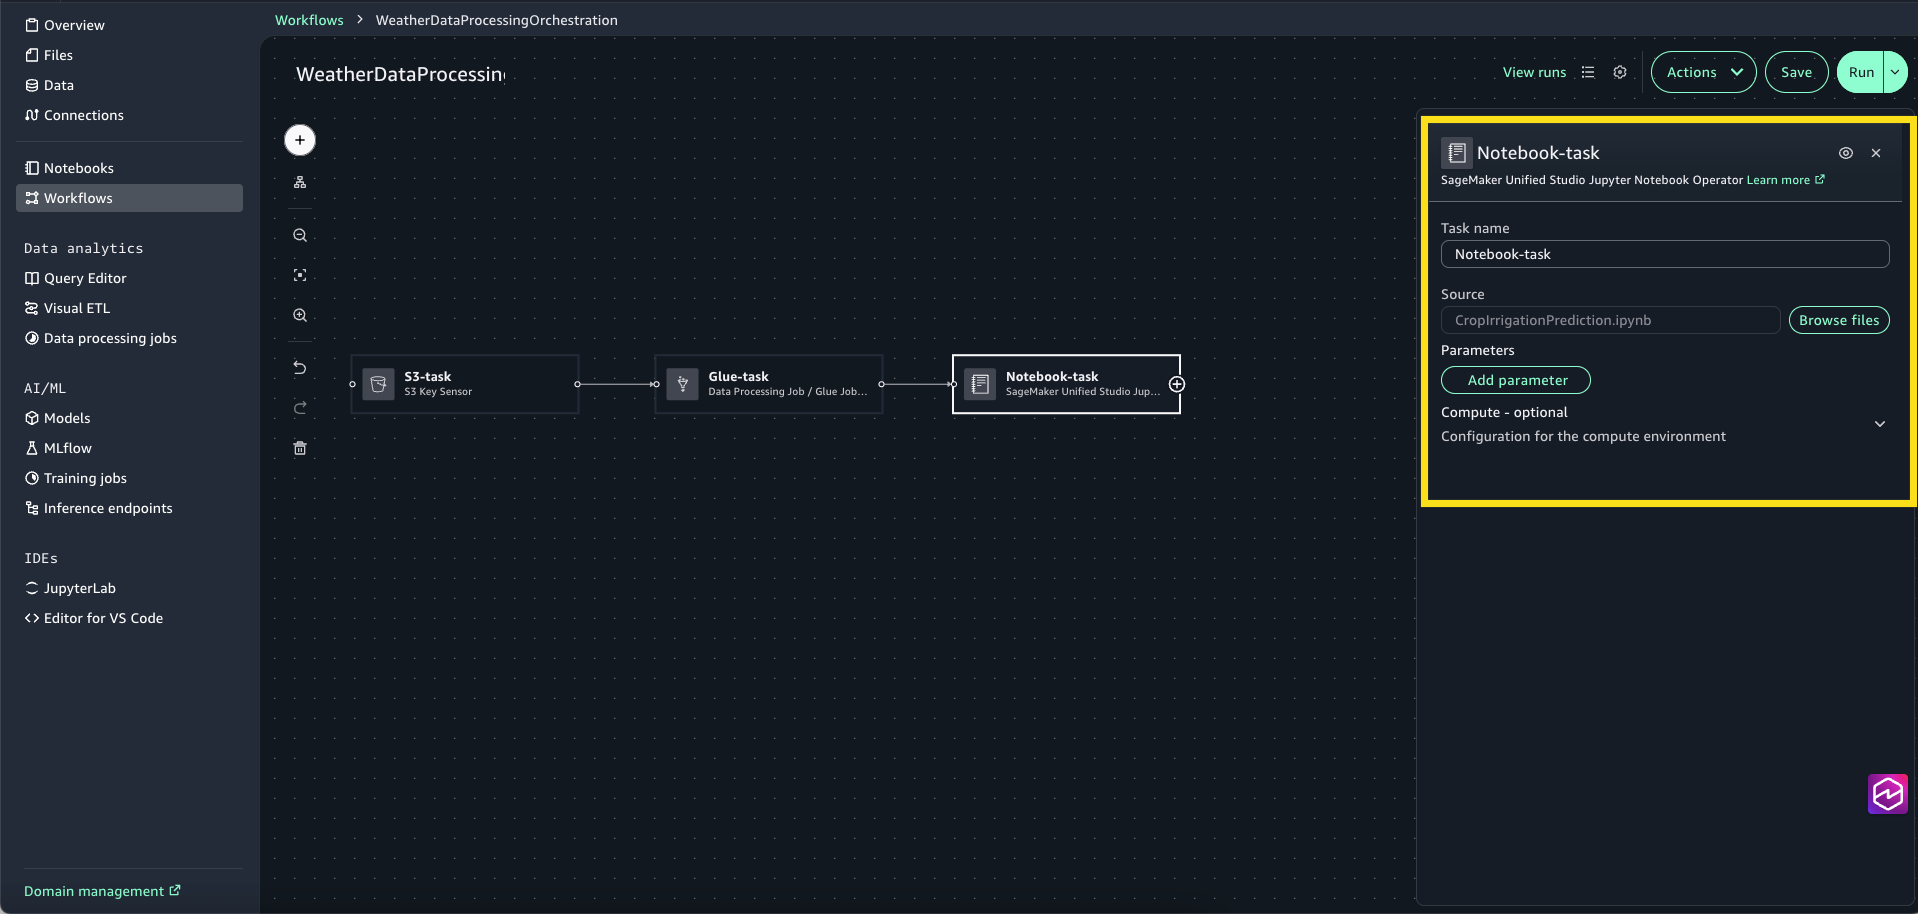
- Join the duties to create the entire workflow.
- Overview the Workflow settings and select Save.
- Present a workflow description, “Workflow for Climate Knowledge Processing”
- For Set off, select Handbook solely, as a result of on this instance you’ll set off the workflow manually. You may as well configure the workflow to set off mechanically on a schedule or disable it from operating

Step 5: Execute and monitor the workflow
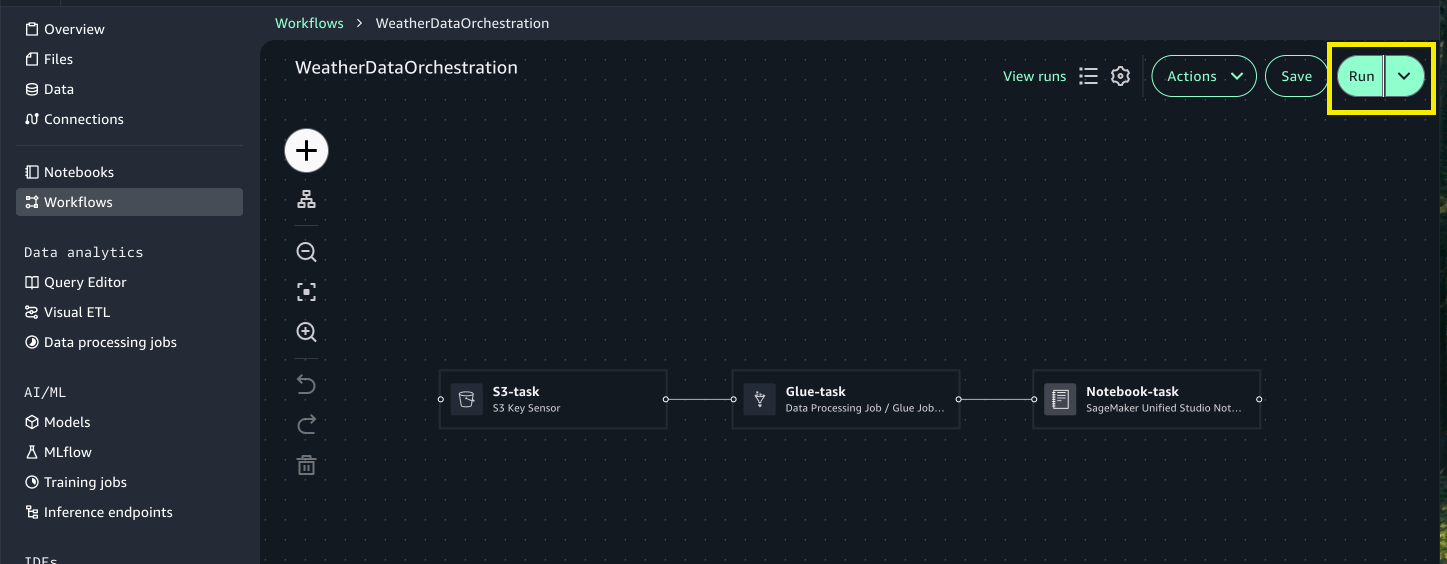
To run your workflow, full the next steps:
- Select Run to set off workflow execution.
- Select View runs to see the operating workflow.

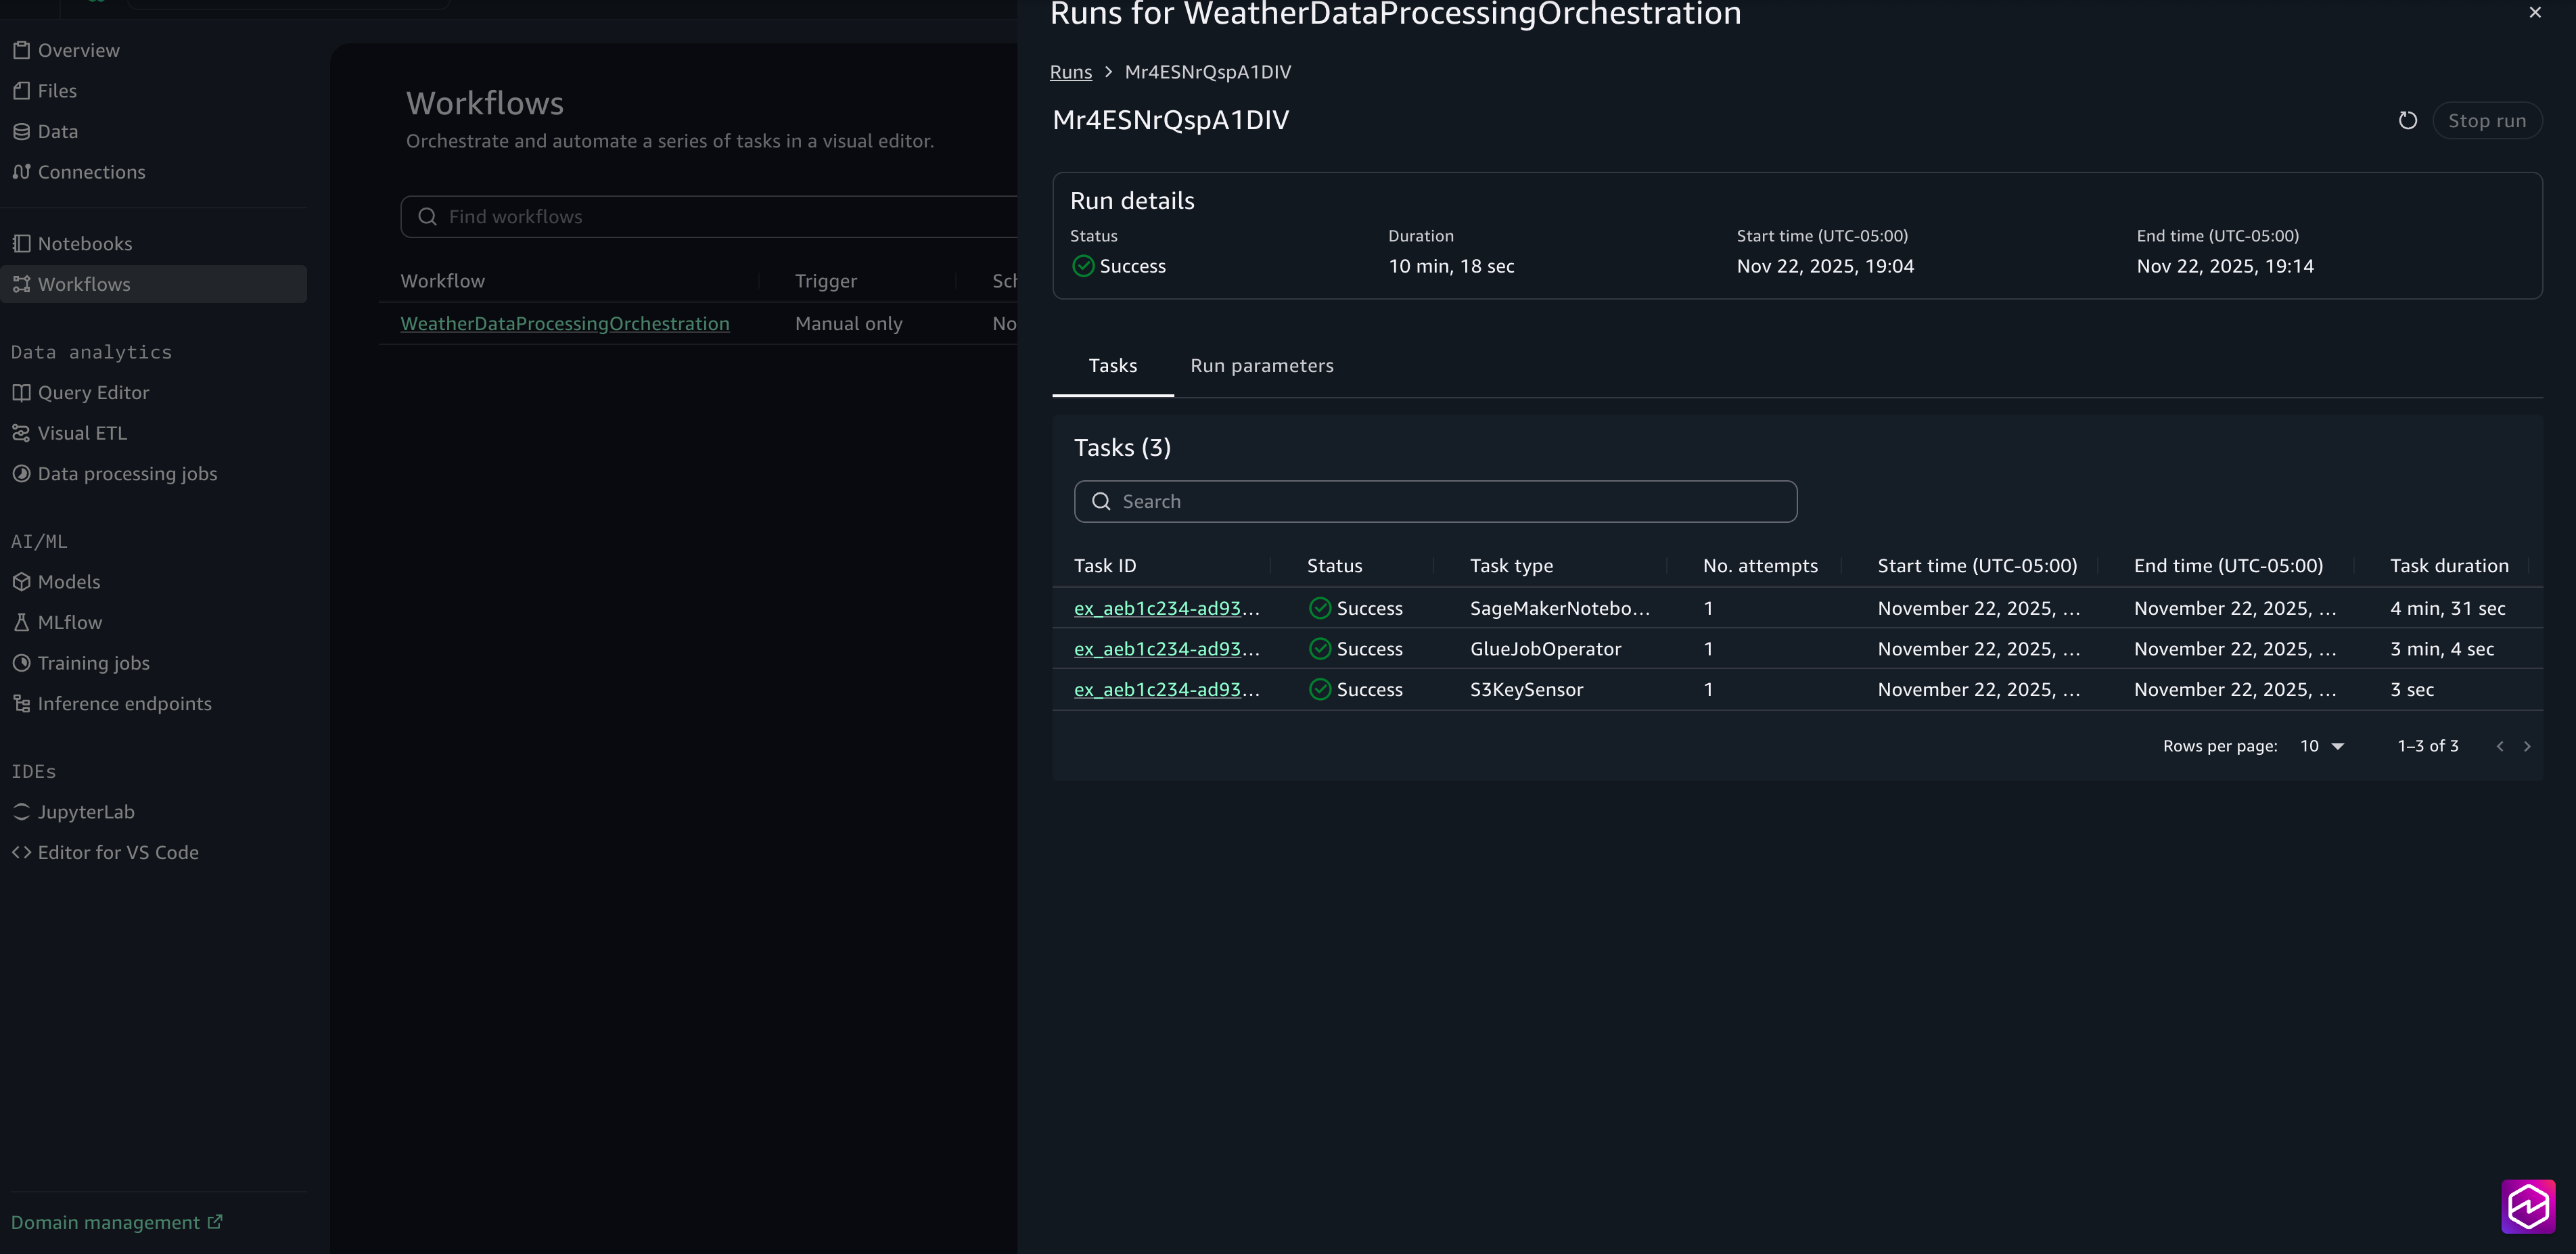
- Select the Run ID for detailed logs on the execution.
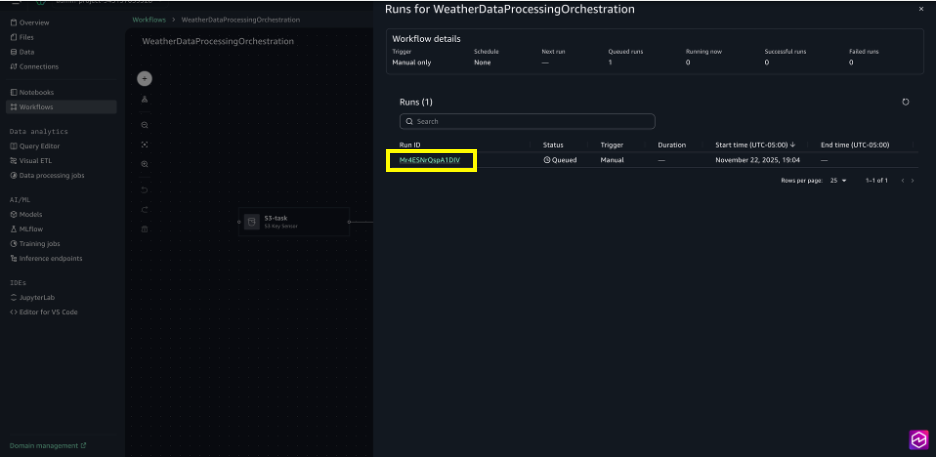
- When the run is full, you’ll be able to evaluate the duty logs by selecting the Activity ID.
The mannequin’s output is written to the S3 processed knowledge output folder. You possibly can evaluate the crop irrigation prediction outcomes to confirm they replicate sensible climate patterns and area situations. If any outcomes seem surprising or unclear, study the upstream transformation steps or modify the pocket book logic to refine the outputs.

Clear up
To keep away from incurring future fees, clear up the sources you created throughout this walkthrough. Leaving these sources operating might lead to ongoing prices for storage and compute.To scrub up your sources:
- On the workflows web page, choose your workflow, and underneath Actions, select Delete workflow.
- In Visible ETL, choose your climate knowledge transformation move, and underneath Actions, select Delete job.
- In Question Editor, use the three dots subsequent to the identify of the desk weather_data and select Drop desk.
- In JupyterLab, within the File Browser sidebar, select (right-click) your pocket book and select Delete.
- In Information, select the folder raw_data and underneath Actions, select Delete. Repeat the steps for the folders processed_data and output.
Conclusion
On this publish, you discovered how you should use the visible workflow expertise in Amazon SageMaker Unified Studio to construct end-to-end knowledge processing pipelines by means of an intuitive, no-code interface. This expertise removes the necessity to write orchestration logic manually whereas nonetheless providing production-grade reliability and scalability powered by Amazon MWAA Serverless. Whether or not you’re processing climate knowledge for agricultural insights or constructing extra complicated machine studying pipelines, the visible workflow expertise accelerates growth and makes workflow automation accessible to knowledge engineers, analysts, and knowledge scientists alike.As organizations more and more depend on automated knowledge pipelines to drive enterprise selections, the visible workflow expertise supplies the proper stability of simplicity and energy. We encourage you to discover this new functionality in Amazon SageMaker Unified Studio and uncover the way it can rework your knowledge processing workflows.
To study extra, go to the Amazon SageMaker Unified Studio web page.
In regards to the authors
