

|
When constructing functions that span a number of cloud suppliers or combine with exterior providers, builders face a persistent problem: managing credentials securely. Conventional approaches require storing long-term credentials like API keys and passwords, creating safety dangers and operational overhead.
As we speak, we’re asserting a brand new functionality referred to as AWS Identification and Entry Administration (IAM) outbound identification federation that clients can use to securely federate their Amazon Net Providers (AWS) identities to exterior providers with out storing long-term credentials. Now you can use short-lived JSON Net Tokens (JWTs) to authenticate your AWS workloads with a variety of third-party suppliers, software-as-a-service (SaaS) platforms and self-hosted functions.
This function allows IAM principals—resembling IAM roles and customers—to acquire cryptographically signed JWTs that assert their AWS identification. Exterior providers, resembling third-party suppliers, SaaS platforms, and on-premises functions, can confirm the token’s authenticity by validating its signature. Upon profitable verification, you may securely entry the exterior service.
The way it works
With IAM outbound identification federation, you trade your AWS IAM credentials for short-lived JWTs. This mitigates the safety dangers related to long-term credentials whereas enabling constant authentication patterns.
Let’s stroll by way of a state of affairs the place your utility working on AWS must work together with an exterior service. To entry the exterior service’s APIs or sources, your utility calls the AWS Safety Token Service (AWS STS) `GetWebIdentityToken` API to acquire a JWT.
The next diagram exhibits this circulate:
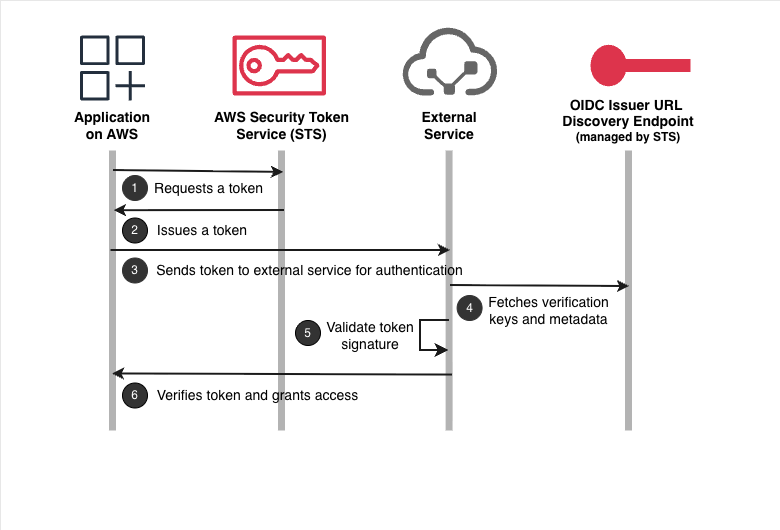
- Your utility working on AWS requests a token from AWS STS by calling the
GetWebIdentityTokenAPI. The applying makes use of its present AWS credentials obtained from the underlying platform (resembling Amazon EC2 occasion profiles, AWS Lambda execution roles, or different AWS compute providers) to authenticate this API name. - AWS STS returns a cryptographically signed JSON Net Token (JWT) that asserts the identification of your utility.
- Your utility sends the JWT to the exterior service for authentication.
- The exterior service fetches the verification keys from the JSON Net Key Set (JWKS) endpoint to confirm the token’s authenticity.
- The exterior service validates the JWT’s signature utilizing these verification keys and confirms the token is genuine and was issued by AWS.
- After profitable verification, the exterior service exchanges the JWT for its personal credentials. Your utility can then use these credentials to carry out its supposed operations.
Organising AWS IAM outbound identification federation
To start utilizing this function, I have to allow outbound identification federation for my AWS account. I navigate to IAM and select Account settings below Entry administration within the left-hand navigation pane.
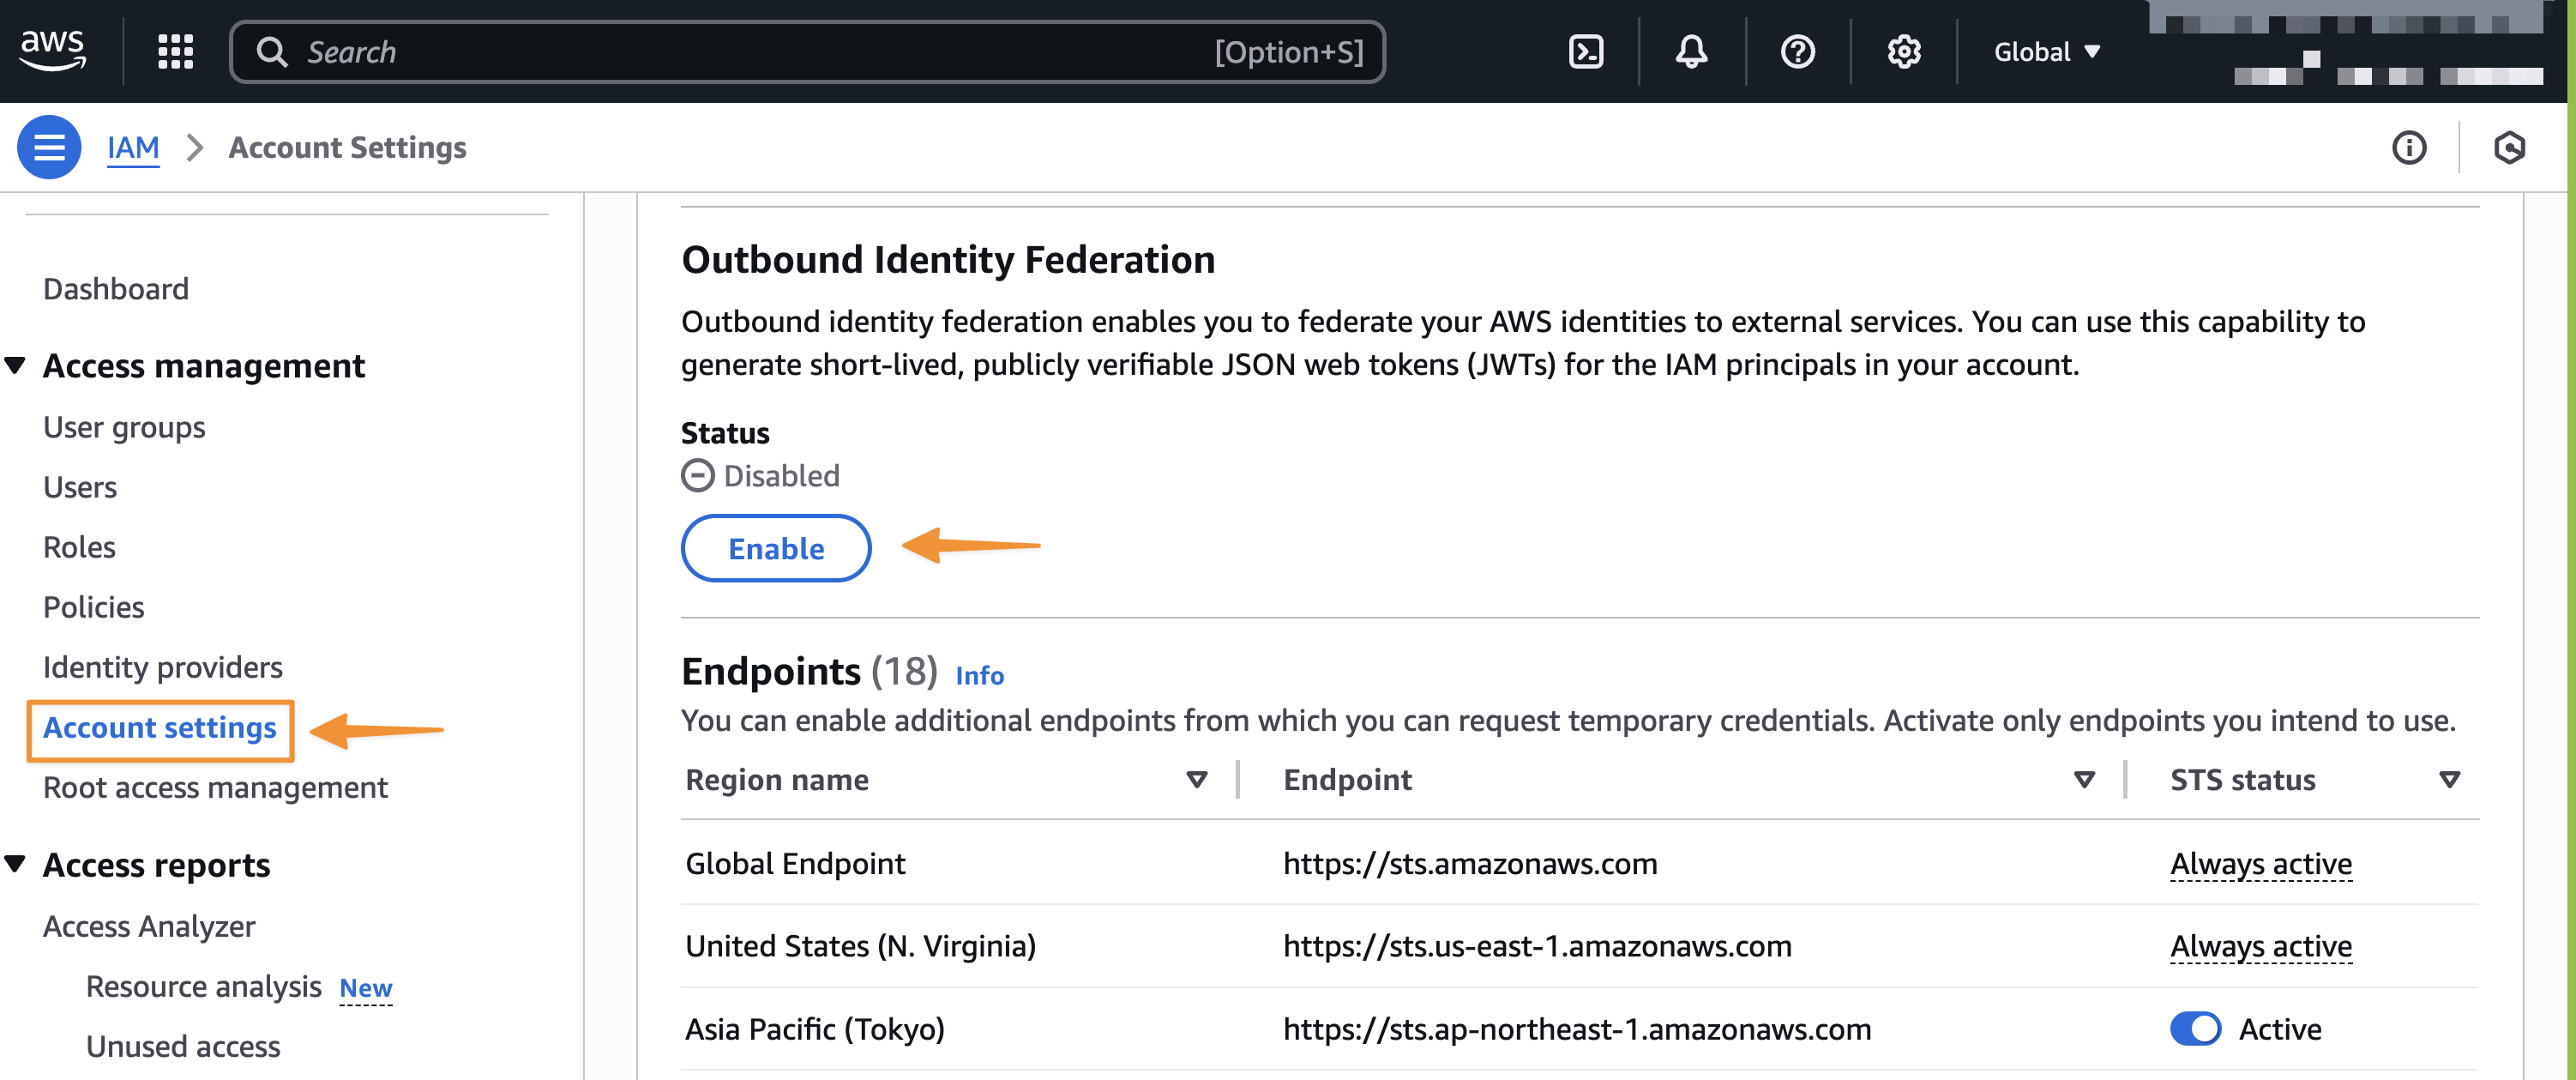
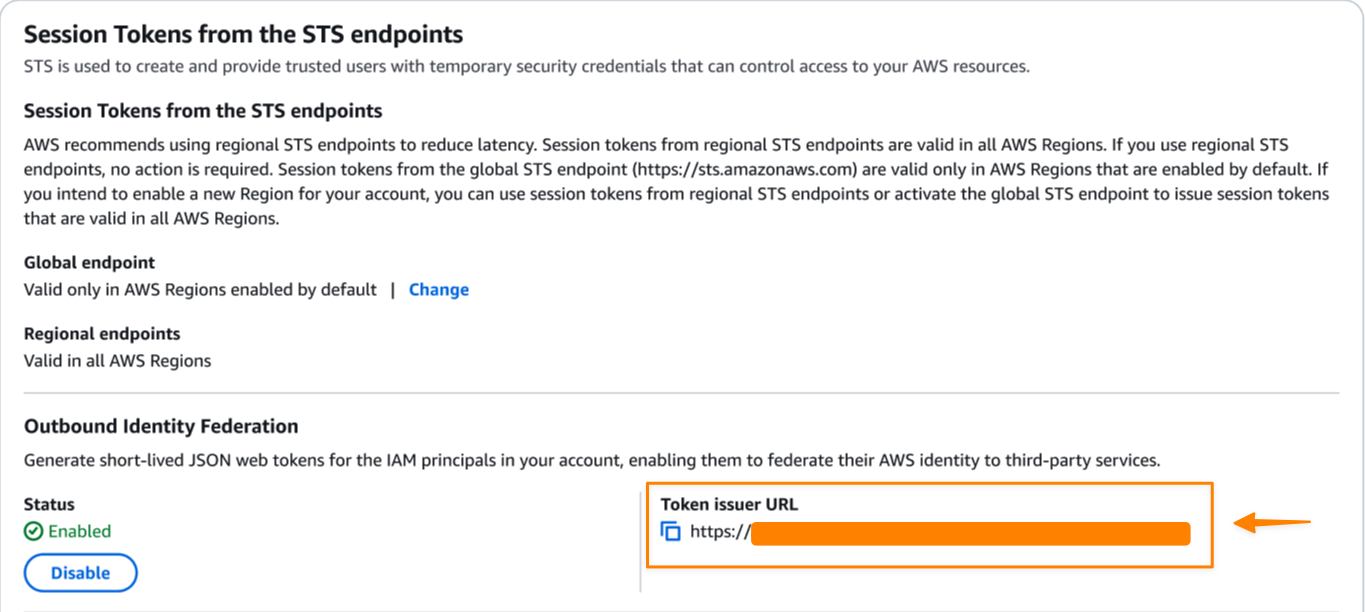
After I allow the function, AWS generates a singular issuer URL for my AWS account that hosts the OpenID Join (OIDC) discovery endpoints at /.well-known/openid-configuration and /.well-known/jwks.json. The OpenID Join (OIDC) discovery endpoints include the keys and metadata essential for token verification.
Subsequent, I have to configure IAM permissions. My IAM principal (function or person) should have the sts:GetWebIdentityToken permission to request tokens.
For instance, the next identification coverage specifies entry to the STS GetWebIdentityToken API, enabling the IAM principal to generate tokens.
{
  "Model": "2012-10-17",
  "Assertion": [
    {
      "Effect": "Allow",
      "Action": "sts:GetWebIdentityToken",
      "Resource": "*",
    }
  ]
}
At this stage, I have to configure the exterior service to belief and settle for tokens issued by my AWS account. The precise steps fluctuate by service, however typically contain:
- Registering my AWS account issuer URL as a trusted identification supplier
- Configuring which claims to validate (viewers, topic patterns)
- Mapping token claims to permissions within the exterior service
Let’s get began
Now, let me stroll you thru an instance displaying each the client-side token technology and server-side verification course of.
First, I name the STS GetWebIdentityToken API to acquire a JWT that asserts my AWS identification. When calling the API, I can specify the supposed viewers, signing algorithm, and token lifetime as request parameters.
Viewers: Populates the `aud` declare within the JWT, figuring out the supposed recipient of the token (for instance, “my-app”)DurationSeconds: The token lifetime in seconds, starting from 60 seconds (1 minute) to 3600 seconds (1 hour), with a default of 600 seconds (5 minutes)SigningAlgorithm: Select both ES384 (ECDSA utilizing P-384 and SHA-384) or RS256 (RSA utilizing SHA-256)Tags(optionally available): An array of key-value pairs that seem as customized claims within the token, which you should use to incorporate extra context that permits exterior providers to implement fine-grained entry management
Right here’s an instance of getting an identification token utilizing the AWS SDK for Python (Boto3). I also can do that utilizing AWS Command Line Interface (AWS CLI).
import boto3

sts_client = boto3.shopper('sts')
response = sts_client.get_web_identity_token(
    Viewers=['my-app'],
    SigningAlgorithm='ES384',  # or 'RS256'
    DurationSeconds=300
)
jwt_token = response['IdentityToken']
print(jwt_token)
This returns a signed JWT that I can examine utilizing any JWT parser.
{
eyJraWQiOiJFQzM4NF8wIiwidHlwIjoiSldUIiwiYWxnIjoiRVMzODQifQ.hey...
I can decode the token utilizing any JWT parser like this JWT Debugger. The token header exhibits it’s signed with ES384 (ECDSA).
{
  "child": "EC384_0",
  "typ": "JWT",
  "alg": "ES384"
}
Additionally, the payload incorporates commonplace OIDC claims plus AWS particular metadata. The usual OIDC claims embody topic (“sub”), viewers (“aud”), issuer (“iss”), and others.
{
  "aud": "my-app",
  "sub": "arn:aws:iam::ACCOUNT_ID:function/MyAppRole",
  "https://sts.amazonaws.com/": {
    "aws_account": "ACCOUNT_ID",
    "source_region": "us-east-1",
    "principal_id": "arn:aws:iam::ACCOUNT_ID:function/MyAppRole"
  },
  "iss": "https://abc12345-def4-5678-90ab-cdef12345678.tokens.sts.international.api.aws",
  "exp": 1759786941,
  "iat": 1759786041,
  "jti": "5488e298-0a47-4c5b-80d7-6b4ab8a4cede"
}
AWS STS additionally enriches the token with identity-specific claims (resembling account ID, group ID, and principal tags) and session context. These claims present details about the compute atmosphere and session the place the token request originated. AWS STS mechanically contains these claims when relevant based mostly on the requesting principal’s session context. You too can add customized claims to the token by passing request tags to the API name. To study extra about claims supplied within the JWT, go to the documentation web page.
Notice the iss (issuer) declare. That is your account-specific issuer URL that exterior providers use to confirm that the token originated from a trusted AWS account. Exterior providers can confirm the JWT by validating its signature utilizing AWS’s verification keys accessible at a public JSON Net Key Set (JWKS) endpoint hosted on the /.well-known/jwks.json endpoint of the issuer URL.
Now, let’s take a look at how exterior providers deal with this identification token.
Right here’s a snippet of Python instance that exterior providers can use to confirm AWS tokens:
import json
import jwt
import requests
from jwt import PyJWKClient

# Trusted issuers record - obtained from EnableOutboundFederation API response
TRUSTED_ISSUERS = [
    "https://EXAMPLE.tokens.sts.global.api.aws",
    # Add your trusted AWS account issuer URLs here
    # Obtained from EnableOutboundFederation API response
]

def verify_aws_jwt(token, expected_audience=None):
    """Confirm an AWS IAM outbound identification federation JWT"""
    attempt:
        # Get issuer from token
        unverified_payload = jwt.decode(token, choices={"verify_signature": False})
        issuer = unverified_payload.get('iss')

 	# Confirm issuer is trusted
        if not TRUSTED_ISSUERS or issuer not in TRUSTED_ISSUERS:
            increase ValueError(f"Untrusted issuer: {issuer}")

        # Fetch JWKS from AWS utilizing PyJWKClient
        jwks_client = PyJWKClient(f"{issuer}/.well-known/jwks.json")
        signing_key = jwks_client.get_signing_key_from_jwt(token)

        # Confirm token signature and claims
        decoded_token = jwt.decode(
            token,
            signing_key.key,
            algorithms=["ES384", "RS256"],
            viewers=expected_audience,
            issuer=issuer
        )
        return decoded_token
    besides Exception as e:
        print(f"Token verification failed: {e}")
        return None
Utilizing IAM insurance policies to manage entry to token technology
An IAM principal (resembling a task or person) should have the sts:GetWebIdentityToken permission of their IAM insurance policies to request tokens for authentication with exterior providers. AWS account directors can configure this permission in all related AWS coverage sorts resembling identification insurance policies, service management insurance policies (SCPs), useful resource management insurance policies (RCPs), and digital non-public cloud endpoint (VPCE) insurance policies to manage which IAM principals of their account can generate tokens.
Moreover, directors can use the brand new situation keys to specify signing algorithms (sts:SigningAlgorithm), permitted token audiences (sts:IdentityTokenAudience), and most token lifetimes (sts:DurationSeconds). To study extra concerning the situation keys, go to IAM and STS Situation keys documentation web page.
Extra issues to know
Listed here are key particulars about this launch:
Get began with AWS IAM outbound identification federation by visiting AWS IAM console and enabling the function in your AWS account. For extra data, go to Federating AWS Identities to Exterior Providers documentation web page.
Completely satisfied constructing!
— Donnie
