
- Launch the Visible Studio 2022 IDE.
- Click on on “Create new mission.”
- Within the “Create new mission” window, choose “ASP.NET Core Internet API” from the record of templates displayed.
- Click on Subsequent.
- Within the “Configure your new mission” window, specify the title and placement for the brand new mission. Optionally verify the “Place resolution and mission in the identical listing” verify field, relying in your preferences.
- Click on Subsequent.
- Within the “Further Info” window proven subsequent, choose “.NET 9.0 (Normal Time period Help)” because the framework model and uncheck the verify field that claims “Use controllers,” as we’ll be utilizing minimal APIs on this mission.
- Elsewhere within the “Further Info” window, depart the “Authentication Kind” set to “None” (the default) and ensure the verify containers “Allow Open API Help,” “Configure for HTTPS,” and “Allow Docker” stay unchecked. We gained’t be utilizing any of these options right here.
- Click on Create.
We’ll use this ASP.NET Core Internet API mission to work with the code examples given within the sections beneath.
IFormFile and IFormFileCollection in ASP.NET Core
Within the latest variations of ASP.NET Core, minimal APIs present assist for importing information utilizing the IFormFile and IFormFileCollection interfaces. Whereas IFormFile is used to add a single file, IFormFileCollection is used to add a number of information. The next code snippet illustrates how one can add a single file utilizing IFormFile in your minimal API software.
app.MapPost("/add", async (IFormFile file) =>
{
    var tempFile = Path.GetTempFileName();
    utilizing var fileStream = File.OpenWrite(tempFile);
    await file.CopyToAsync(fileStream);
});
Word that the File.OpenWrite technique accepts the trail to a file in your file system as a parameter and returns a FileStream occasion. As its title signifies, a FileStream object offers a Stream for a file, that means a sequence of bytes.
Equally, the next piece of code reveals how one can add a number of information utilizing the IFormFileCollection interface.
app.MapPost("/upload_multiple_files", async (IFormFileCollection information) =>
{
    foreach (var file in information)
    {
        var tempFile = Path.GetTempFileName();
        utilizing var fileStream = File.OpenWrite(tempFile);
        await file.CopyToAsync(fileStream);
    }
});
Typically we are going to need to do extra with a file than merely add it. If we need to parse or manipulate the contents of a file [OK?], we will make the most of the StreamReader class. StreamReader is a high-level class, constructed on prime of FileStream, that enables us to learn the characters from a byte stream. StreamReader can even deal with character encoding (UTF-8, ASCII, and so forth.) if wanted.
Let’s say you have got a file that incorporates writer information that you simply need to insert right into a database desk. Assuming every line of textual content within the file represents a distinct writer report, you could possibly embrace the next code in your Program.cs file to add the contents of the file, line by line, to a minimal API endpoint.
app.MapPost("/writer/add", (IFormFile file,
    [FromServices] IAuthorRepository authorRepository) =>
{
    utilizing var streamReader = new StreamReader(file.OpenReadStream());
    whereas (streamReader.Peek() >= 0)
        authorRepository.Create(streamReader.ReadLine() ?? string.Empty);
});
You would possibly use the previous code snippet to learn a set of writer information represented as JSON, for instance, after which insert these information in a database desk. Word that I’ve omitted the supply code of the IAuthorRepository interface and its carried out lessons right here for brevity.
Avoiding anti-forgery errors when importing information
When importing information in ASP.NET Core, you could typically encounter anti-forgery errors. ASP.NET Core points these errors to warn of cross-site request forgery assaults.
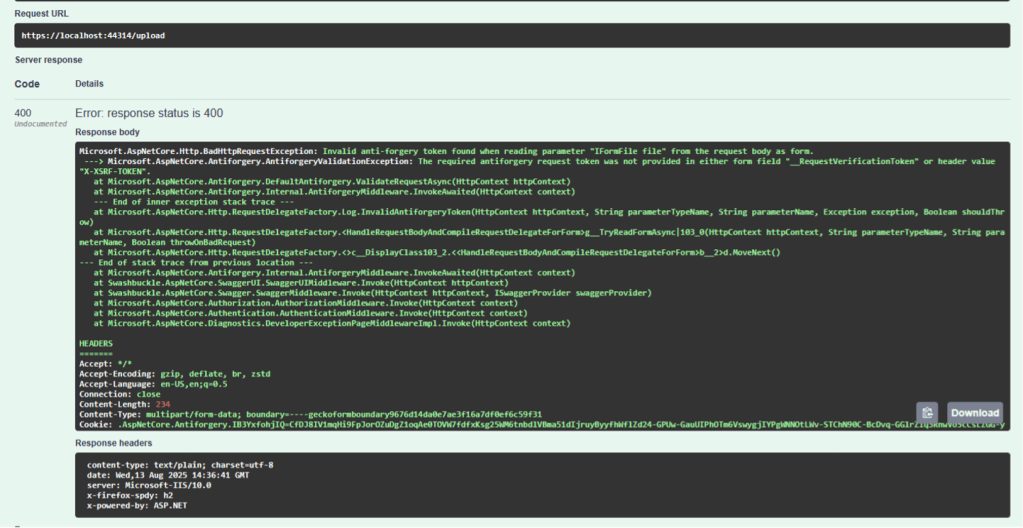
Determine 1: ASP.NET Core might generate an anti-forgery error when importing a file.
Foundry
In case your endpoint is secure and it doesn’t require anti-forgery safety, you may disable anti-forgery validation for the endpoint by utilizing the DisableAntiforgery technique, as proven within the following code.
