
I’ve been flying the Flywoo Explorer LR4 for five years, and it stays one among my favourite drones to take when touring. It’s light-weight and provides distinctive flight time—excellent for long-range exploration and capturing cinematic footage. So once I heard Flywoo had launched a brand new model that includes the DJI O4 Professional, I knew I had to purchase one and take a look at it out. On this evaluation, I’ll share my ideas on the up to date Explorer LR4, its execs and cons, and how one can optimize its flight efficiency and reliability.


Study extra about long-range FPV flying on this information: https://oscarliang.com/long-range-fpv-flying-mini-quad/
Just a few years in the past I travelled overseas with the Explorer carrying the Vista + Bare GoPro 6 on this compact setup.

And it was capable of produce this stage of footage, very spectacular efficiency. The O4 Professional is barely going to get even higher!
The place to Purchase
You should purchase the Explorer LR4 O4 Professional Version from these distributors:
Be aware: You should purchase the Explorer LR4 with or with out the DJI O4 Professional Air Unit. Nonetheless, the model that features the O4 Professional is $270 extra—whereas the O4 Professional alone prices solely $220. That’s a $50 markup! Should you’re comfy putting in the Air Unit your self, it’s less expensive to purchase the drone with out it and set up the O4 Professional individually. I’ll stroll you thru the set up course of later on this evaluation.
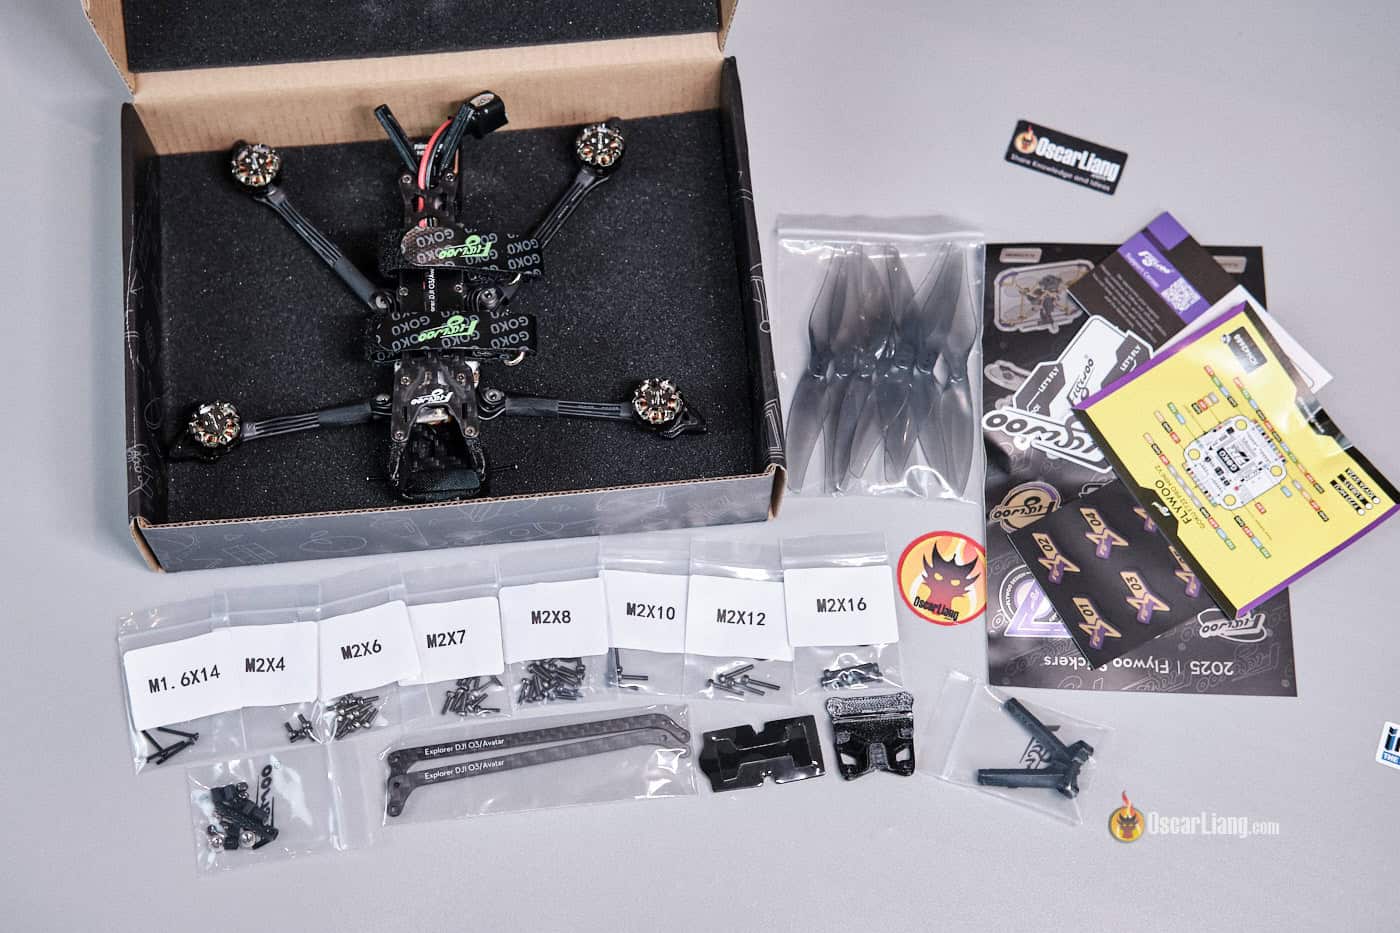
Equipment embrace:
- 8 × Gemfan 4024-2 Black Props
- 2 × Battery Straps (15x180mm)
- Screws
- Extra 3D printed mounts
Specs
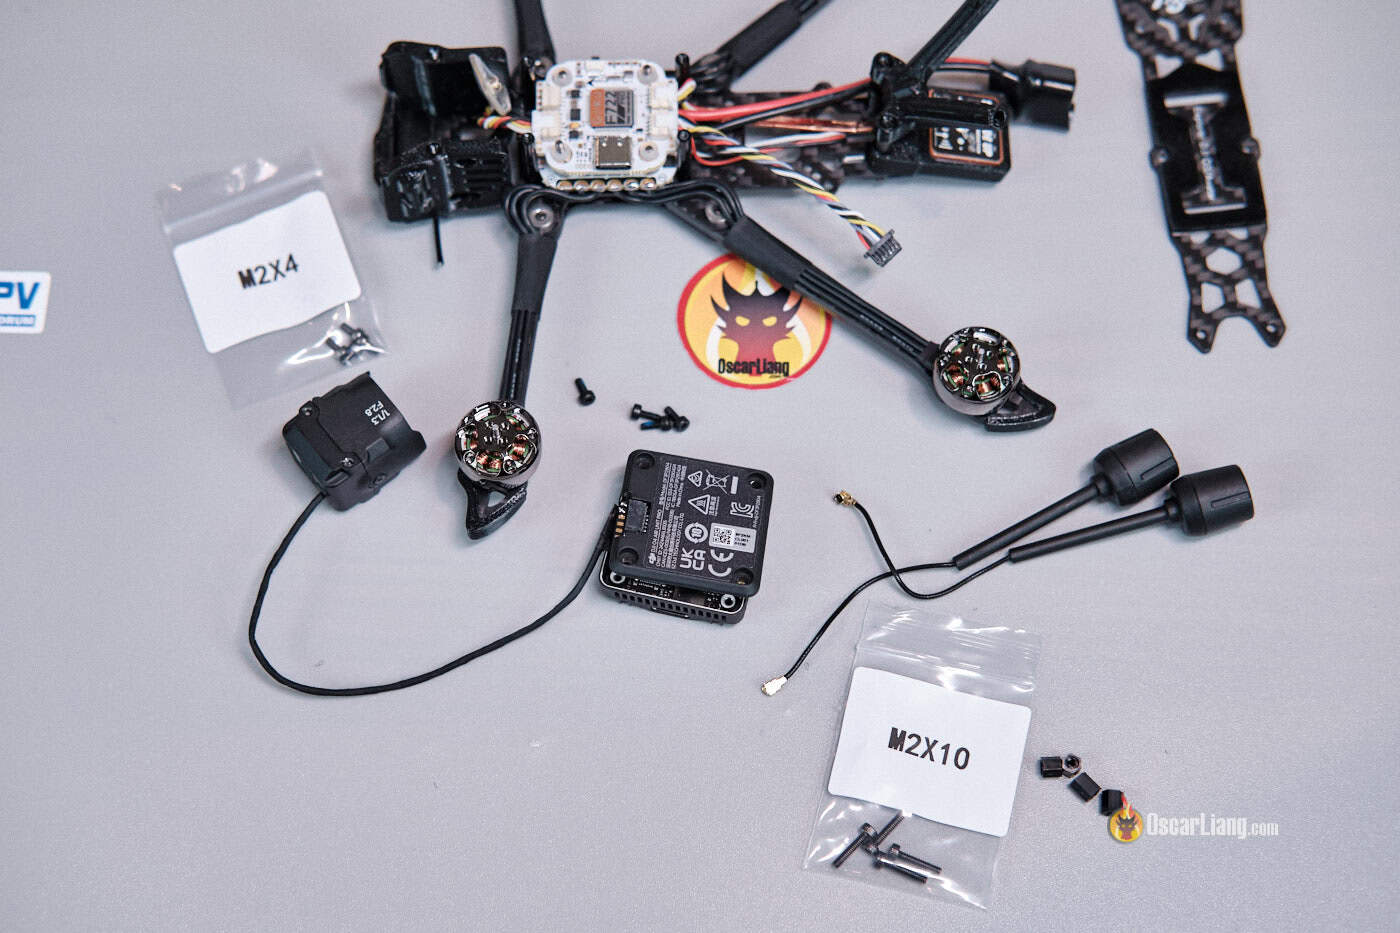
- Body: Flywoo Explorer LR4 O4 PRO Body Package
- Flight Controller: Goku F722 Mini
- ESC: Flywoo 45A 32bit 4-in-1 ESC
- FPV System: DJI O4 Professional Air Unit
- Receiver: ExpressLRS
- Propellers: Gemfan 4024×2 Bi-blade
- Motors: Flywoo Nin V2 1404 2750KV
- GPS: GOKU GM10 Mini V3
- Battery Connector: XT30
- Weight:
- 171g (with out battery)
- 239g with a 4S 720mAh LiHV (sub-250g)
- 266g with a BetaFPV Lava 4S 850mAh LiPo

Construct High quality & Design
Virtually the Similar because the Unique Design
Flywoo hasn’t modified a lot in regards to the Explorer’s design for the reason that unique model from 5 years in the past. The principle replace is a modification to the body to accommodate the DJI O4 Professional Air Unit.
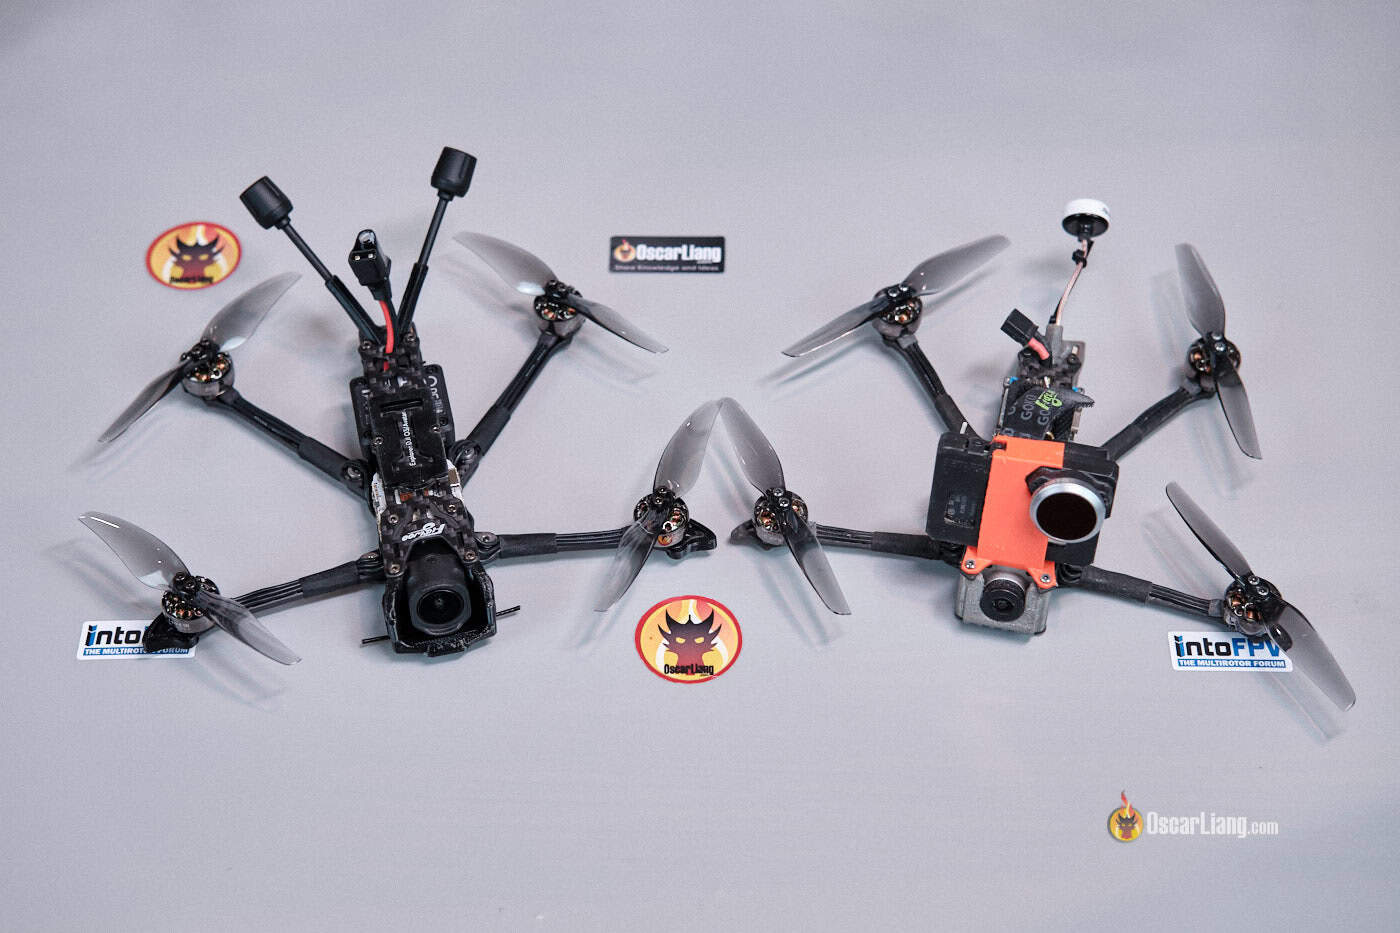
Left: Explorer O4 Professional; Proper: Unique Explorer with Caddx Vista
For these unfamiliar with the Explorer, it makes use of a deadcat structure, which helps preserve the props out of the digicam’s view. The arms are extraordinarily skinny—this drone isn’t constructed for crashing, however quite for staying gentle to maximise effectivity and flight time.
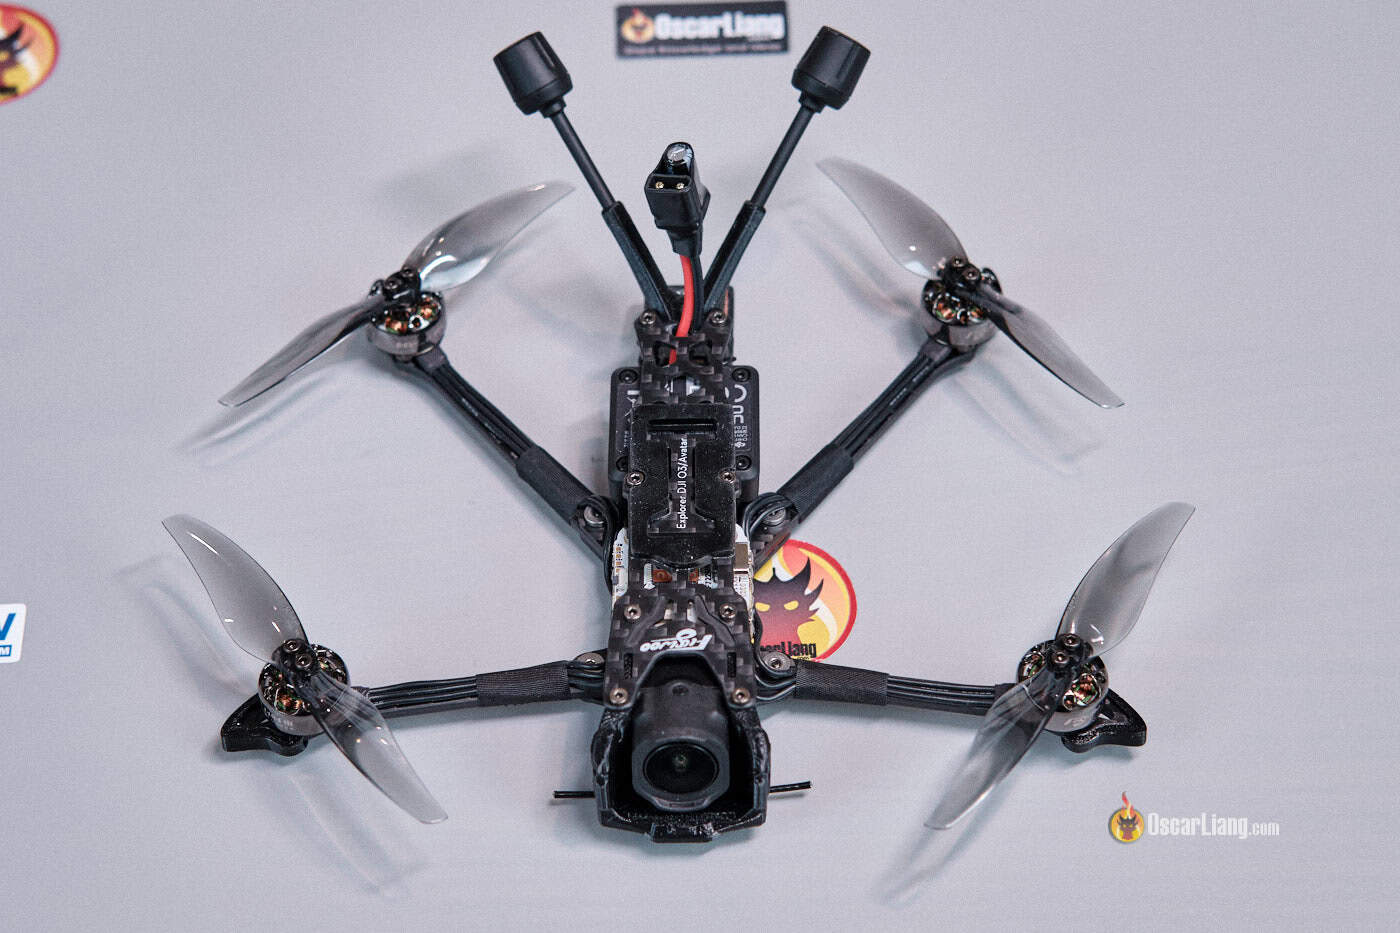
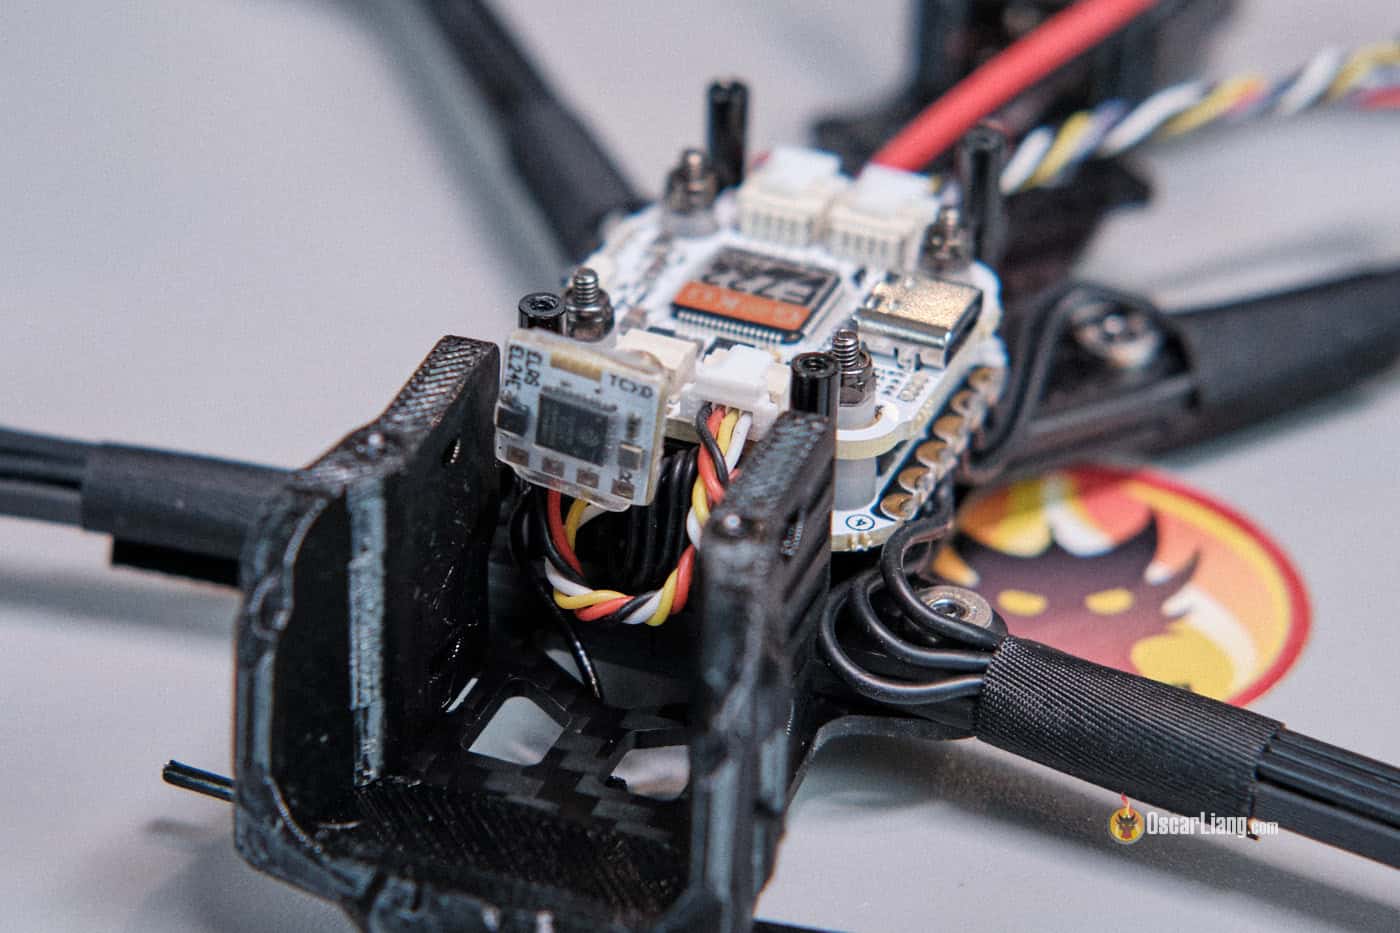
The soldering high quality appears to be like nice. The motor wires are soldered vertically, preserving the profile low and lowering the chance of wire injury. Antennas are mounted in a V-shape at 90°, which is perfect for sign reception—good consideration to element from Flywoo.
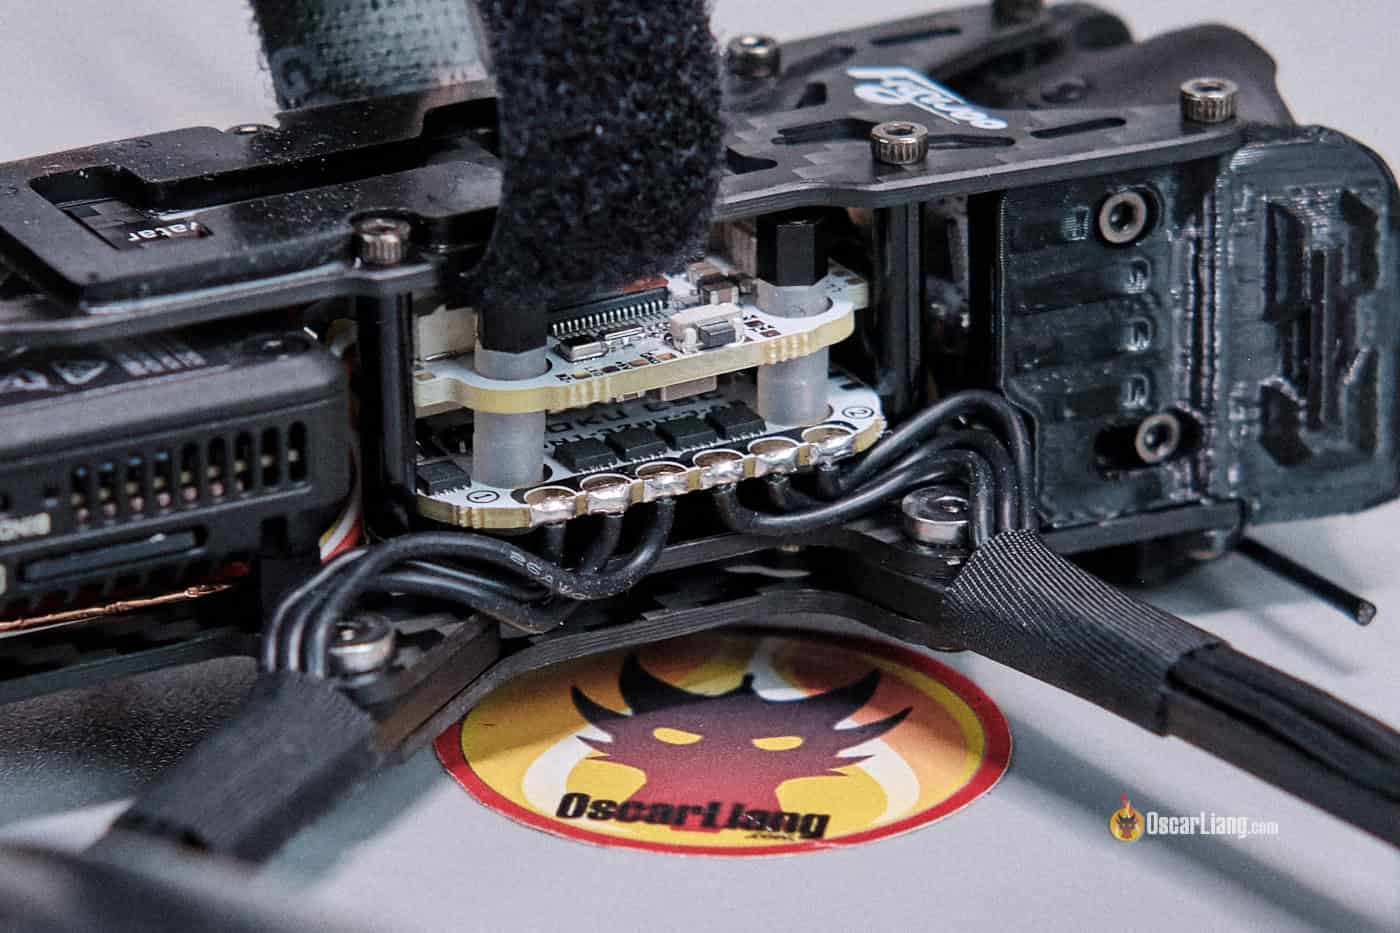
Electronics
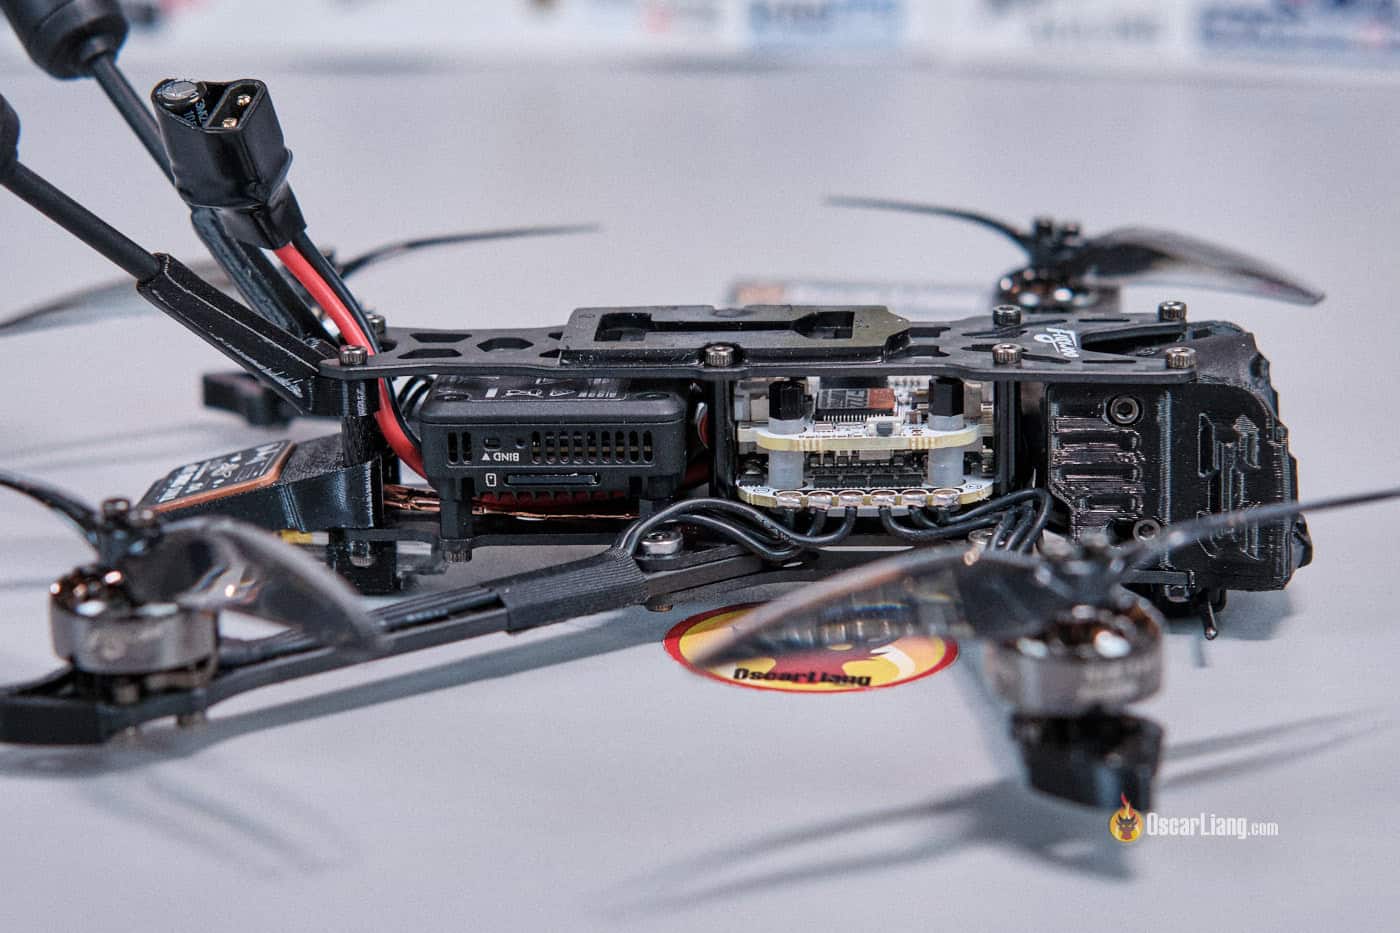
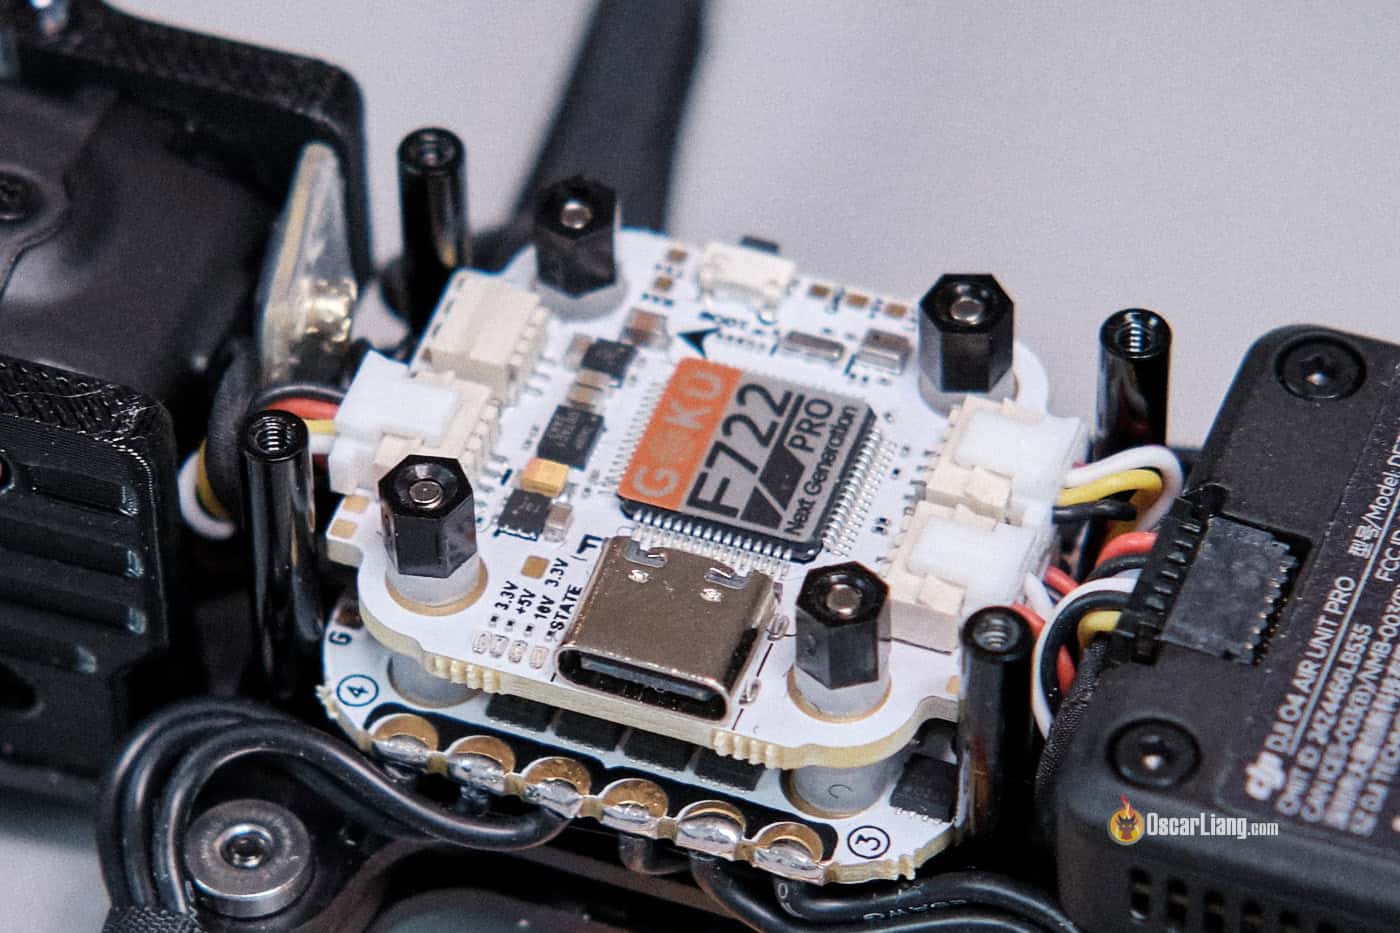
Flywoo upgraded the FC/ESC stack from 16x16mm to 20x20mm. The bigger board dimension not solely makes repairs simpler doubtlessly, however the brand new ESC now options 45A 32-bit help—a significant step up from the earlier 13A model. It’s an enormous overkill for this construct (you’ll hardly use 10% of its present ranking), however hey, having additional headroom is rarely a nasty factor.


All of the elements are related to the FC by way of connectors – no soldering on the FC in any respect.

The receiver just isn’t connected to something, simply left there hanging freely. With the O4 digicam put in it’s form of being pressed by all of the wires between the stack and digicam, so it’s not unfastened or something and hasn’t been a priority to this point throughout my testing.
They’ve additionally lastly added a present sensor, which is a giant plus for long-range flying. Voltage alone may be unreliable—particularly with low C-rated batteries that undergo from voltage sag. With a present sensor, you get a significantly better concept of battery utilization and might higher choose when to land.
As a result of tight area, Flywoo needed to solder the capacitor on to the XT30 connector, which is a bit removed from the ESC. The capacitor can be fairly small. Whereas not the best setup for noise filtering, it’s higher than nothing. Fortunately, the small motors don’t produce an excessive amount of electrical noise, so this needs to be high quality normally. Find out about capacitor on this information: https://oscarliang.com/capacitors-mini-quad/

GPS Enhancements
Flywoo continues to mount the GPS module on the rear, just below the VTX antennas—a location that I’ve at all times discovered problematic. Within the earlier mannequin, the M8-based GPS would take a very long time to get a 3D repair, and satellite tv for pc counts have been typically low attributable to interference from the close by VTX antennas. The routing of GPS wires beneath the VTX added much more EMI and made matter worse.

This time round, Flywoo tried to deal with the problem by:
- Shielding the GPS wires with copper tape
- Upgrading to a more recent, extra highly effective M10 GPS module
Whereas I nonetheless want that they had moved the GPS away from the VTX solely, these adjustments ought to enhance GPS reliability.
Receiver Antenna Mounting
One other design alternative I’m not a fan of is how the receiver antenna is mounted.

Whereas this mounting methodology is less complicated for producers and works high quality for short-range flights (inside a few km), it’s not superb for long-range. For finest efficiency, antennas needs to be mounted vertically. Study extra about antenna mounting: https://oscarliang.com/antenna-positioning/
DJI O4 Professional
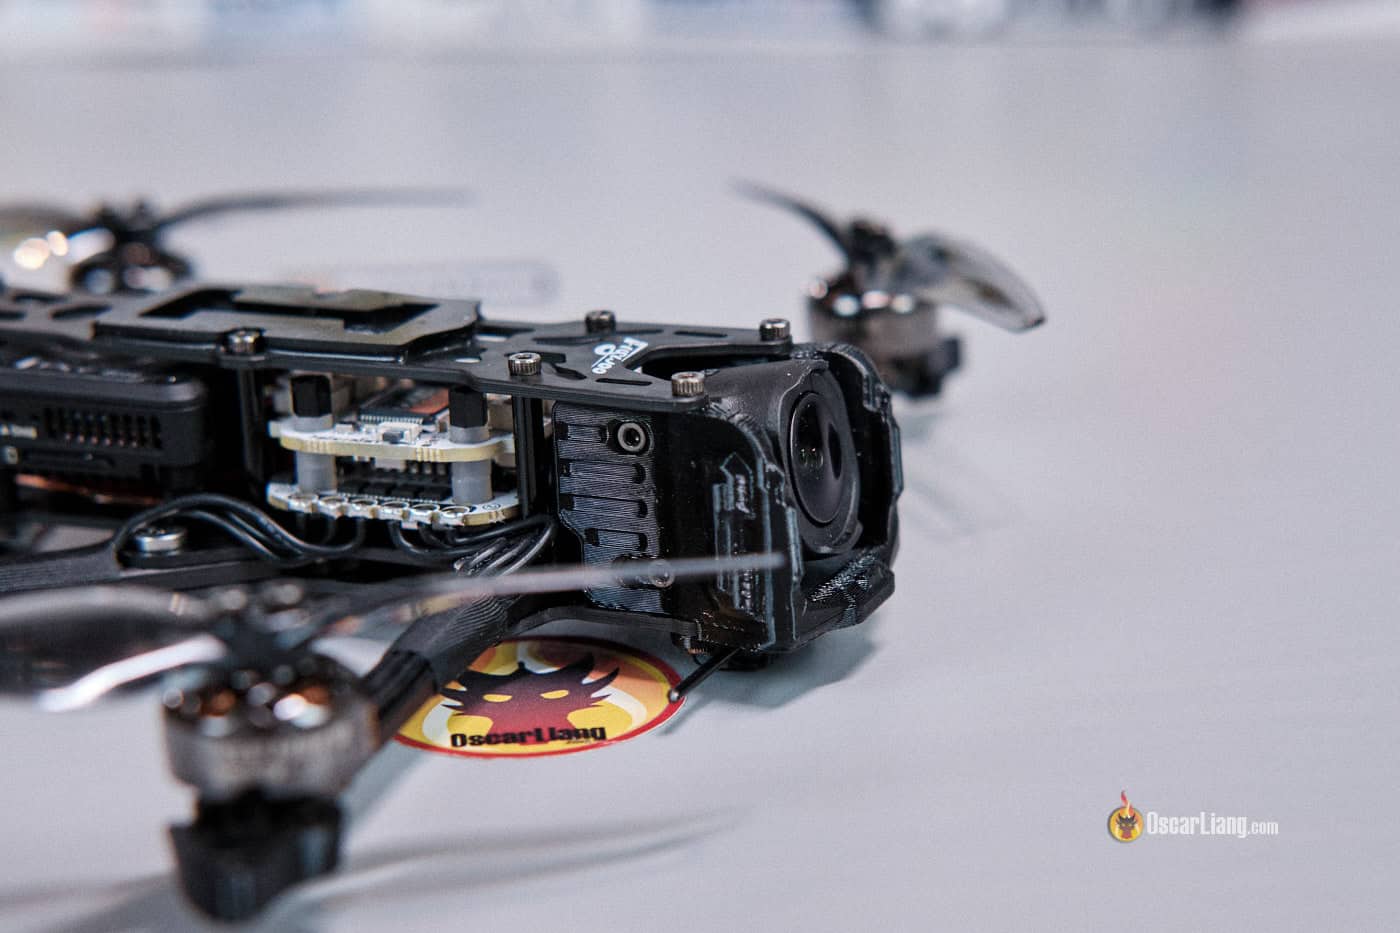
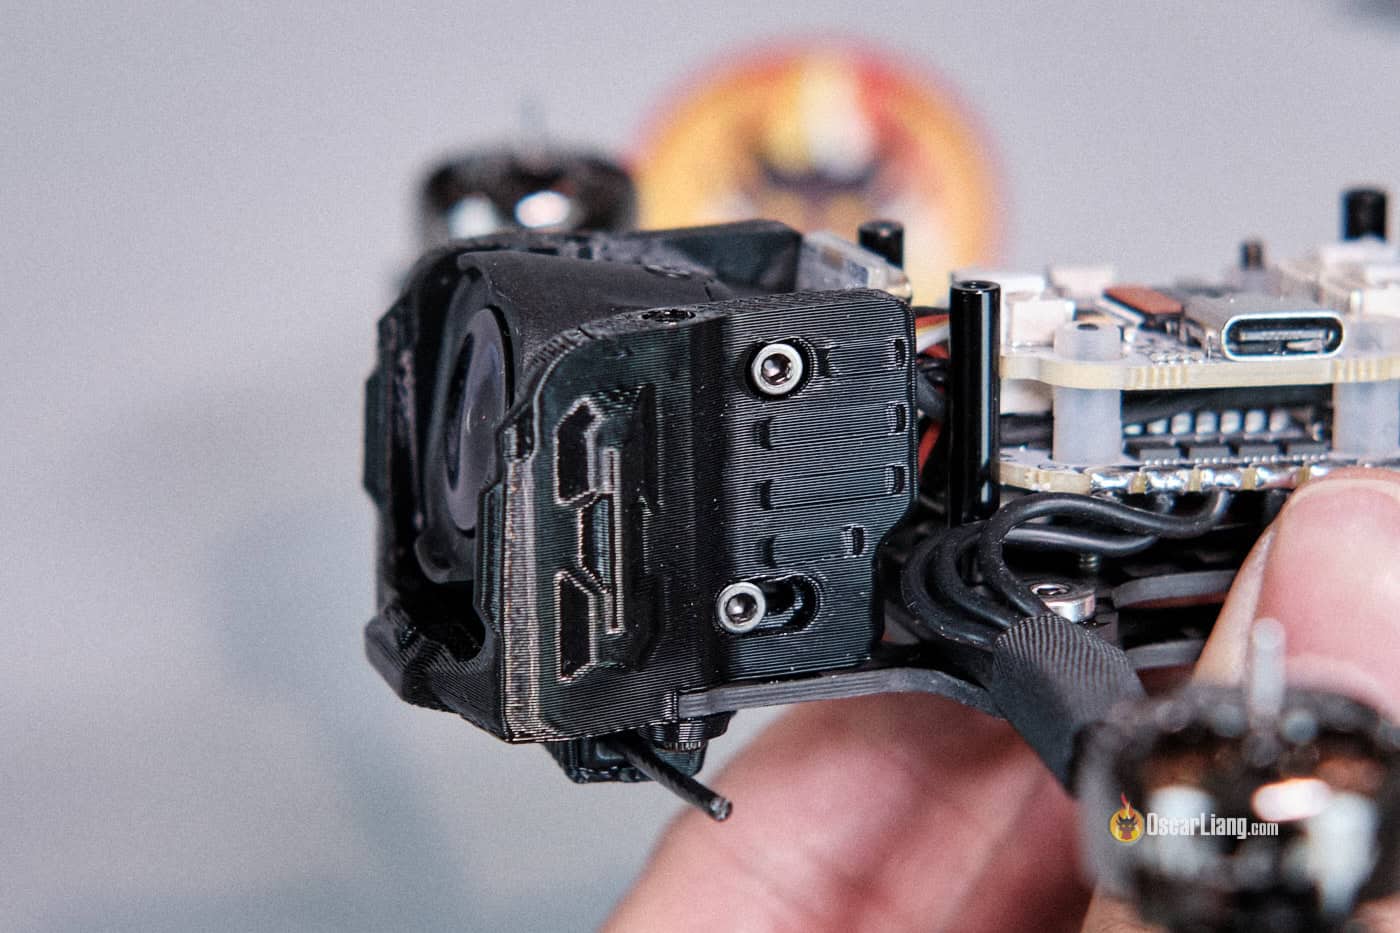
The DJI O4 Professional Air Unit is securely mounted on standoffs, leaving clearance for wires beneath. This setup permits for respectable airflow, serving to to maintain the air unit cool throughout flight. Although the O4 Professional digicam is barely mounted between easy TPU adapters, I didn’t discover any jello or vibration within the footage, Gyroflow additionally works flawlessly.

One draw back: the digicam tilt angle is very restricted, with a most of round 15 levels. This restricts how briskly you may fly, as larger speeds could have you staring on the floor extra. The restricted angle is as a result of body’s compact peak—the O4 Professional digicam is bodily massive, and growing the lean would require a taller body, which in flip would enhance weight, drag and scale back effectivity. That mentioned, for a sluggish cruiser just like the Explorer, this angle is satisfactory.
Onboard Buzzer
Flywoo features a self-powered buzzer—a uncommon characteristic in BNF FPV drones. In case your battery dies or will get disconnected in a crash, the buzzer will proceed beeping for hours, enormously enhancing your probabilities of discovering the drone.

Should you’ve by no means used one among these buzzers earlier than, don’t be stunned when it begins beeping after you unplug the battery—that is anticipated conduct. To cease the beeping, simply press and maintain the button on the buzzer for just a few seconds to disarm it. Should you’re merely swapping batteries, you don’t have to press the button, merely plugging in a brand new battery will robotically cease the beep.
Flight Efficiency
Right here’s footage from one among my take a look at flights:
Battery Selection and Effectivity
Relying on battery weight, the Explorer pulls round 6-7A at 50 km/h and seven–8A at 60 km/h—which is impressively environment friendly.
If you wish to keep beneath the 250g weight restrict, the biggest battery you should utilize can be 4S 720mAh LiHV, which is available in just below the edge and provides round 8 minutes of cruising flight time. LiHV batteries are barely extra energy-dense than common LiPo, supplying you with a bit extra flight time, see my testing right here: https://oscarliang.com/lihv-battery/
With some modifications—similar to eradicating pointless elements—you would possibly be capable to run 4S 850mAh LiPo and nonetheless keep sub-250g. This might doubtlessly provide you with over 10 minutes of flight time and as much as 7 km of whole flight distance.
For optimum flight time, the 4S 18650 Li-ion battery pack is the best way to go. It could possibly present nearly half-hour of flight time (primarily based on my testing with the earlier model of Explorer), although it will increase the general weight to round 365g. Ideally, you must construct your individual pack utilizing high-quality cells. I like to recommend the Molicel P30B 18650 cells, which I’ve examined right here: https://oscarliang.com/best-18650-li-ion-battery/#Outcomes-and-Suggestions. You can even purchase pre-built Li-ion packs, however they typically use cheaper cells, right here’s a listing of really helpful choices: https://oscarliang.com/li-ion-battery-long-range/#Shopping for-Prepared-Made-Li-ion-Battery-Packs
Personally, I like cruising at round 40–45% throttle (45–50 km/h) with 4S 850mAh, or 50% throttle (50–60 km/h) with the 4S Li-ion pack. This appears to be the optimum throttle vary for maximizing flight time.
Cinematic Smoothness
This drone flies prefer it was on rail, very locked in and steady. Within the flight footage, I used to be flying in 20 MPH gusts, and whereas the drone did drift fairly a bit (attributable to its gentle weight), it didn’t wobble like many smaller micros do. That stability may be very useful for capturing cinematic footage.
Freestyle Functionality
With hover at 36% throttle and a high pace of 105 km/h utilizing a 4S 850mAh LiPo, the Explorer just isn’t a quick drone. Throughout excessive maneuvers, it tends to wobble and expertise instability as a result of restricted energy of the motors.
Let’s be trustworthy—the Explorer feels underpowered. The 1404 motors are thought of very small for 4-inch props; they’re generally utilized in 2.5-inch freestyle drones, and in my expertise, they even wrestle with 3-inch props! However bear in mind, this drone is constructed for effectivity and endurance, not uncooked energy, so it is sensible.

Whereas it’s no freestyle beast, it could actually deal with primary strikes like split-S, energy loops, and inverted yaw spins simply high quality. You simply want to regulate your expectations—this isn’t a 5-inch ripper.
Noise
The Explorer is surprisingly quiet. It’s not silent, however it’s a lot much less intimidating than a 5-inch freestyle FPV drone. This makes it well-suited for flying in parks or city areas with out drawing an excessive amount of consideration.
Sturdiness
As talked about earlier, Flywoo hasn’t modified a lot in regards to the Explorer’s body design for the reason that unique model—and primarily based on my expertise, it’s fairly fragile. I’ve damaged arms in gentle to medium crashes—not even laborious hits—attributable to how skinny the arms are. So long as you’re conscious of its fragility and follow cruising as a substitute of aggressive flying, it’s high quality.

GPS and Rescue Mode
Slight disappointment right here: the GPS takes fairly a very long time to get a repair from a chilly begin—about 6 minutes to accumulate 8 satellites. The max satellite tv for pc rely was round 19. I believe the low GPS efficiency is because of its mounting location—it’s beneath the VTX antennas.
That mentioned, Betaflight GPS Rescue Mode works nicely. I’d nonetheless advocate just a few adjustments to make it higher—similar to adapting “throttle fallback” (see my Rescue mode information for element) and lowering return pace, and so on.
How you can Setup
Putting in DJI O4 Professional
I purchased the Flywoo Explorer with out the DJI O4 Professional Air Unit, so I needed to set up it myself.


Since that is fairly a small quad, engaged on it is a little more difficult in comparison with bigger drones like a 5-inch, however it’s nonetheless doable with persistence. It took me about half-hour. No soldering is required—simply mount the digicam, air unit, and antennas, plug within the cable, and also you’re good to go. Listed here are the steps.
Take away the antennas from the DJI O4 Professional Air Unit.
Set up the antennas into the TPU holder.

Set up the 4 standoffs behind the body for mounting the air unit.

I most popular to run the digicam cable beneath the FC, so I eliminated the FC from the stack quickly.

Set up the O4 Professional digicam within the body.
Reattaching the antennas onto the air unit, plug within the cable from the FC, and mount the air unit onto the standoffs. That’s it!

There’s no have to take away the SBUS wire within the O4 Professional cable, as a result of it’s related to UART1 (particularly RX1) on the flight controller. Because the ExpressLRS receiver is related to UART2, there’s no battle so long as you’re not utilizing UART1 for the rest. Should you plan to make use of UART1, you must take away the SBUS wire within the O4 cable.
Earlier than powering the drone for the primary time, plug in a smoke stopper such because the Vifly Shortsaver, and join a battery and take a look at the drone and see if it powers up accurately. You must hear the ESC/motor initiation beeps.
Activate the O4 Professional in case you haven’t already: https://oscarliang.com/how-to-setup-dji-o4-pro/#Activation
Pair the DJI O4 Air Unit along with your goggles – Information: https://oscarliang.com/how-to-setup-dji-o4-pro/#Pairing-DJI-Goggles-3-with-O4-Air-Unit-Professional
Firmware
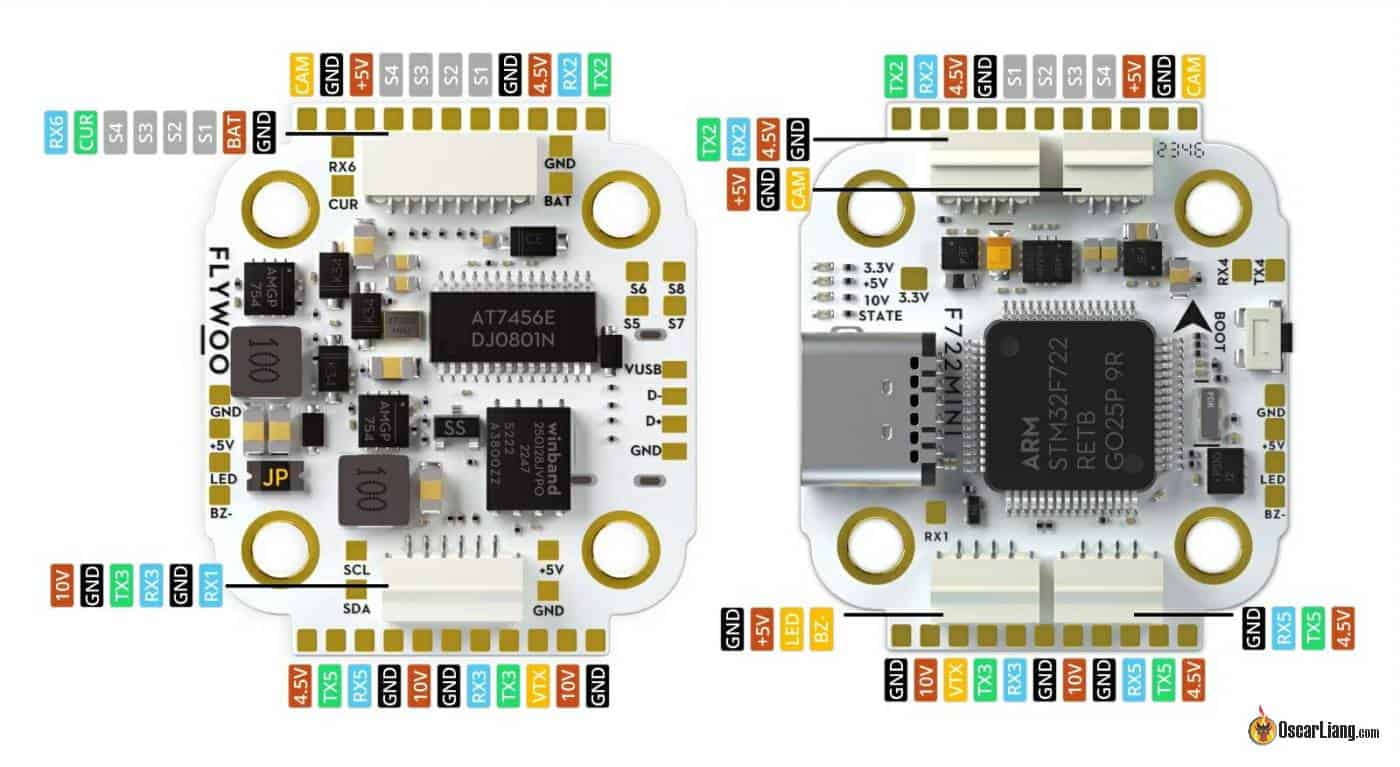
The flight controller (FC) board goal is FLYWOOF722PROV2, and it comes preloaded with Betaflight firmware model 4.5.1. For inventory CLI Diff, see right here. Right here’s the pinout diagram.
ESC Firmware: F4A_4IN1 – AM32 2.16. Listed here are the default ESC settings.

ELRS Receiver Firmware Goal: Flywoo EL24E 2.4GHz RX, firmware model says “merge 481945 CE_LBT”, unsure what model that is however it binds high quality with my radio which is on ELRS V3.5.
Betaflight Setup
What May Be Improved
By eradicating pointless elements, I’m hoping to scale back the load by one other 15–16 grams, which might enable me to make use of a 4S 850mAh LiPo and nonetheless keep beneath the 250g restrict. This is able to enable 10+ minutes of flight time, which is superb for exploring new spots when touring. If there’s curiosity, I can write a put up detailing these modifications—let me know within the feedback!
The FC stack may benefit from utilizing plastic nuts as a substitute of steel lock nuts. Not solely are steel nuts heavier, however they’re additionally difficult to take away whenever you need to work on the FC.
As talked about earlier, mounting the receiver antenna vertically can be superb. I’m not doing that simply but as a result of I plan to improve to a variety receiver, with antennas mounted on each side of the body—similar to I did with the unique Explorer. With that setup and simply 100mW on my T-Lite V2 radio, I used to be capable of fly out 3km and again.

It’s a little bit of a missed alternative that Flywoo didn’t use their GOKU Nano GPS with an onboard compass. With Betaflight 4.6 bringing place maintain characteristic, this could have been an incredible addition. I’m additionally not a fan of the present GPS mounting location—beneath the VTX antennas. I feel it might be higher positioned on the entrance, above the FPV digicam, and away from all of the antennas.
Additionally, there’s no handbook included, and the screw baggage aren’t labeled for his or her objective—solely by dimension. It might have saved a while in the event that they have been labeled (e.g., M2x7 for propellers, M2x4 for O4 Professional digicam, and so on.).
Some Betaflight settings might have been configured extra thoughtfully for the Explorer. For instance, GPS and OSD settings have been left at default. Whereas Flywoo did present a customized PID tune, the filter settings have been largely left untouched. There’s positively room for enchancment in filters, PIDs, and Rescue Mode configuration. I’ll be posting my configuration on Patreon.

Inventory PID Settings
Additionally value noting: the present sensor isn’t calibrated correctly – it overestimated present draw. I like to recommend setting the present scale to 440.
Ultimate Ideas
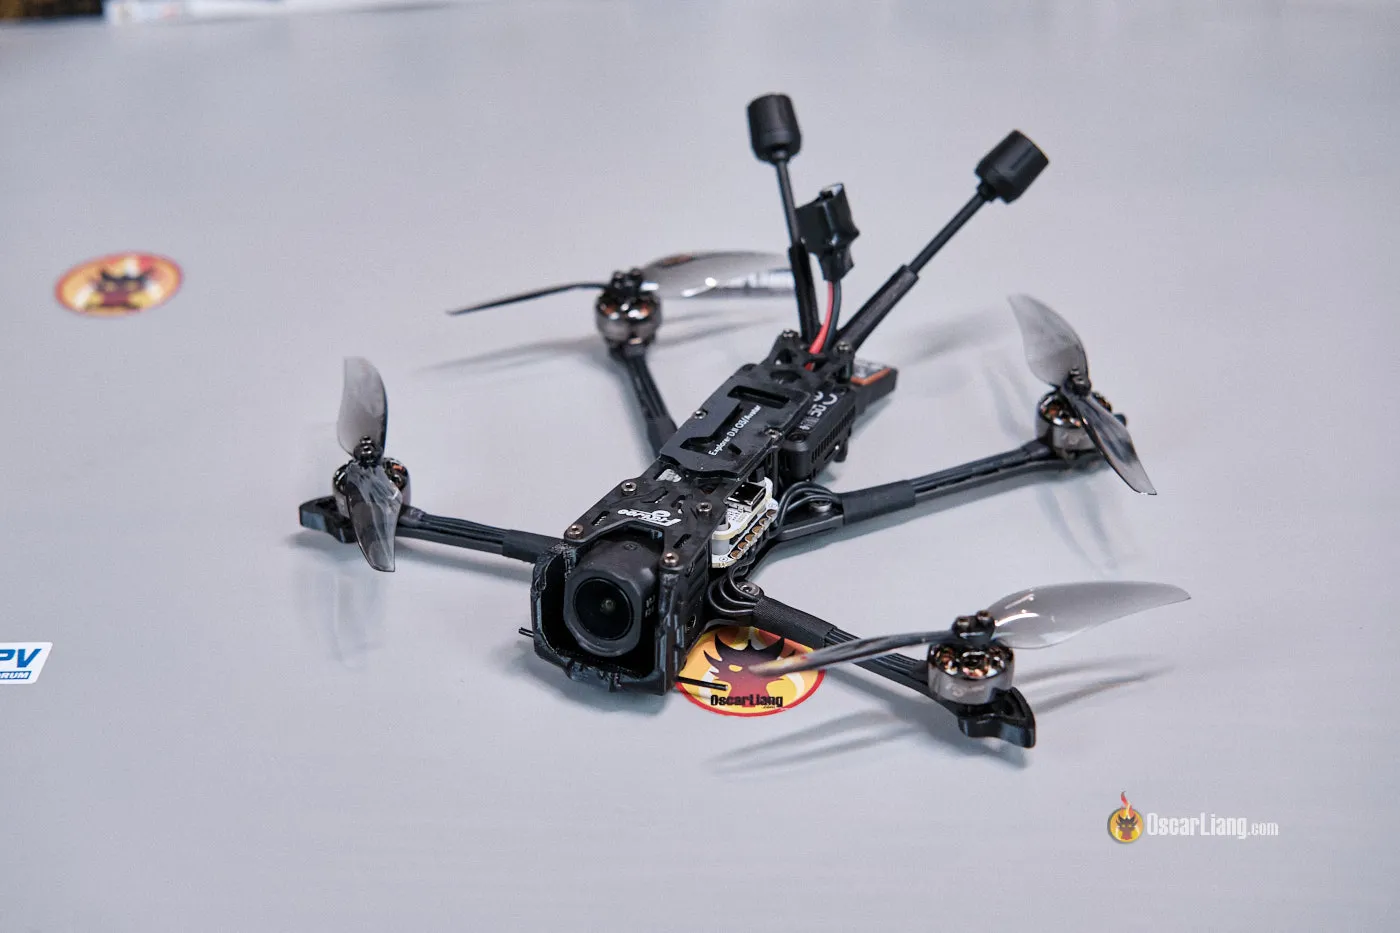
I’ve been a giant fan of the Explorer LR4 from Flywoo for years—it’s a implausible platform with a great deal of potential. There’s nonetheless room for enhancements, I want Flywoo had carried out extra than simply improve the FPV system. However total, the Explorer LR4 with the DJI O4 Professional is a implausible long-range FPV drone, particularly for many who journey rather a lot and have weight necessities. I’d completely advocate it.
You should purchase the Explorer LR4 O4 Professional Version from these distributors:
Professionals
- Extremely environment friendly – provides nearly half-hour of flight time with Li-ion battery
- Below 250g with a smaller battery, but nonetheless provides as much as 8 minutes of flight time
- No want to hold a GoPro due to the DJI O4 Professional
- Very compact and nice for touring
- Flies easily out of the field
- Rescue mode works straight away (solely minor tweaks wanted for optimization)
Cons
- Takes a very long time to get a GPS repair from a chilly begin
- Lacks energy and freestyle agility
- Fragile construct – not superb for newbies and bashing/crashing
- Over 250g when utilizing bigger batteries for prolonged flight time
- Drifts rather a lot when it’s windy in comparison with bigger 7″ lengthy vary quads
