
Amazon SageMaker Unified Studio serves as a collaborative workspace the place information engineers and scientists can work collectively on end-to-end information and machine studying (ML) workflows. SageMaker Unified Studio makes a speciality of orchestrating complicated information workflows throughout a number of AWS providers by way of its integration with Amazon Managed Workflows for Apache Airflow (Amazon MWAA). Challenge homeowners can create shared environments the place staff members collectively develop and deploy workflows, whereas sustaining oversight of pipeline execution. This unified strategy makes certain information pipelines run persistently and effectively, with clear visibility into the whole course of, making it seamless for groups to collaborate on subtle information and ML tasks.
This put up explores the way to construct and handle a complete extract, remodel, and cargo (ETL) pipeline utilizing SageMaker Unified Studio workflows by way of a code-based strategy. We display the way to use a single, built-in interface to deal with all facets of knowledge processing, from preparation to orchestration, through the use of AWS providers together with Amazon EMR, AWS Glue, Amazon Redshift, and Amazon MWAA. This answer streamlines the information pipeline by way of a single UI.
Instance use case: Buyer habits evaluation for an ecommerce platform
Let’s contemplate a real-world situation: An e-commerce firm needs to investigate buyer transactions information to create a buyer abstract report. They’ve information coming from a number of sources:
- Buyer profile information saved in CSV recordsdata
- Transaction historical past in JSON format
- Web site clickstream information in semi-structured log recordsdata
The corporate needs to do the next:
- Extract information from these sources
- Clear and remodel the information
- Carry out high quality checks
- Load the processed information into a knowledge warehouse
- Schedule this pipeline to run day by day
Answer overview
The next diagram illustrates the structure that you just implement on this put up.
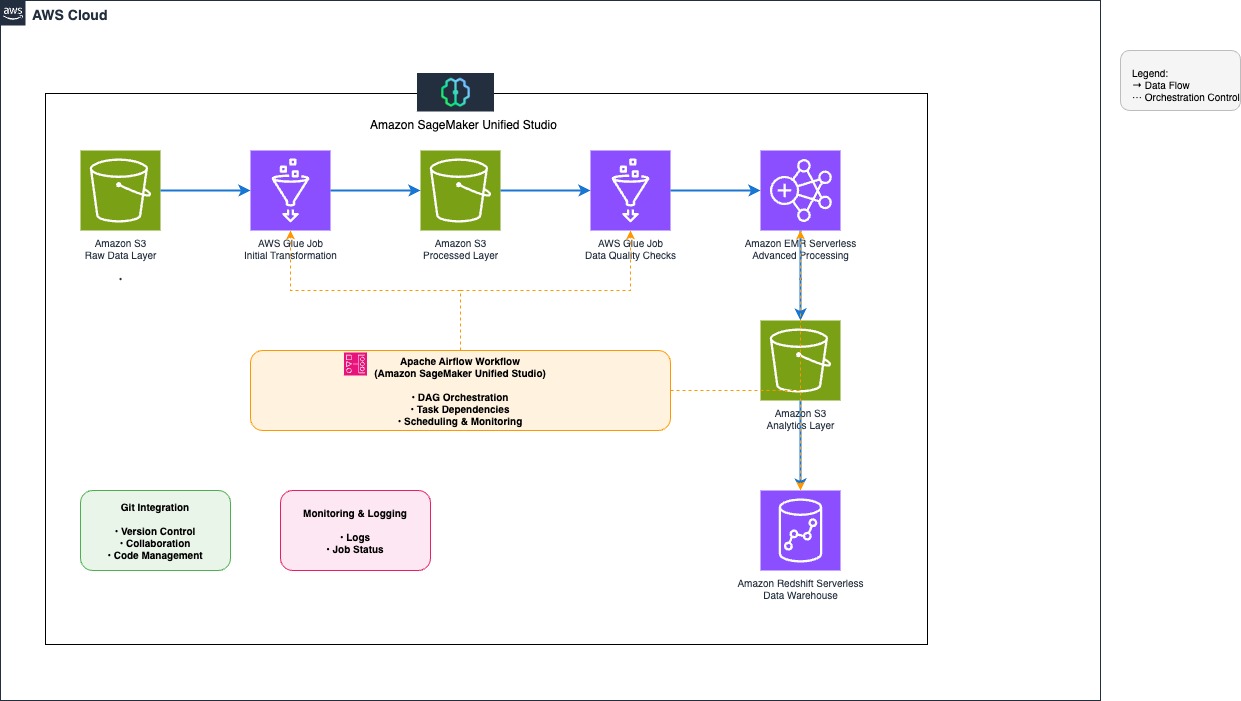
The workflow consists of the next steps:
- Set up a knowledge repository by creating an Amazon Easy Storage Service (Amazon S3) bucket with an organized folder construction for buyer information, transaction historical past, and clickstream logs, and configure entry insurance policies for seamless integration with SageMaker Unified Studio.
- Extract information from the S3 bucket utilizing AWS Glue jobs.
- Use AWS Glue and Amazon EMR Serverless to wash and remodel the information.
- Implement information high quality validation utilizing AWS Glue Knowledge High quality.
- Load the processed information into Amazon Redshift Serverless.
- Create and handle the workflow setting utilizing SageMaker Unified Studio with Id Heart–primarily based domains.
Be aware: Amazon SageMaker Unified Studio helps two area configuration fashions: IAM Id Heart (IdC)–primarily based domains and IAM position–primarily based domains. Whereas IAM-based domains allow role-driven entry administration and visible workflows, this put up particularly focuses on Id Heart–primarily based domains, the place customers authenticate by way of IdC and tasks entry information and assets utilizing challenge roles and identity-based authorization.
Conditions
Earlier than starting, guarantee you will have the next assets:
Configure Amazon SageMaker Unified Studio area
This answer requires SageMaker Unified Studio area within the us-east-1 AWS Area. Though SageMaker Unified Studio is on the market in a number of Areas, this put up makes use of us-east-1 for consistency. For an entire listing of supported Areas, seek advice from Areas the place Amazon SageMaker Unified Studio is supported.
Full the next steps to configure your area:
- Check in to the AWS Administration Console, navigate to Amazon SageMaker, and open the Domains part from the left navigation pane.
- On the SageMaker console, select Create area, then select Fast setup.
- If the message “No VPC has been particularly arrange to be used with Amazon SageMaker Unified Studio” seems, choose Create VPC. The method redirects to an AWS CloudFormation stack. Go away all settings at their default values and choose Create stack.
- Beneath Fast setup settings, for Title, enter a site title (for instance, etl-ecommerce-blog-demo). Assessment the chosen configurations.
- Select Proceed to proceed.
- On the Create IAM Id Heart consumer web page, create an SSO consumer (account with IAM Id Heart) or choose an present SSO consumer to log in to the Amazon SageMaker Unified Studio. The SSO chosen right here is used because the administrator within the Amazon SageMaker Unified Studio.
- Select Create area.
For detailed directions, see Create a SageMaker area and Onboarding information in Amazon SageMaker Unified Studio.

After you will have created a site, popup will seem with the message: “Your area has been created! Now you can log in to Amazon SageMaker Unified Studio”. You may shut the popup for now.
Create a challenge
On this part, we create a challenge to function a collaborative workspace for groups to work on enterprise use circumstances. Full the next steps:
- Select Open Unified Studio and register together with your SSO credentials utilizing the Check in with SSO choice.
- Select Create challenge.
- Title the challenge (for instance,
ETL-Pipeline-Demo) and create it utilizing the All capabilities challenge profile. - Select Proceed.
- Maintain the default values for the configuration parameters and select Proceed.
- Select Create challenge.
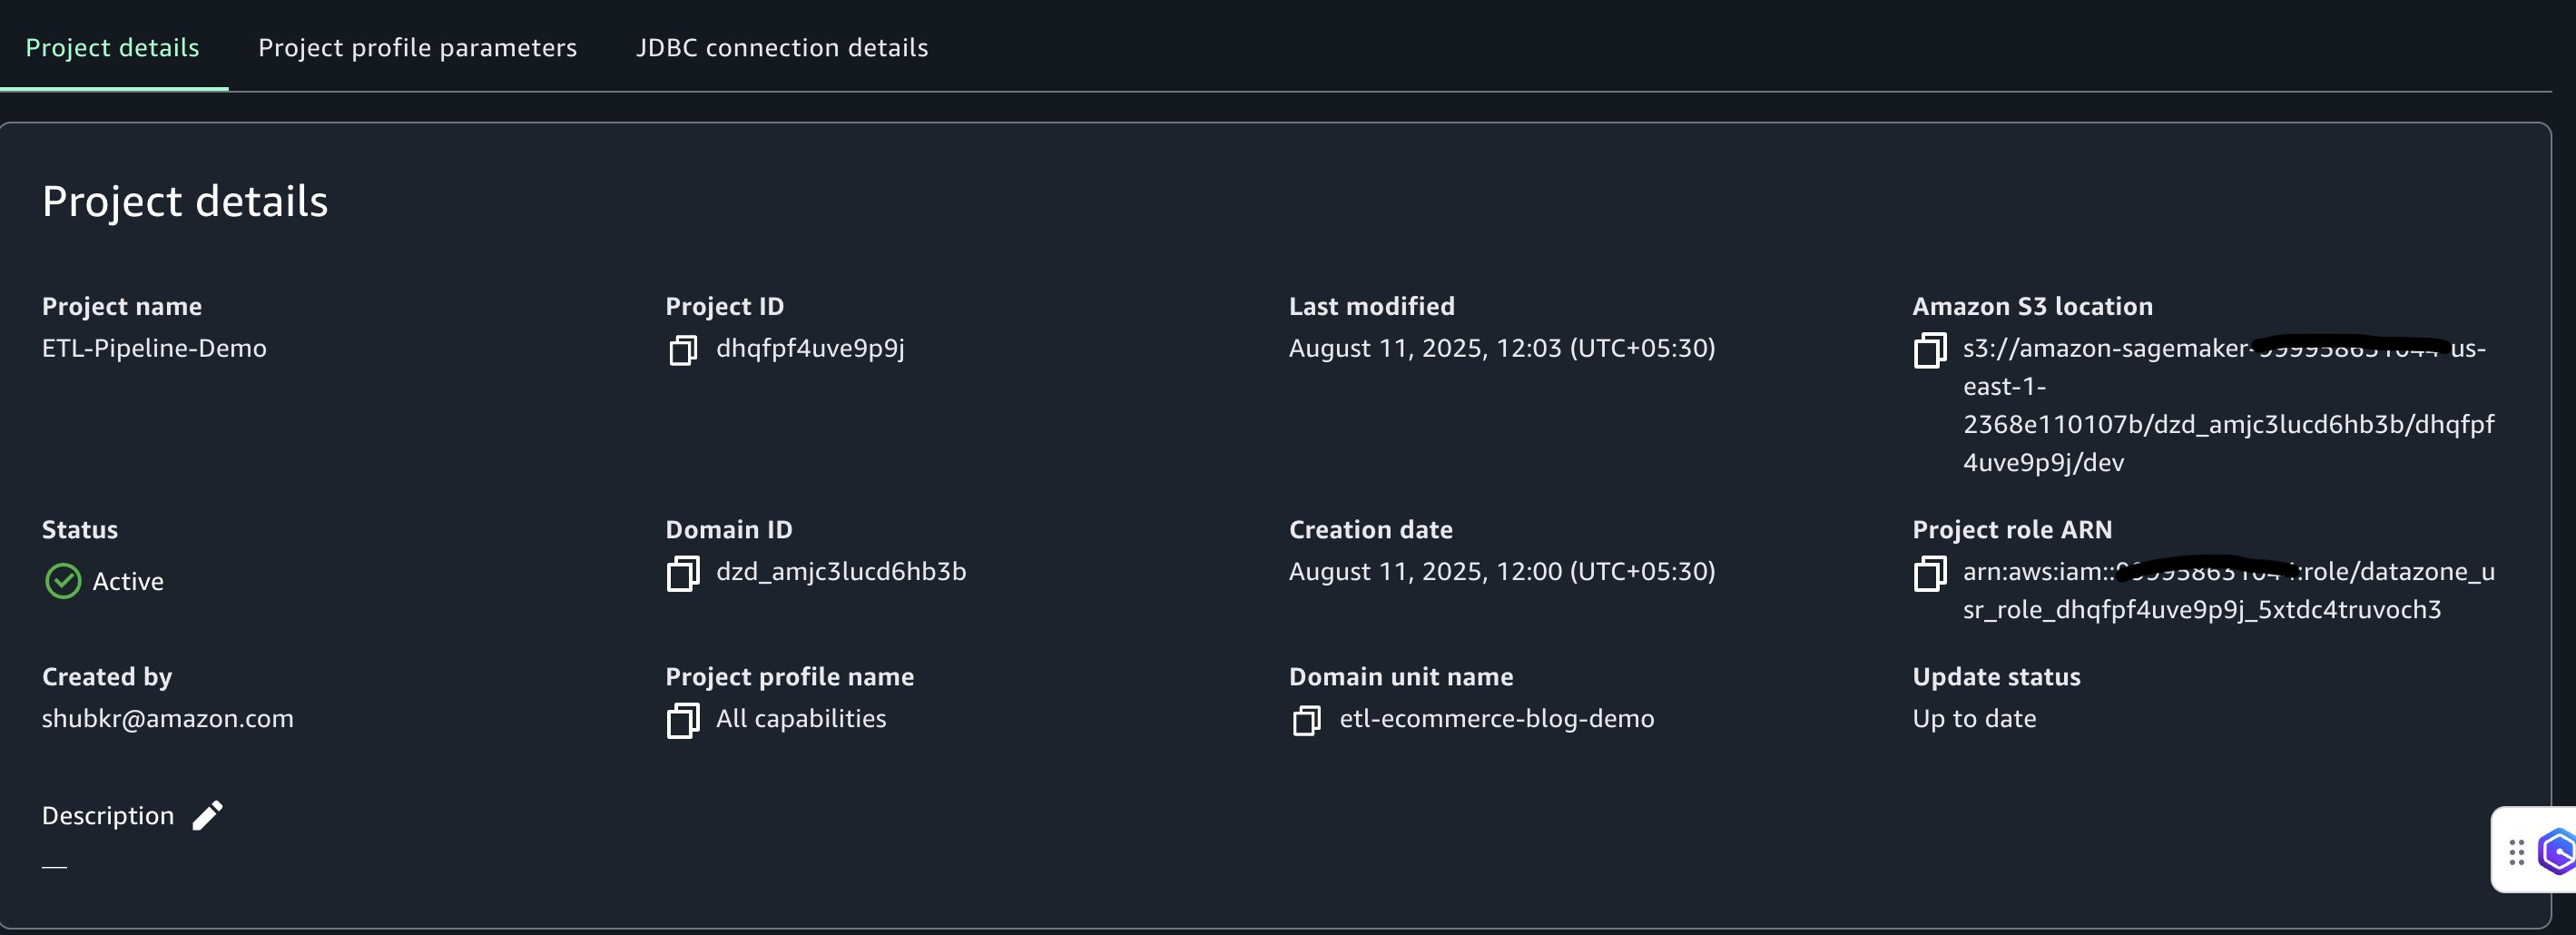
Challenge creation would possibly take a couple of minutes. After the challenge is created, the setting can be configured for information entry and processing.
Combine S3 bucket with SageMaker Unified Studio
To allow exterior information processing inside SageMaker Unified Studio, configure integration with an S3 bucket. This part walks by way of the steps to arrange the S3 bucket, configure permissions, and combine it with the challenge.
Create and configure S3 bucket
Full the next steps to create your bucket:
- In a brand new browser tab, open the AWS Administration Console and seek for S3.
- On the Amazon S3 console, select Create Bucket .
- Create a bucket named
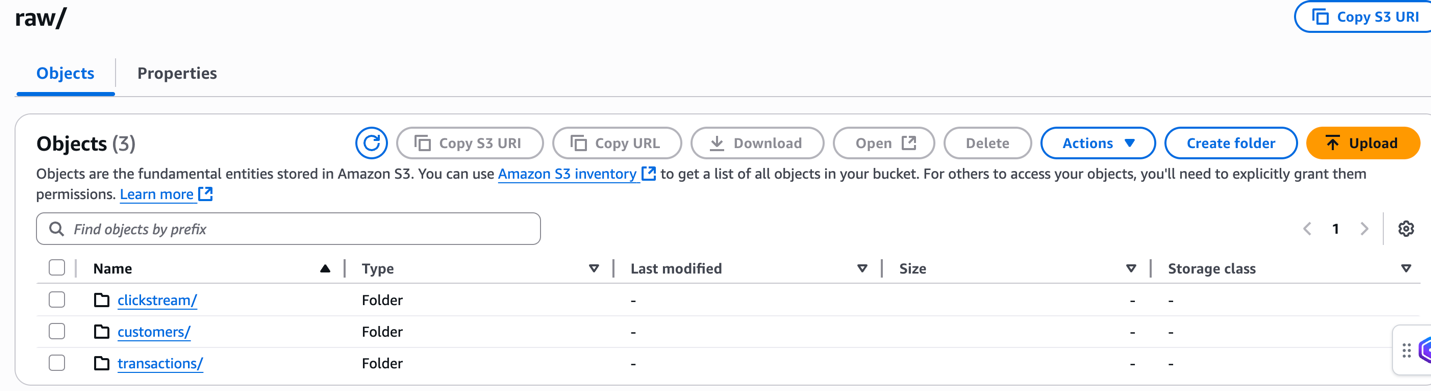
ecommerce-raw-layer-bucket-demo-. For detailed directions, see create a general-purpose Amazon S3 bucket for storage.-us-east-1 - Create the next folder construction within the bucket. For detailed directions, see Making a folder:
uncooked/prospects/uncooked/transactions/uncooked/clickstream/processed/analytics/
Add pattern information
On this part, we add pattern ecommerce information that represents a typical enterprise situation the place buyer habits, transaction historical past, and web site interactions have to be analyzed collectively.
The uncooked/prospects/prospects.csv file incorporates buyer profile data, together with registration particulars. This structured information can be processed first to determine the shopper dimension for our analytics.
The uncooked/transactions/transactions.json file incorporates buy transactions with nested product arrays. This semi-structured information can be flattened and joined with buyer information to investigate buying patterns and buyer lifetime worth.
The uncooked/clickstream/clickstream.csv file captures consumer web site interactions and habits patterns. This time-series information can be processed to know buyer journey and conversion funnel analytics.
For detailed directions on importing recordsdata to Amazon S3, seek advice from the Importing objects.
Configure CORS coverage
To permit entry from the SageMaker Unified Studio area portal, replace the Cross-Origin Useful resource Sharing (CORS) configuration of the bucket:
- On the bucket’s Permissions tab, select Edit beneath Cross-origin useful resource sharing (CORS).

- Enter the next CORS coverage and substitute
domainUrlwith the SageMaker Unified Studio area URL (for instance,https://). The URL might be discovered on the prime of the area particulars web page on the SageMaker Unified Studio console..sagemaker.us-east-1.on.aws
For detailed data, see Including Amazon S3 information and achieve entry utilizing the challenge position.
Grant Amazon S3 entry to SageMaker challenge position
To allow SageMaker Unified Studio to entry the exterior Amazon S3 location, the corresponding AWS Id and Entry Administration (IAM) challenge position should be up to date with the required permissions. Full the next steps:
- On the IAM console, select Roles within the navigation pane.
- Seek for the challenge position utilizing the final section of the challenge position Amazon Useful resource Title (ARN). This data is positioned on the Challenge overview web page in SageMaker Unified Studio (for instance,
datazone_usr_role_1a2b3c45de6789_abcd1efghij2kl).
- Select the challenge position to open the position particulars web page.
- On the Permissions tab, select Add permissions, then select Create inline coverage.
- Use the JSON editor to create a coverage that grants the challenge position entry to the Amazon S3 location
- Within the JSON coverage beneath, substitute the placeholder values together with your precise setting particulars:
- Substitute
ecommerce-raw-layer) - Substitute
us-east-1) - Substitute
- Substitute
- Paste the up to date JSON coverage into the JSON editor.
- Select Subsequent.
- Enter a reputation for the coverage (for instance,
etl-rawlayer-access), then select Create coverage. - Select Add permissions once more, then select Create inline coverage.
- Within the JSON editor, create a second coverage to handle S3 Entry Grants:Substitute
ecommerce-raw-layer) and paste this JSON coverage. - Select Subsequent.
- Enter a reputation for the coverage (for instance,
s3-access-grants-policy), then select Create coverage.
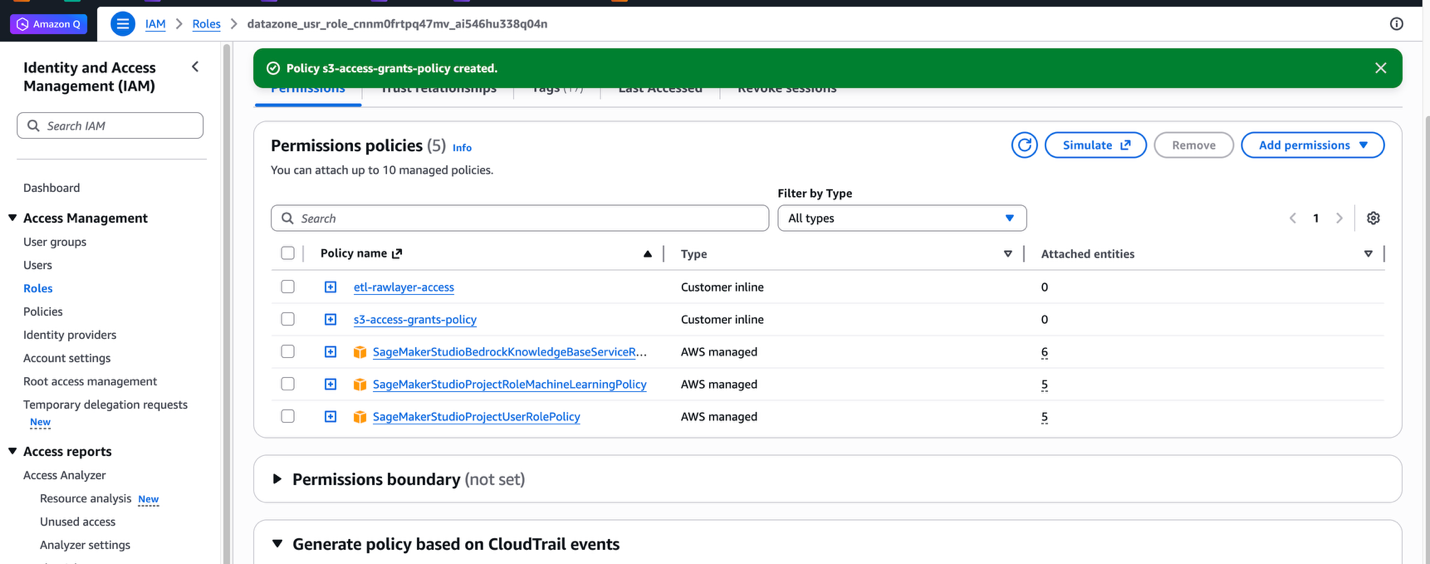
For detailed details about S3 Entry Grants, see Including Amazon S3 information.
Add S3 bucket to challenge
After you add insurance policies to the challenge position for entry to the Amazon S3 assets, full the next steps to combine the S3 bucket with the SageMaker Unified Studio challenge:
- In SageMaker Unified Studio, open the challenge you created beneath Your tasks.
- Select Knowledge within the navigation pane.
- Choose Add after which Add S3 location.
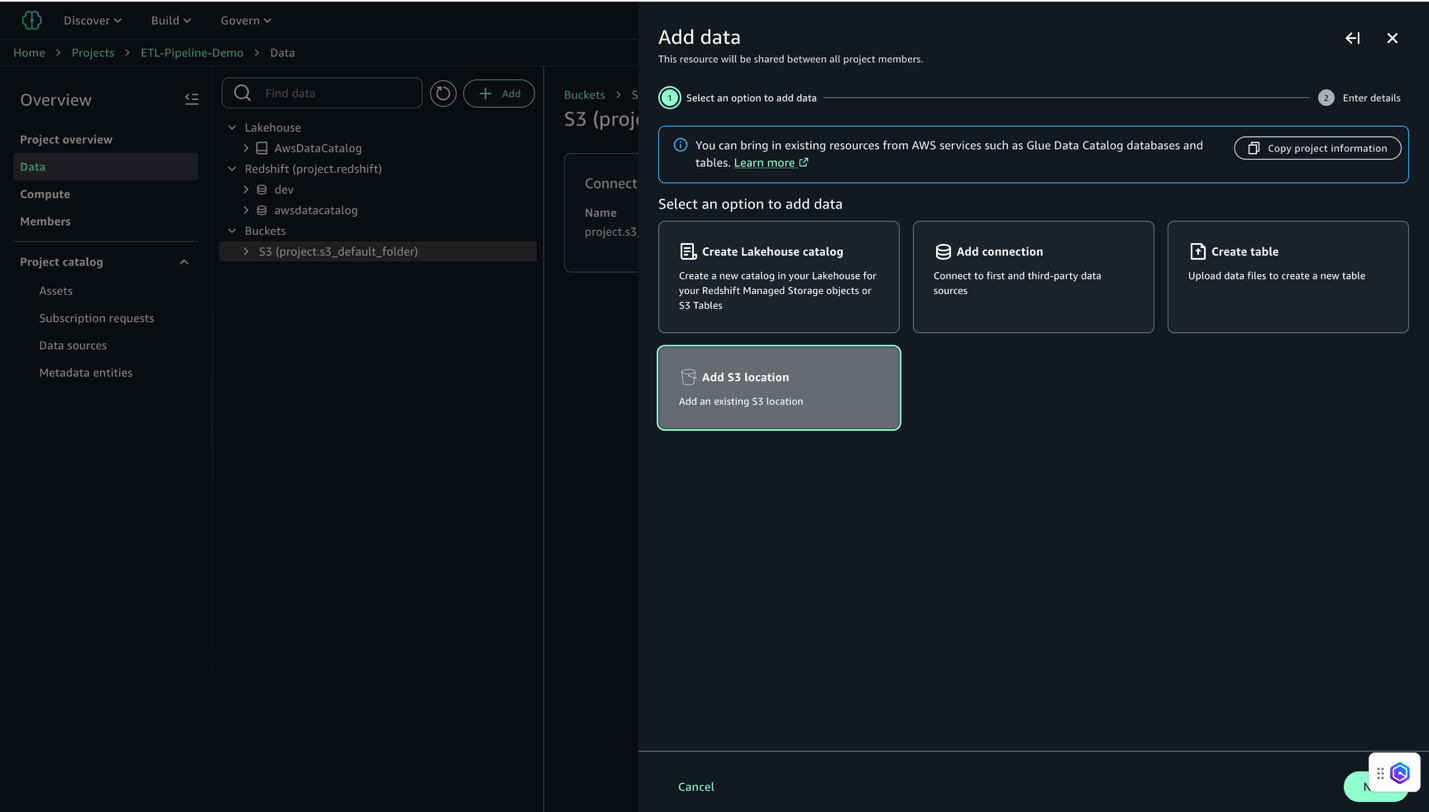
- Configure the S3 location:
- For Title, enter a descriptive title (for instance,
E-commerce_Raw_Data). - For S3 URI, enter your bucket URI (for instance,
s3://ecommerce-raw-layer-bucket-demo-).-us-east-1/ - For AWS Area, enter your Area (for this instance,
us-east-1). - Go away Entry position ARN clean.
- Click on Add S3 Location
- For Title, enter a descriptive title (for instance,
- Look ahead to the mixing to finish.
- Confirm the S3 location seems in your challenge’s information catalog (on the Challenge overview web page, on the Knowledge tab, find the Buckets pane to view the buckets and folders).
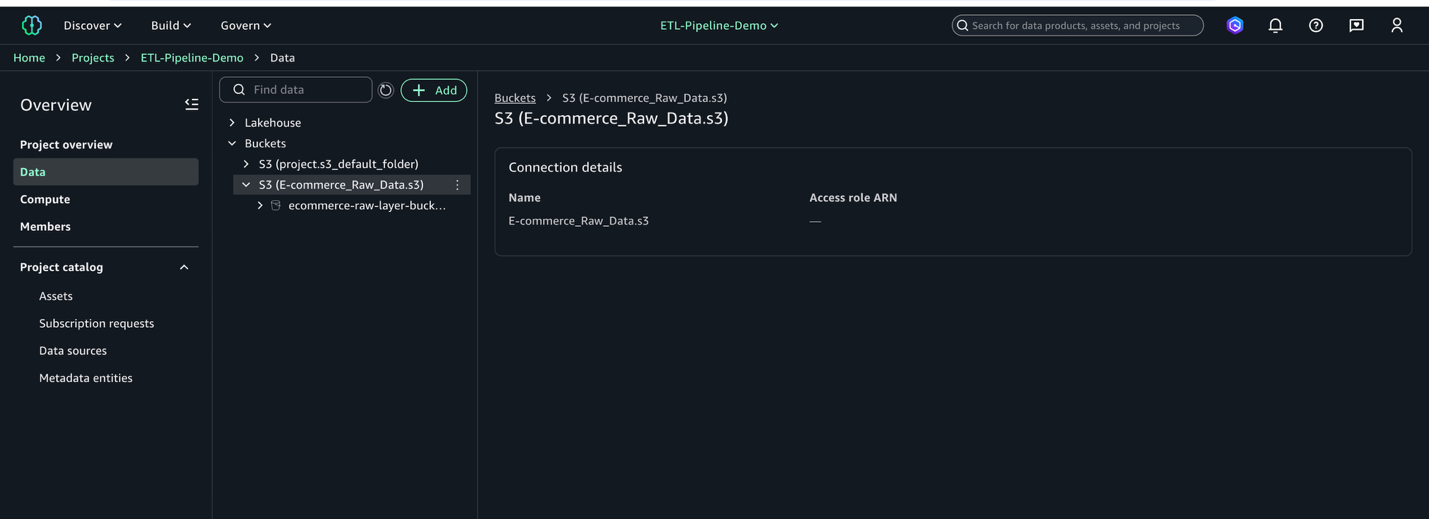
This course of connects your S3 bucket to SageMaker Unified Studio, making your information prepared for evaluation.
Create pocket book for job scripts
Earlier than you possibly can create the information processing jobs, you will need to arrange a pocket book to develop the scripts that can generate and course of your information. Full the next steps:
- In SageMaker Unified Studio, on the highest menu, beneath Construct, select JupyterLab.
- Select Configure House and select the occasion kind ml.t3.xlarge. This makes certain your JupyterLab occasion has at the very least 4 vCPUs and 4 GiB of reminiscence.
- Select Configure and Begin House or Save and Restart to launch your setting.
- Wait a number of moments for the occasion to be prepared.
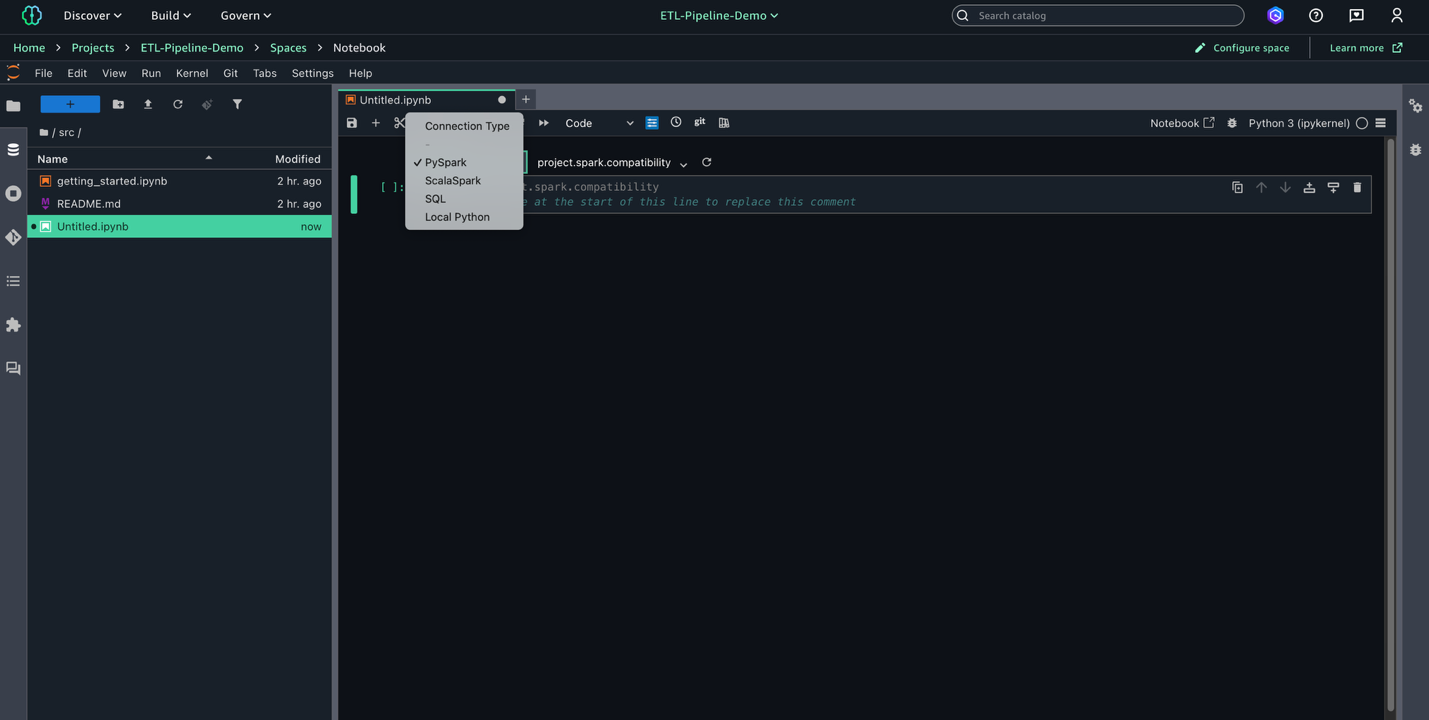
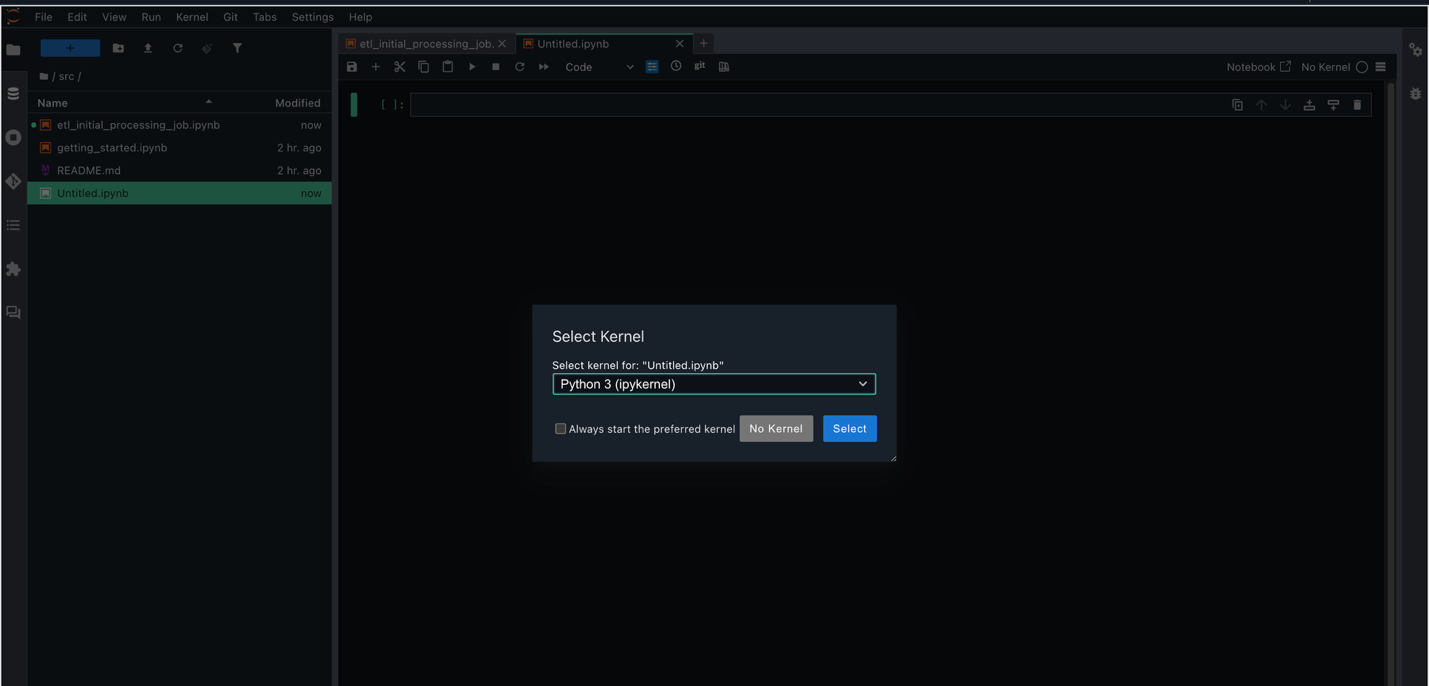
- Select File, New, and Pocket book to create a brand new pocket book.
- Set Kernel as Python 3, Connection kind as PySpark, and Compute as
Challenge.spark.compatibility.
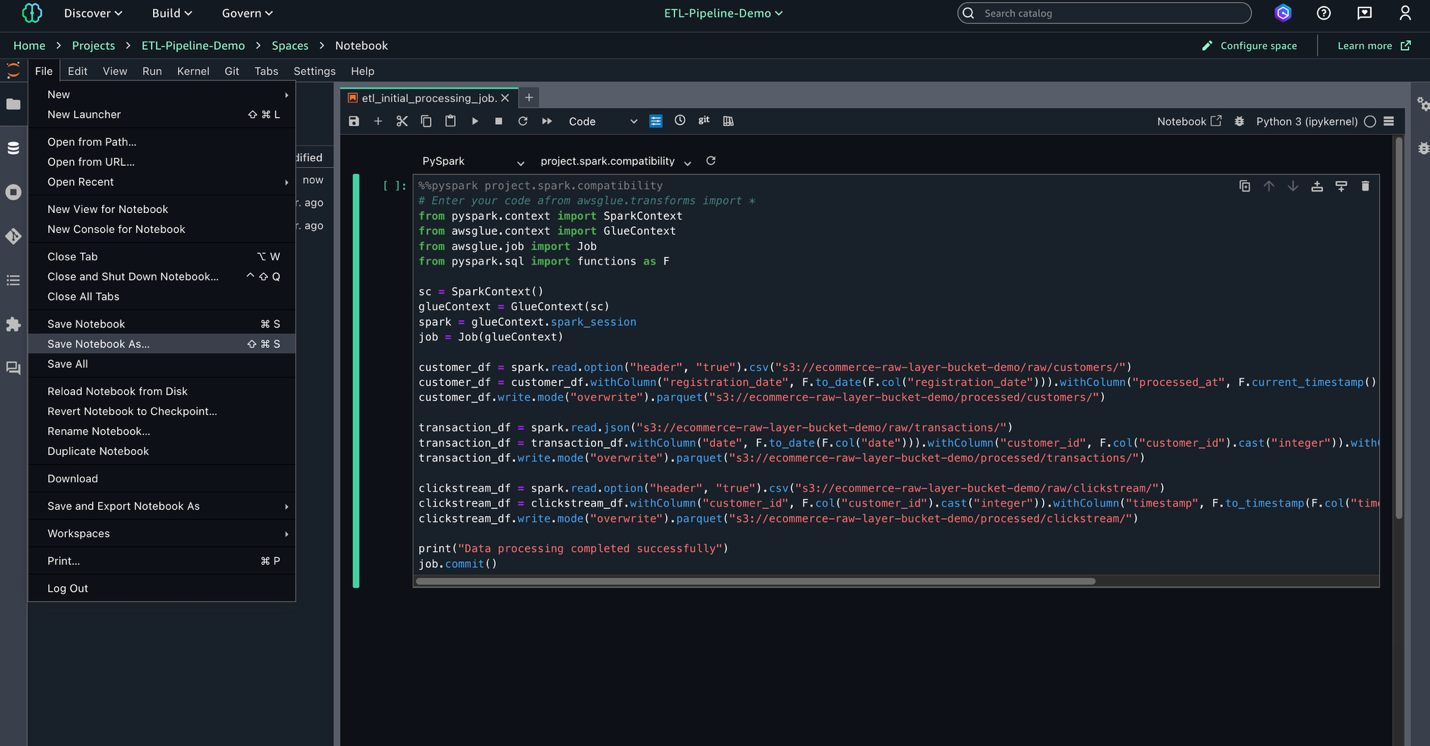
- Within the pocket book, enter the next script to make use of later in your AWS Glue job. This script processes uncooked information from three sources within the S3 information lake, standardizes dates, and converts information varieties earlier than saving the cleaned information in Parquet format for optimum storage and querying.
- Substitute
This script processes buyer, transaction, and clickstream information from the uncooked layer in Amazon S3 and saves it as Parquet recordsdata within the processed layer.
- Select File, Save Pocket book As, and save the file as
shared/etl_initial_processing_job.ipynb.
Create pocket book for AWS Glue Knowledge High quality
After you create the preliminary information processing script, the following step is to arrange a pocket book to carry out information high quality checks utilizing AWS Glue. These checks assist validate the integrity and completeness of your information earlier than additional processing. Full the next steps:
- Select File, New, and Pocket book to create a brand new pocket book.
- Set Kernel as Python 3, Connection kind as PySpark, and Compute as
Challenge.spark.compatibility.
- On this new pocket book, add the information high quality test script utilizing the AWS Glue
EvaluateDataQualitytechnique. Substitute - Select File, Save Pocket book As, and save the file as
shared/etl_data_quality_job.ipynb.
Create and check AWS Glue jobs
Jobs in SageMaker Unified Studio allow scalable, versatile ETL pipelines utilizing AWS Glue. This part walks by way of creating and testing information processing jobs for environment friendly and ruled information transformation.
Create preliminary information processing job
This job performs the primary processing job within the ETL pipeline, reworking uncooked buyer, transaction, and clickstream information and writing the cleaned output to Amazon S3 in Parquet format. Full the next steps to create the job:
- In SageMaker Unified Studio, go to your challenge.
- On the highest menu, select Construct, and beneath Knowledge Evaluation & Integration, select Knowledge processing jobs.

- Select Create job from notebooks.
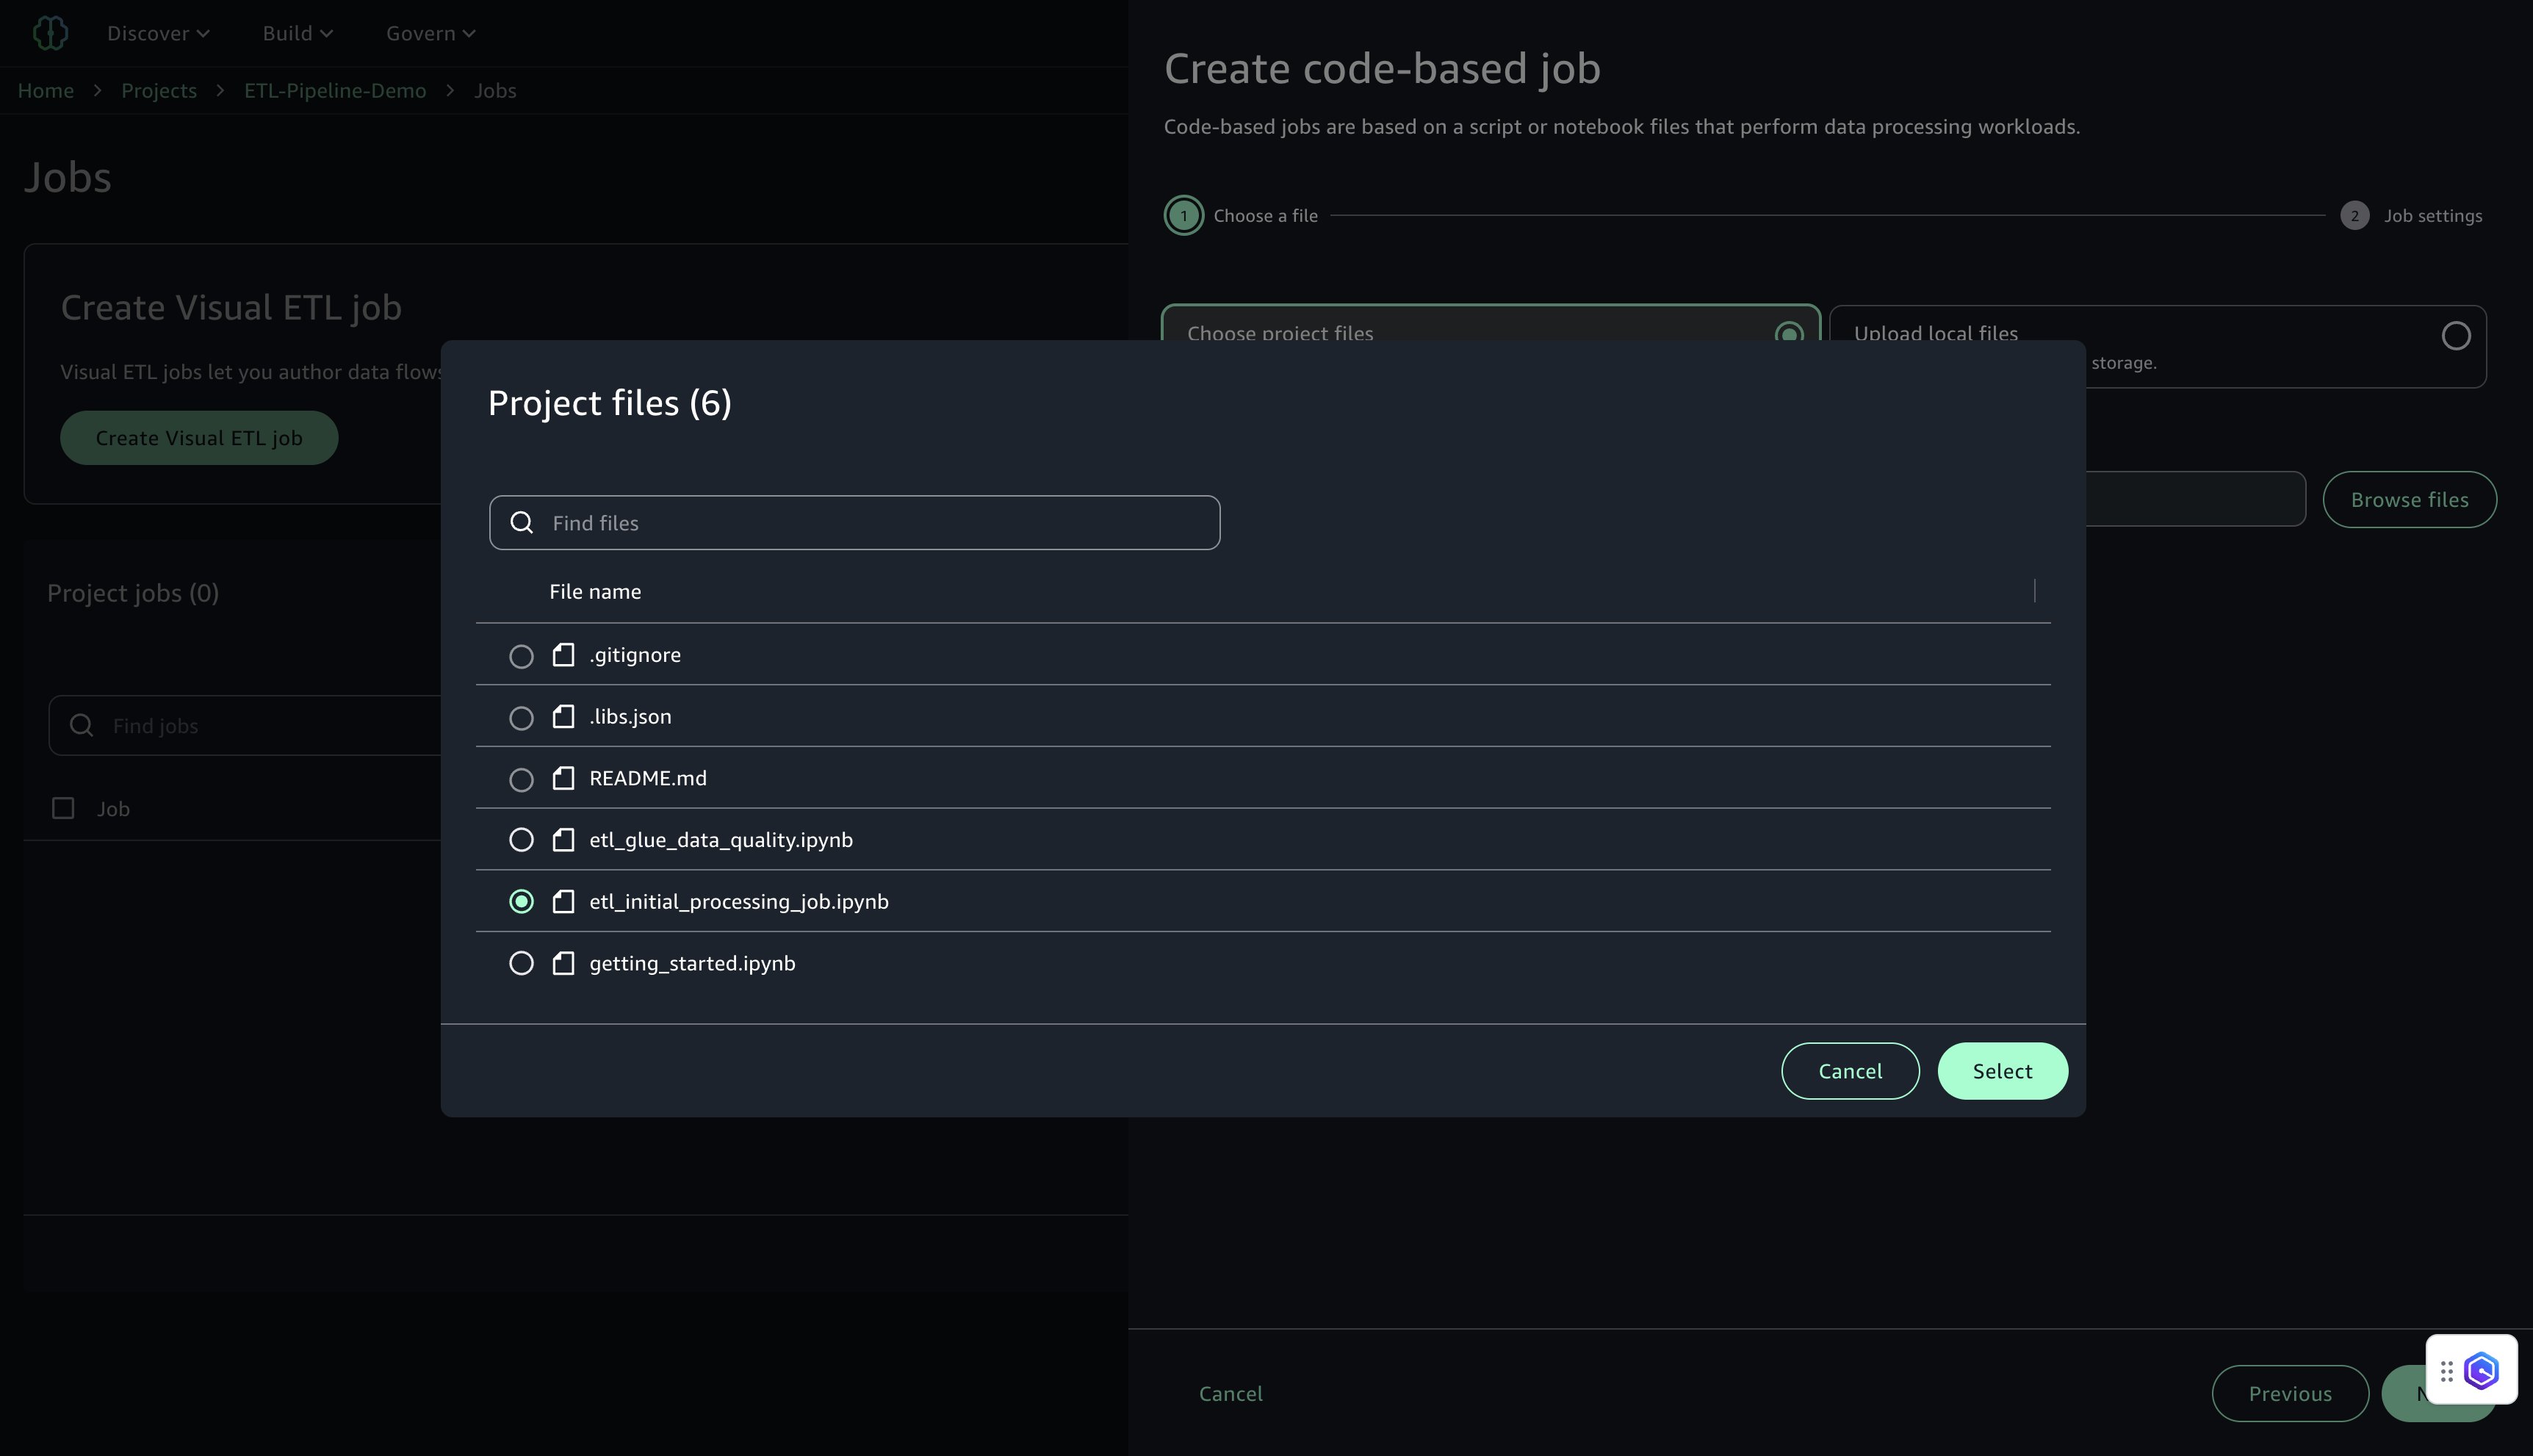
- Beneath Select challenge recordsdata, select Browse recordsdata.
- Find and choose
etl_initial_processing_job.ipynb(the pocket book saved earlier in JupyterLab), then select Choose and Subsequent.
- Configure the job settings:
- For Title, enter a reputation (for instance,
job-1). - For Description, enter an outline (for instance,
Preliminary ETL job for buyer information processing). - For IAM Position, select the challenge position (default).
- For Sort, select Spark.
- For AWS Glue model, use model 5.0.
- For Language, select Python.
- For Employee kind, use G.1X.
- For Variety of Cases, set to 10.
- For Variety of retries, set to 0.
- For Job timeout, set to 480.
- For Compute connection, select
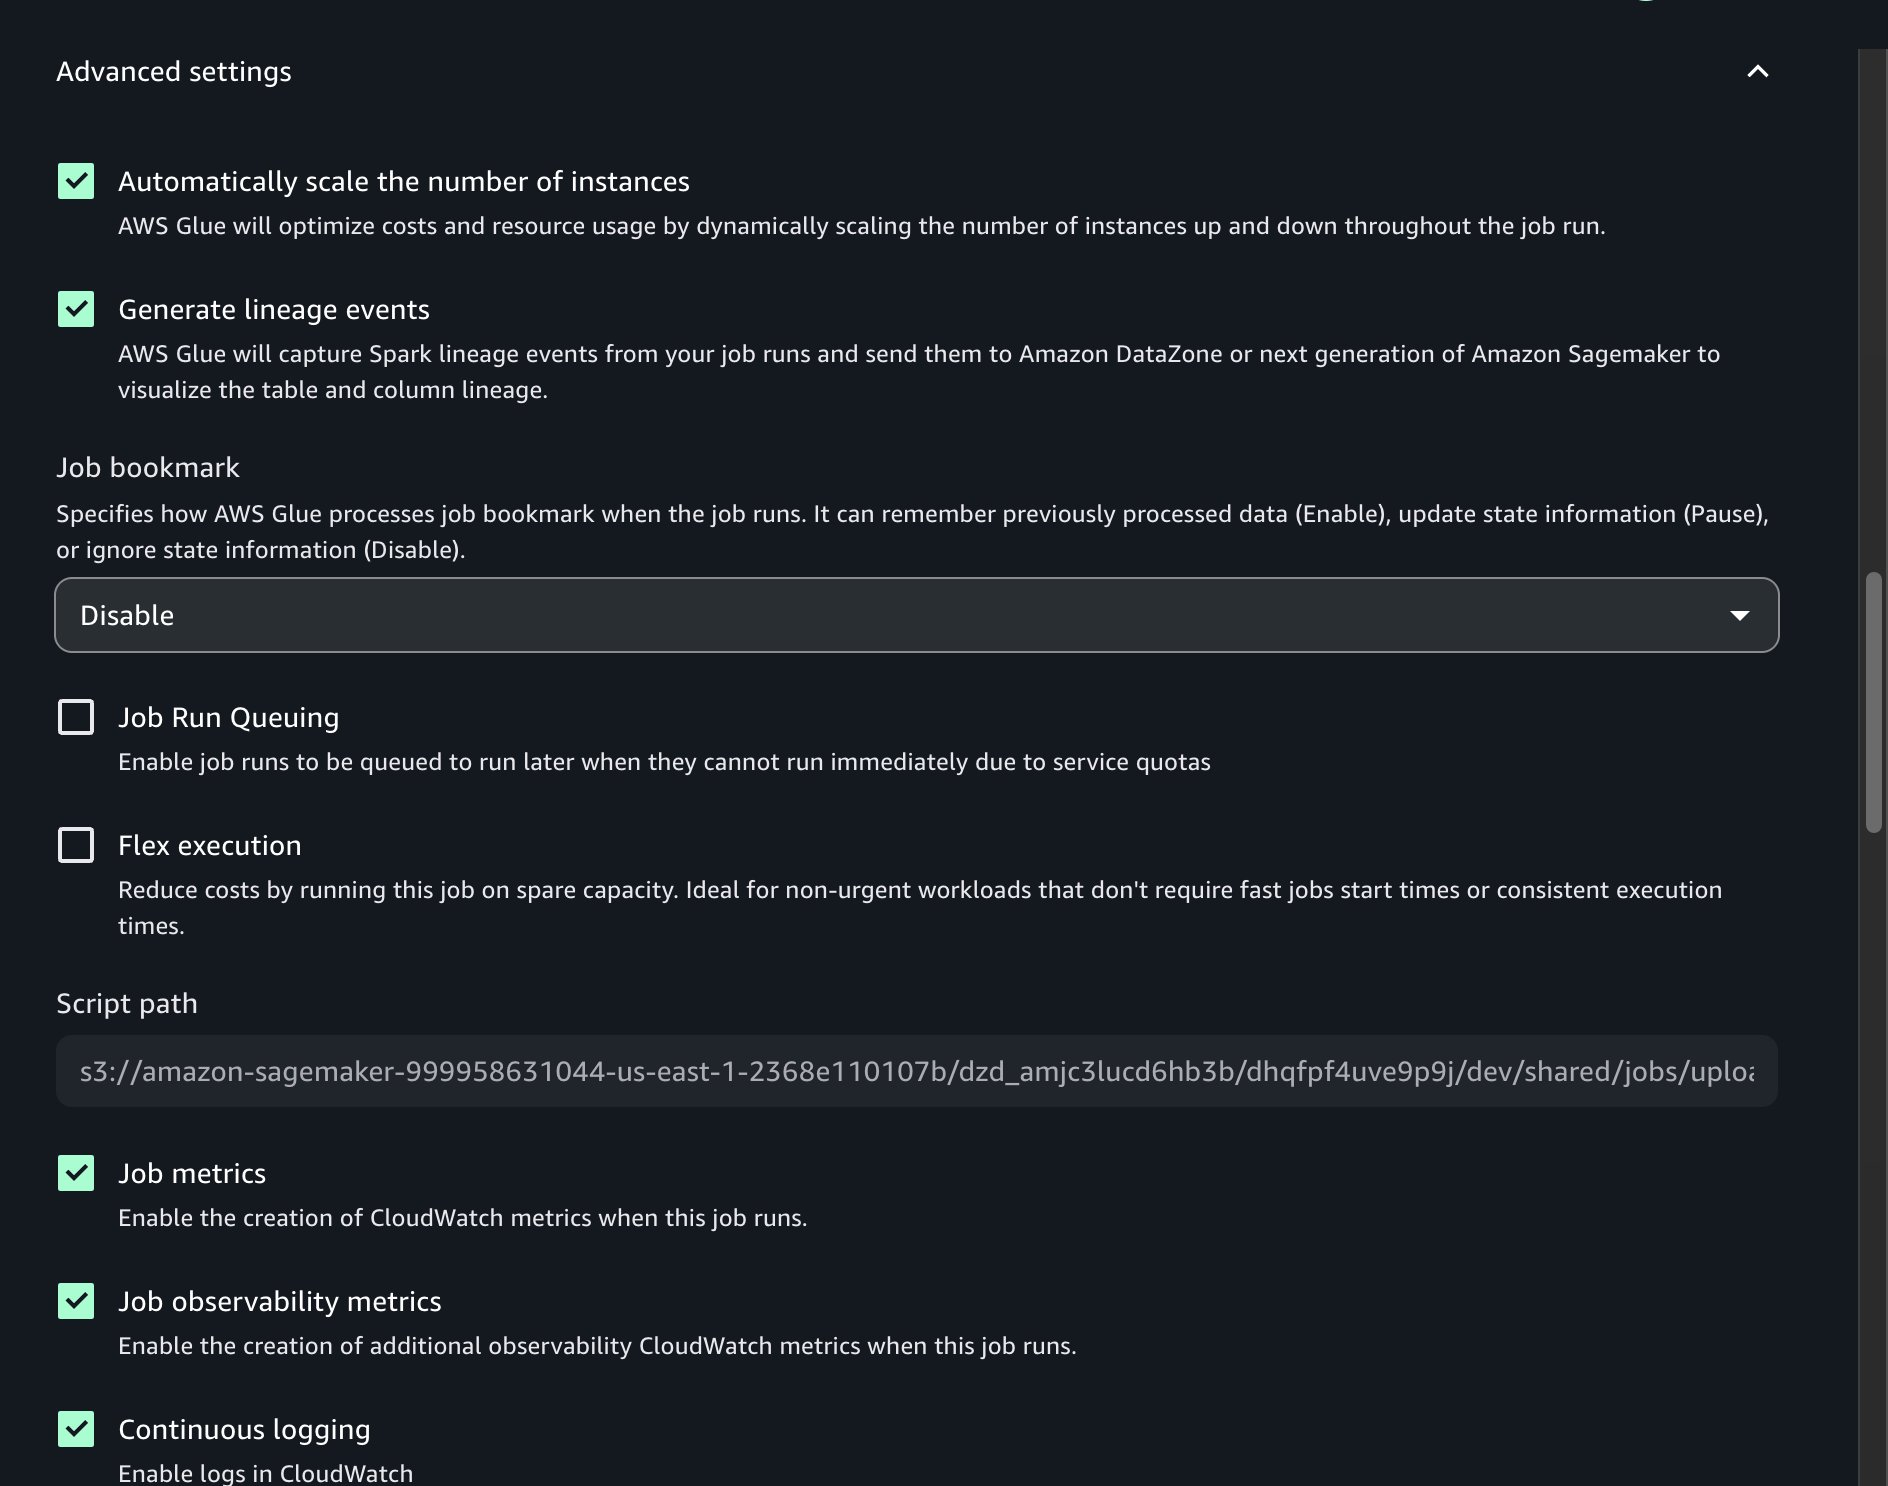
challenge.spark.compatibility. - Beneath Superior settings, activate Steady logging.
- For Title, enter a reputation (for instance,
- Go away the remaining settings as default, then select Submit.
After the job is created, a affirmation message will seem indicating that job-1 was created efficiently.
Create AWS Glue Knowledge High quality job
This job runs information high quality checks on the remodeled datasets utilizing AWS Glue Knowledge High quality. Rulesets validate completeness and uniqueness for key fields. Full the next steps to create the job:
- In SageMaker Unified Studio, go to your challenge.
- On the highest menu, select Construct, and beneath Knowledge Evaluation & Integration, select Knowledge processing jobs.
- Select Create job, Code-based job, and Create job from recordsdata.
- Beneath Select challenge recordsdata, select Browse recordsdata.
- Find and choose
etl_glue_data_quality.ipynb, then select Choose and Subsequent. - Configure the job settings:
- For Title, enter a reputation (for instance,
job-2). - For Description, enter an outline (for instance,
Knowledge high quality checks utilizing AWS Glue Knowledge High quality). - For IAM Position, select the challenge position.
- For Sort, select Spark.
- For AWS Glue model, use model 5.0.
- For Language, select Python.
- For Employee kind, use G.1X.
- For Variety of Cases, set to 10.
- For Variety of retries, set to 0.
- For Job timeout, set to 480.
- For Compute connection, select
challenge.spark.compatibility. - Beneath Superior settings, activate Steady logging.
- Go away the remaining settings as default, then select Submit.
After the job is created, a affirmation message will seem indicating that job-2 was created efficiently.
Take a look at AWS Glue jobs
Take a look at each jobs to ensure they execute efficiently:
- In SageMaker Unified Studio, go to your challenge.
- On the highest menu, select Construct, and beneath Knowledge Evaluation & Integration, select Knowledge processing jobs.
- Choose
job-1and select Run job. - Monitor the job execution and confirm it completes efficiently.
- Equally, choose
job-2and select Run job. - Monitor the job execution and confirm it completes efficiently.
Add EMR Serverless compute
Within the ETL pipeline, we use EMR Serverless to carry out compute-intensive transformations and aggregations on giant datasets. It robotically scales assets primarily based on workload, providing excessive efficiency with simplified operations. By integrating EMR Serverless with SageMaker Unified Studio, you possibly can simplify the method of operating Spark jobs interactively utilizing Jupyter notebooks in a serverless setting.
This part walks by way of the steps to configure EMR Serverless compute inside SageMaker Studio and use it for executing distributed information processing jobs.
Configure EMR Serverless in SageMaker Unified Studio
To make use of EMR Serverless for processing within the challenge, comply with these steps:
- Within the navigation pane on Challenge Overview, select Compute.
- On the Knowledge processing tab, select Add compute and Create new compute assets.
- Choose EMR Serverless and select Subsequent.
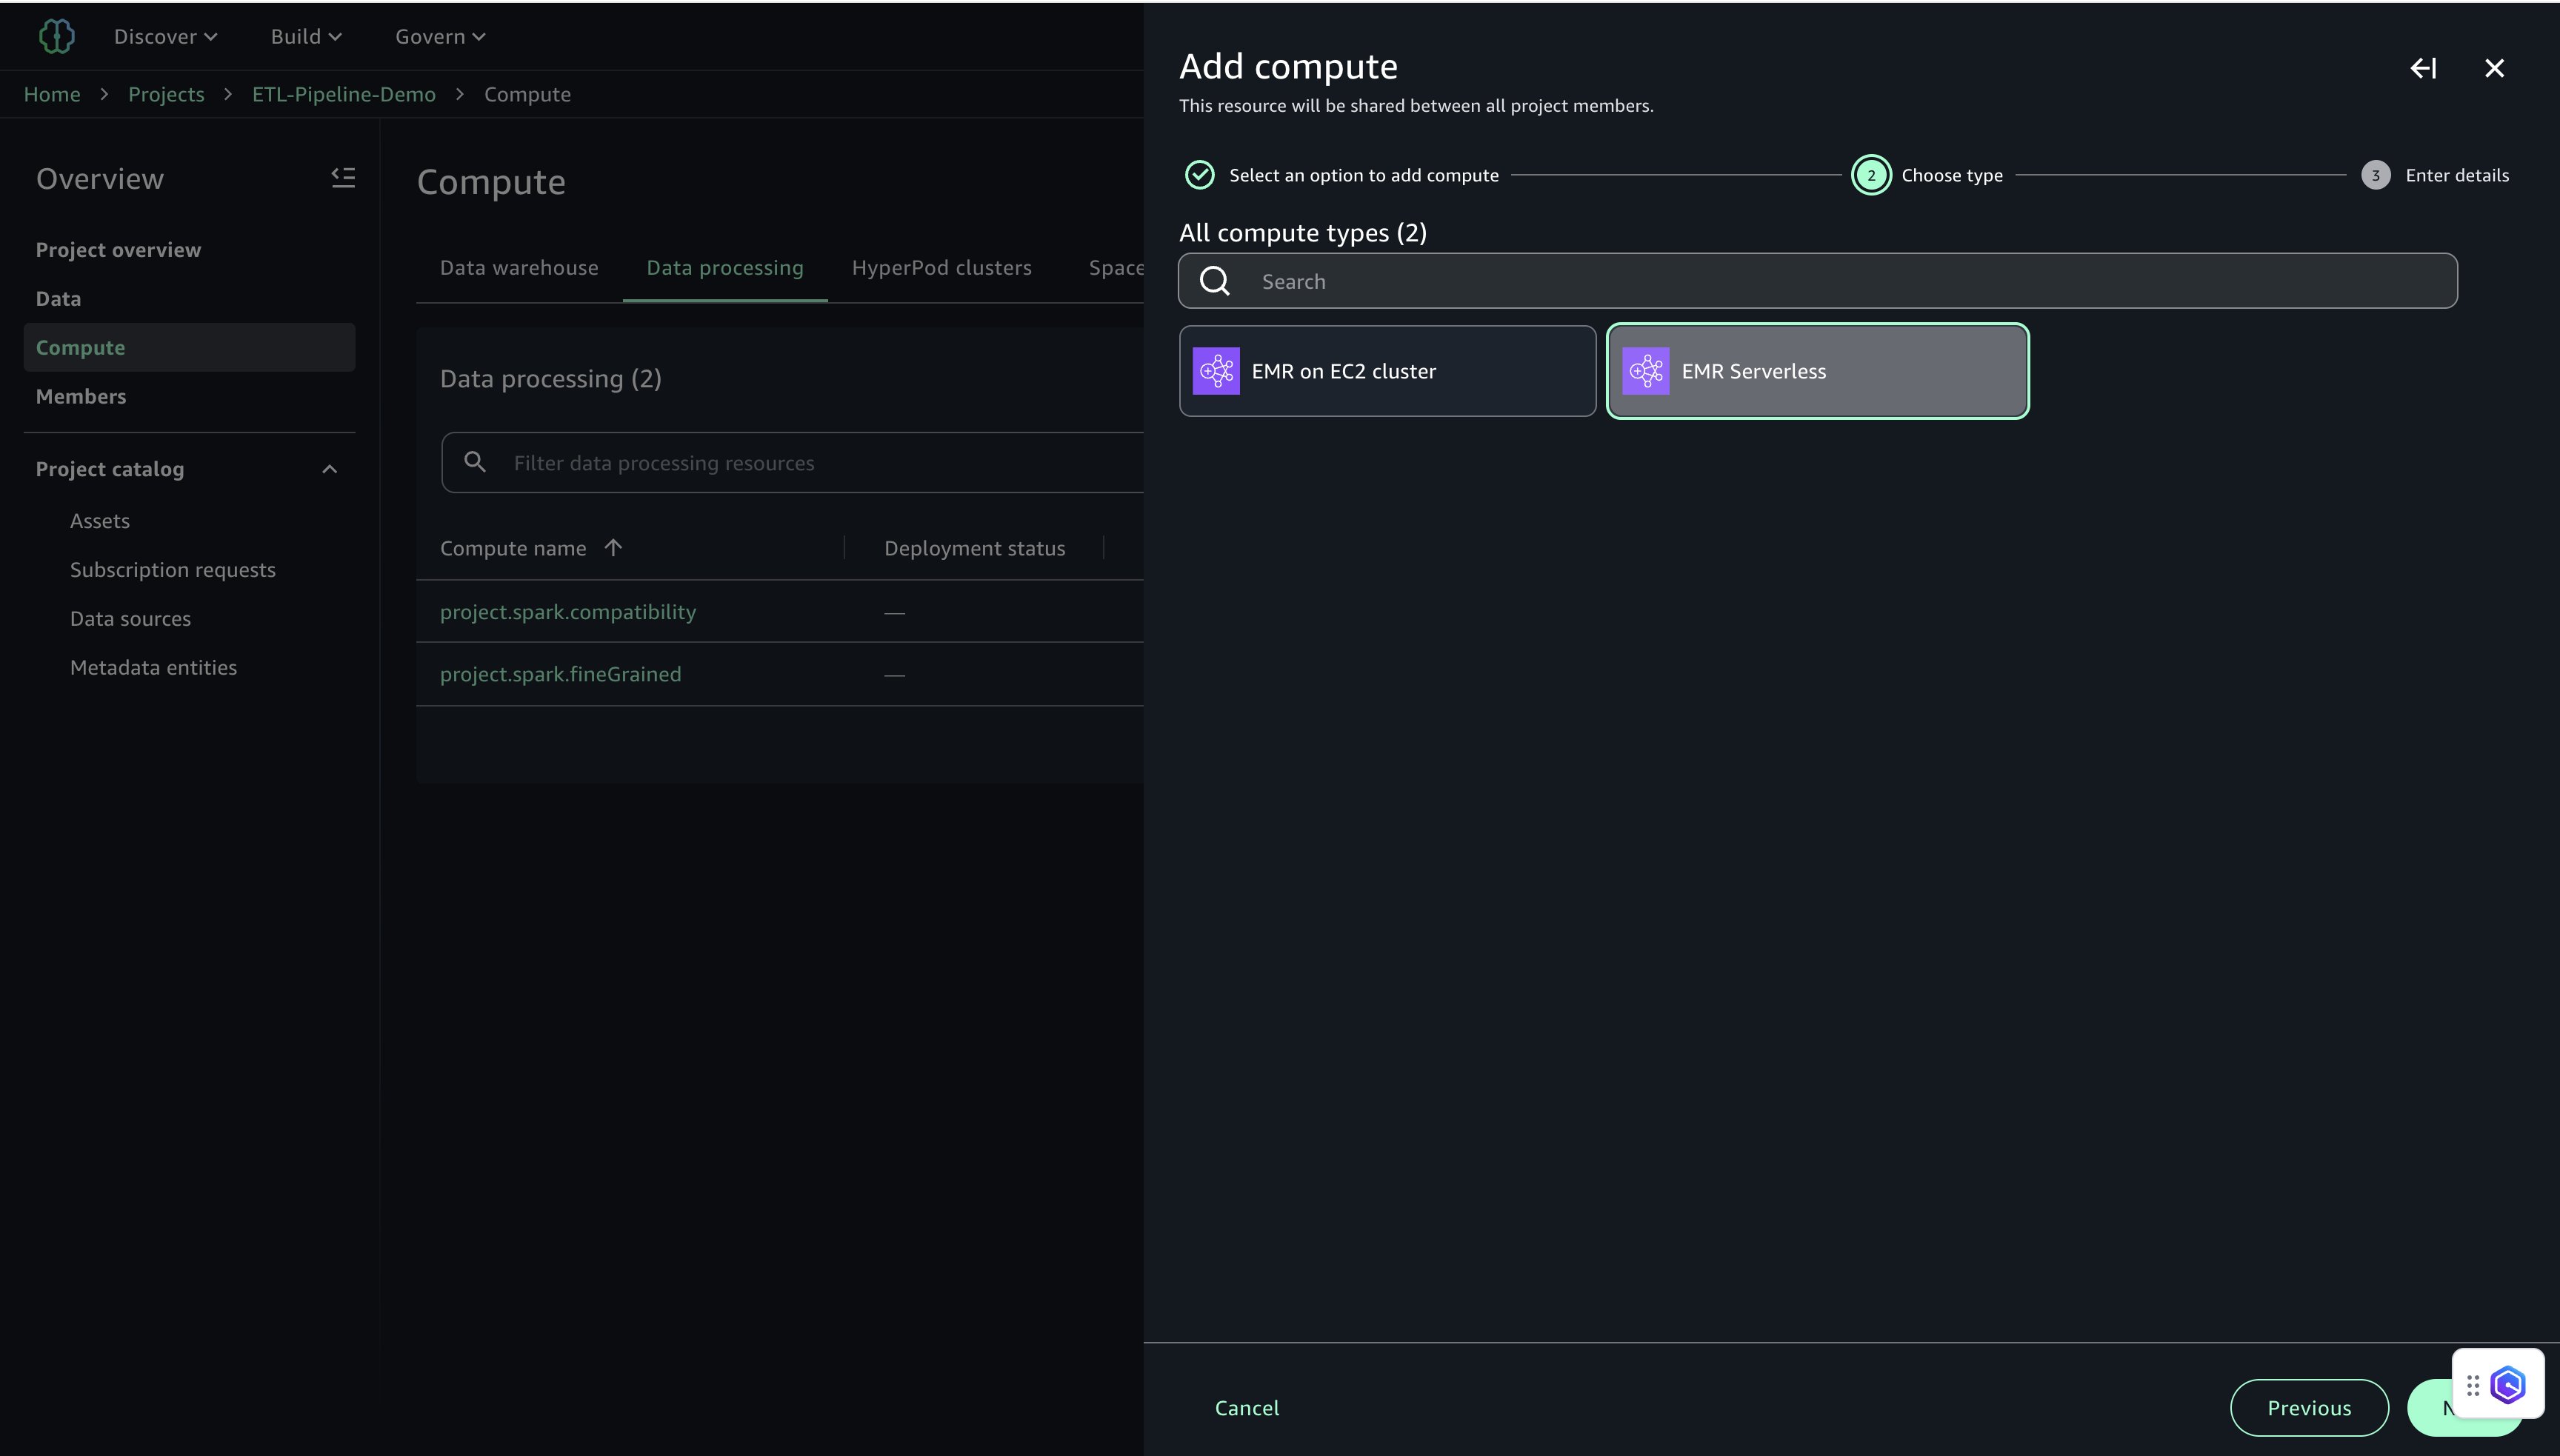
- Configure EMR Serverless settings:
- For Compute title, enter a reputation (for instance,
etl-emr-serverless). - For Description, enter an outline (for instance,
EMR Serverless for superior information processing). - For Launch label, select emr-7.8.0.
- For Permission mode, select Compatibility.
- Select Add Compute to finish the setup.
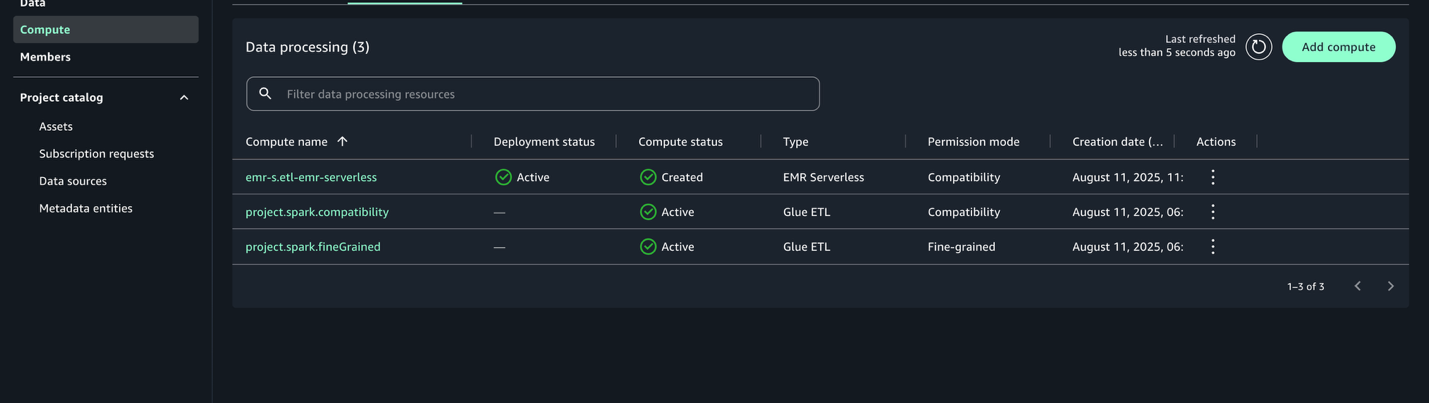
After it’s configured, the EMR Serverless compute can be listed with the deployment standing Energetic.
Create and run pocket book with EMR Serverless
After you create the EMR Serverless compute, you possibly can run PySpark-based information transformation jobs utilizing a Jupyter pocket book to carry out large-scale information transformations. This job reads cleaned buyer, transaction, and clickstream datasets from Amazon S3, performs aggregations and scoring, and writes the ultimate analytics outputs again to Amazon S3 in each Parquet and CSV codecs.Full the next steps to create a pocket book for EMR Serverless processing:
- On the highest menu, beneath Construct, select JupyterLab.
- Select File, New, and Pocket book.
- Set Kernel as Python 3, Connection kind as PySpark, and Compute as
emr-s.etl-emr-serverless.
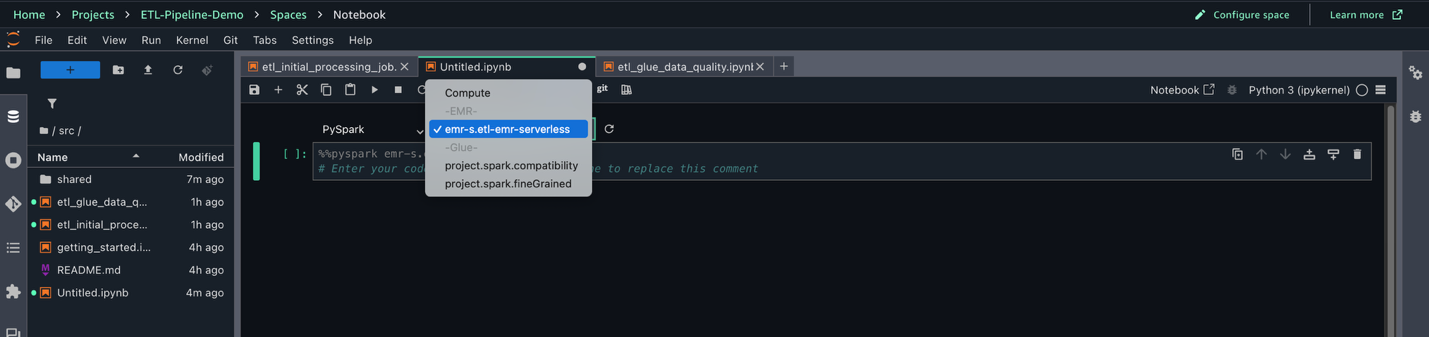
- Enter the next PySpark script to run your information transformation job on EMR Serverless. Present the title of your S3 bucket:
- Select File, Save Pocket book As, and save the file as
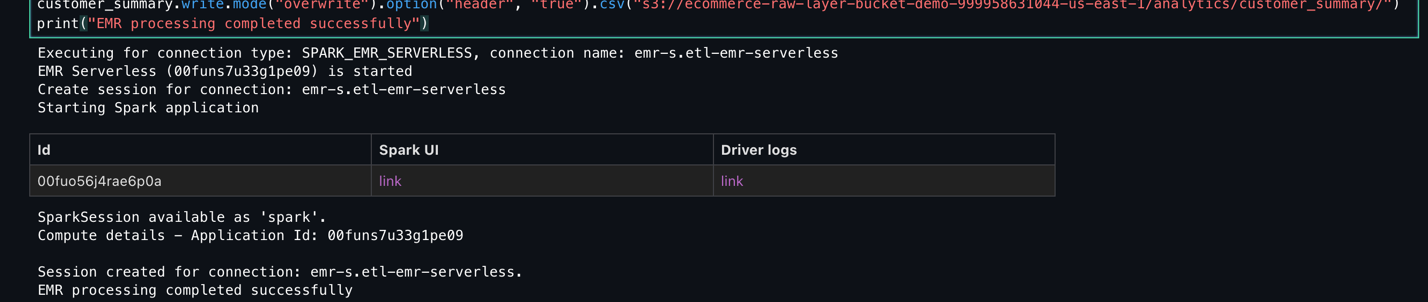
shared/emr_data_transformation_job.ipynb. - Select Run Cell to run the script.
- Monitor the Script execution and confirm it completes efficiently.
- Monitor the Spark job execution and guarantee it completes with out errors.
Add Redshift Serverless compute
With Redshift Serverless, customers can run and scale information warehouse workloads with out managing infrastructure. It’s ideally suited for analytics use circumstances the place information must be queried from Amazon S3 or built-in right into a centralized warehouse. On this step, you add Redshift Serverless to the challenge for loading and querying processed buyer analytics information generated in earlier phases of the pipeline. For extra details about Redshift Serverless, see Amazon Redshift Serverless.
Arrange Redshift Serverless compute in SageMaker Unified Studio
Full the next steps to arrange Redshift Serverless compute:
- In SageMaker Unified Studio, select the Compute tab inside your challenge workspace (
ETL-Pipeline-Demo). - On the SQL analytics tab, select Add compute, then select Create new compute assets to start configuring your compute setting.
- Choose Amazon Redshift Serverless.
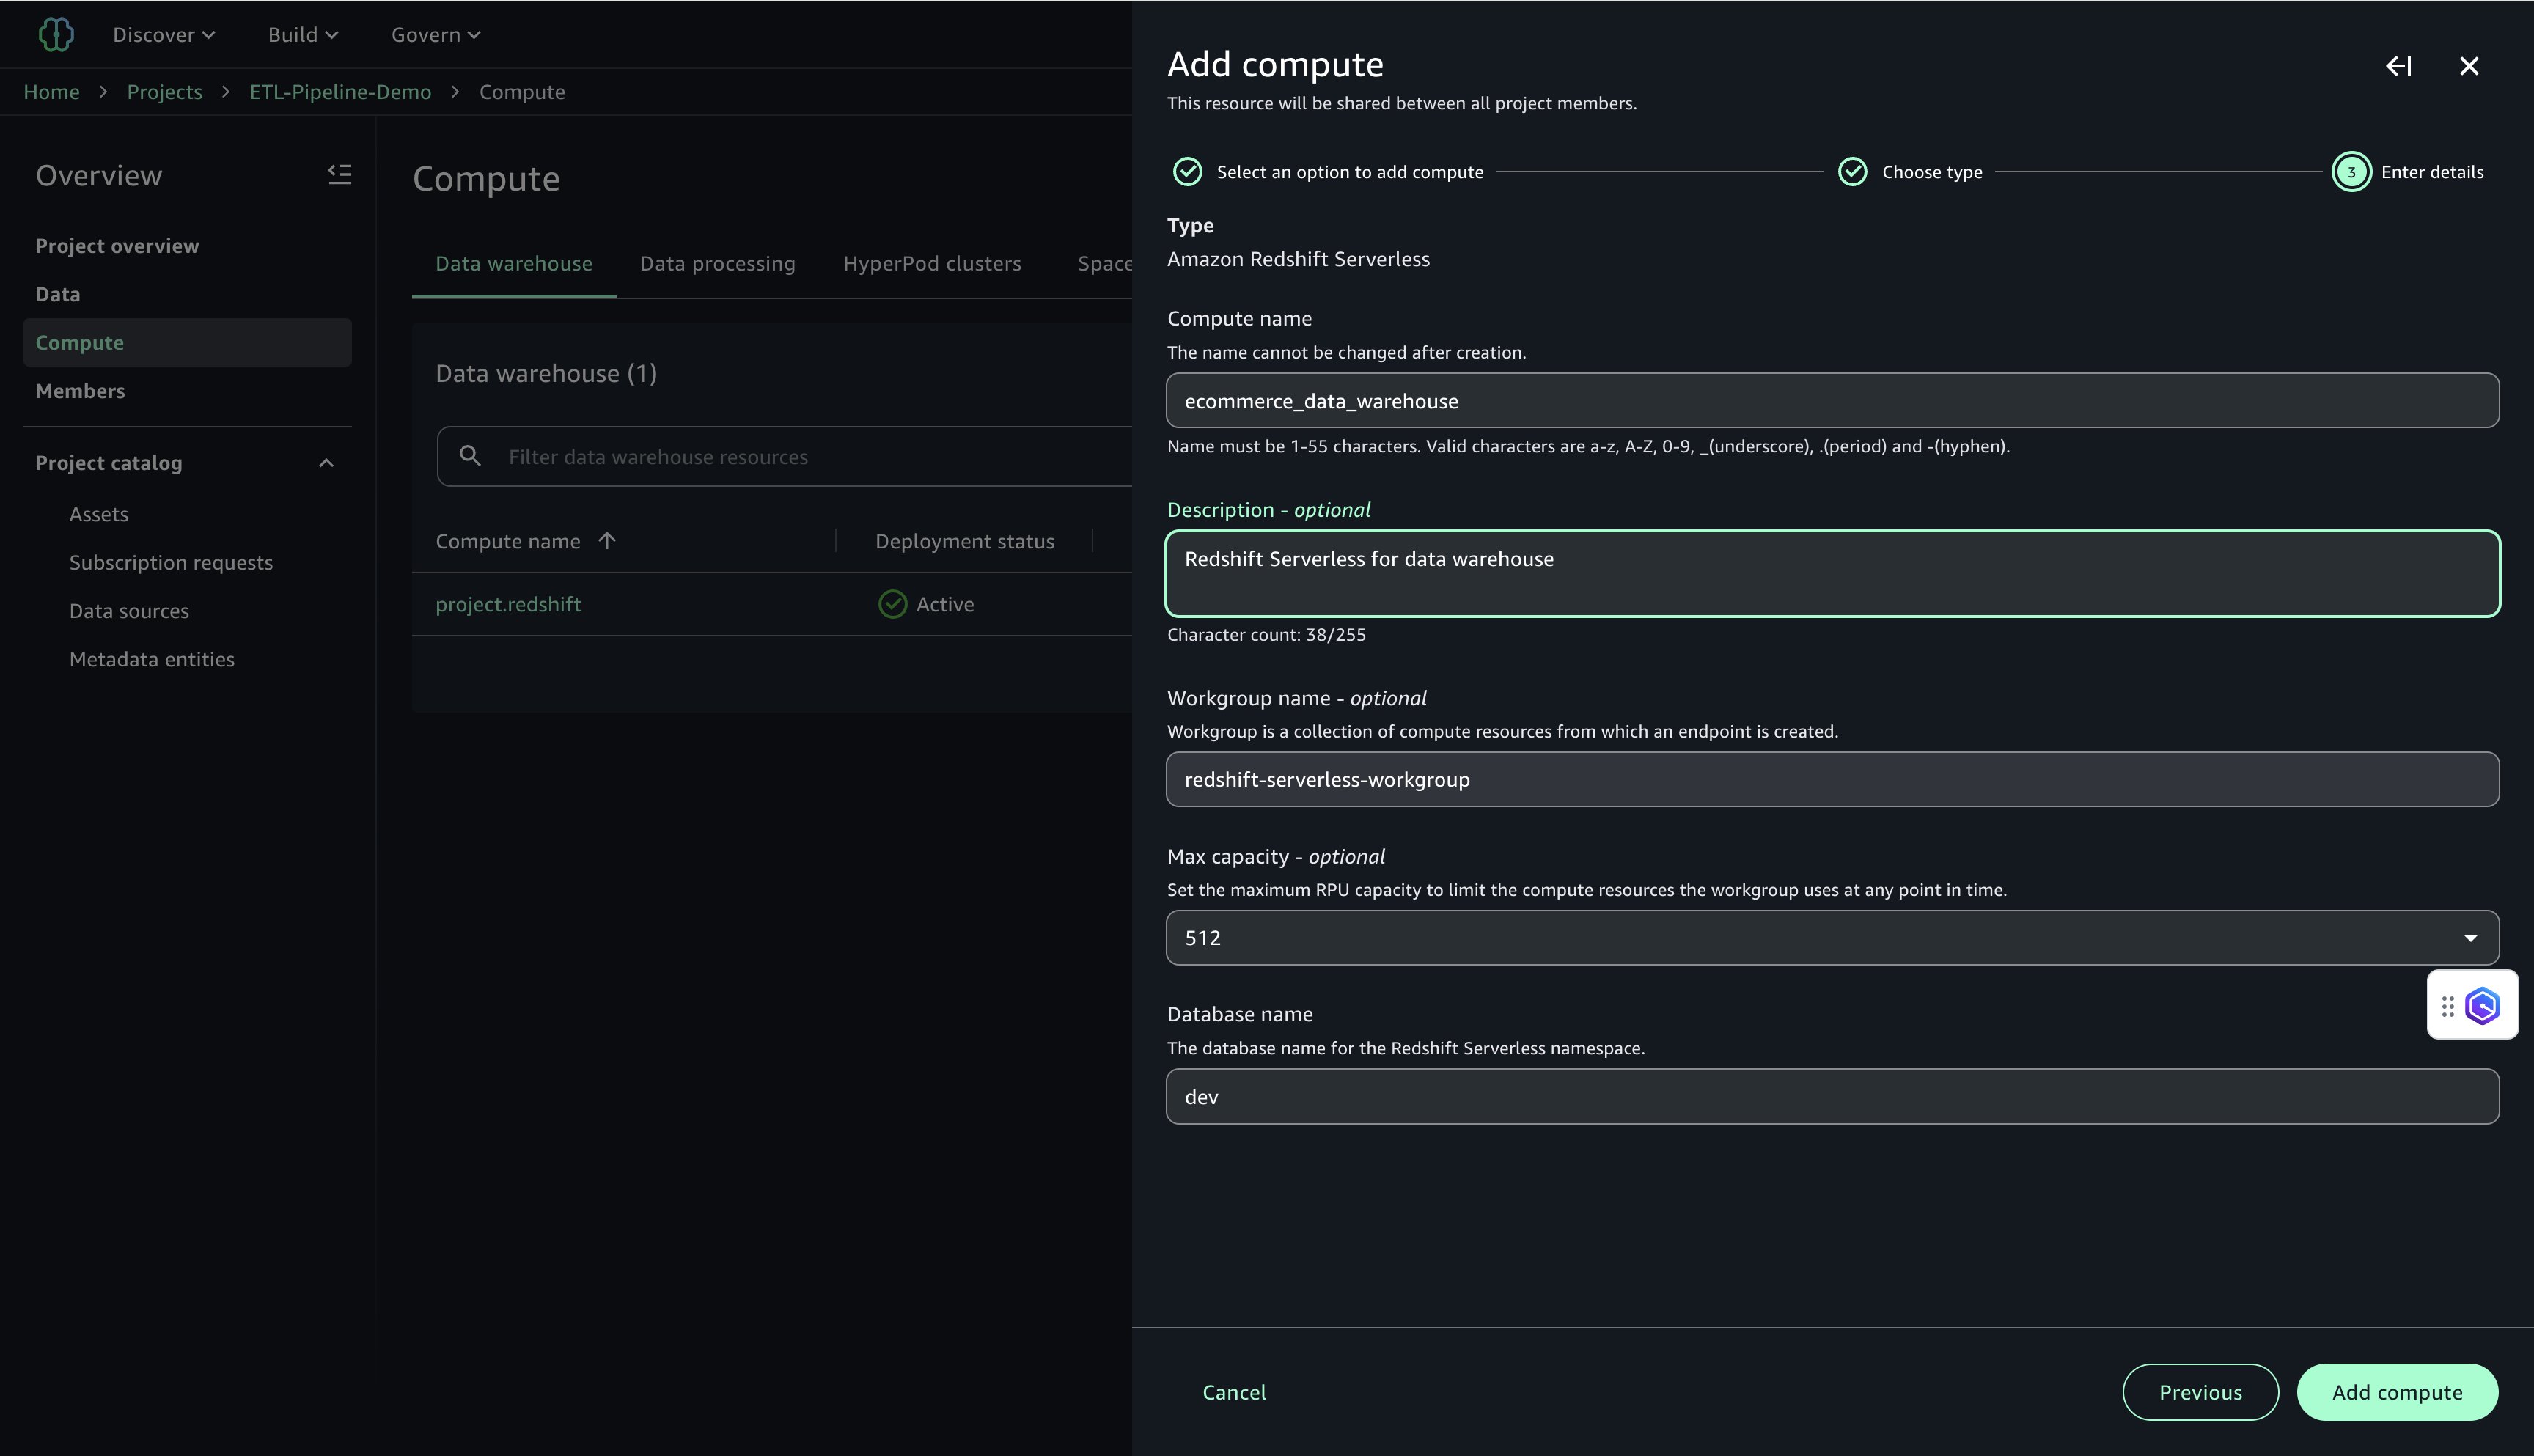
- Configure the next:
- For Compute title, enter a reputation (for instance,
ecommerce_data_warehouse). - For Description, enter an outline (for instance,
Redshift Serverless for information warehouse). - For Workgroup title, enter a reputation (for instance,
redshift-serverless-workgroup). - For Most capability, set to 512 RPUs.
- For Database title, enter
dev.
- For Compute title, enter a reputation (for instance,
- Select Add Compute to create the Redshift Serverless useful resource.
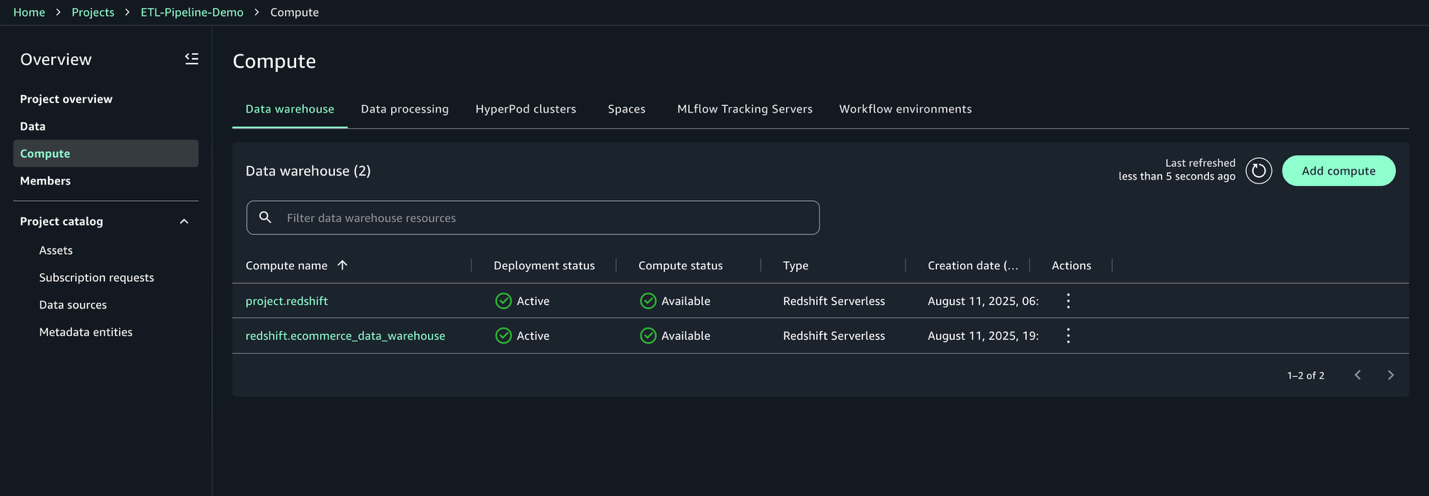
After the compute is created, you possibly can check the Amazon Redshift connection.
- On the Knowledge warehouse tab, verify that
redshift.ecommerce_data_warehouseis listed.
- Select the compute:
redshift.ecommerce_data_warehouse. - On the Permissions tab, copy the IAM position ARN. You utilize this for the Redshift COPY command within the subsequent step.

Create and execute querybook to load information into Amazon Redshift
On this step, you create a SQL script to load the processed buyer abstract information from Amazon S3 right into a Redshift desk. This permits centralized analytics for buyer segmentation, lifetime worth calculations, and advertising campaigns. Full the next steps:
- On the Construct menu, beneath Knowledge Evaluation & Integration, select Question editor.
- Enter the next SQL into the querybook to create the
customer_summarydesk within the public schema: - Select Add SQL so as to add a brand new SQL script.
- Enter the next SQL into the querybook
Be aware: We truncate the
customer_summarydesk to take away present data and guarantee a clear, duplicate-free reload of the newest aggregated information from S3 earlier than operating the COPY command. - Select Add SQL so as to add a brand new SQL script.
- Enter the next SQL to load the information into Redshift Serverless out of your S3 bucket. Present the title of your S3 bucket and IAM position ARN for Amazon Redshift:
- Within the Question Editor, configure the next:
- Connection:
redshift.ecommerce_data_warehouse - Database:
dev - Schema:
public
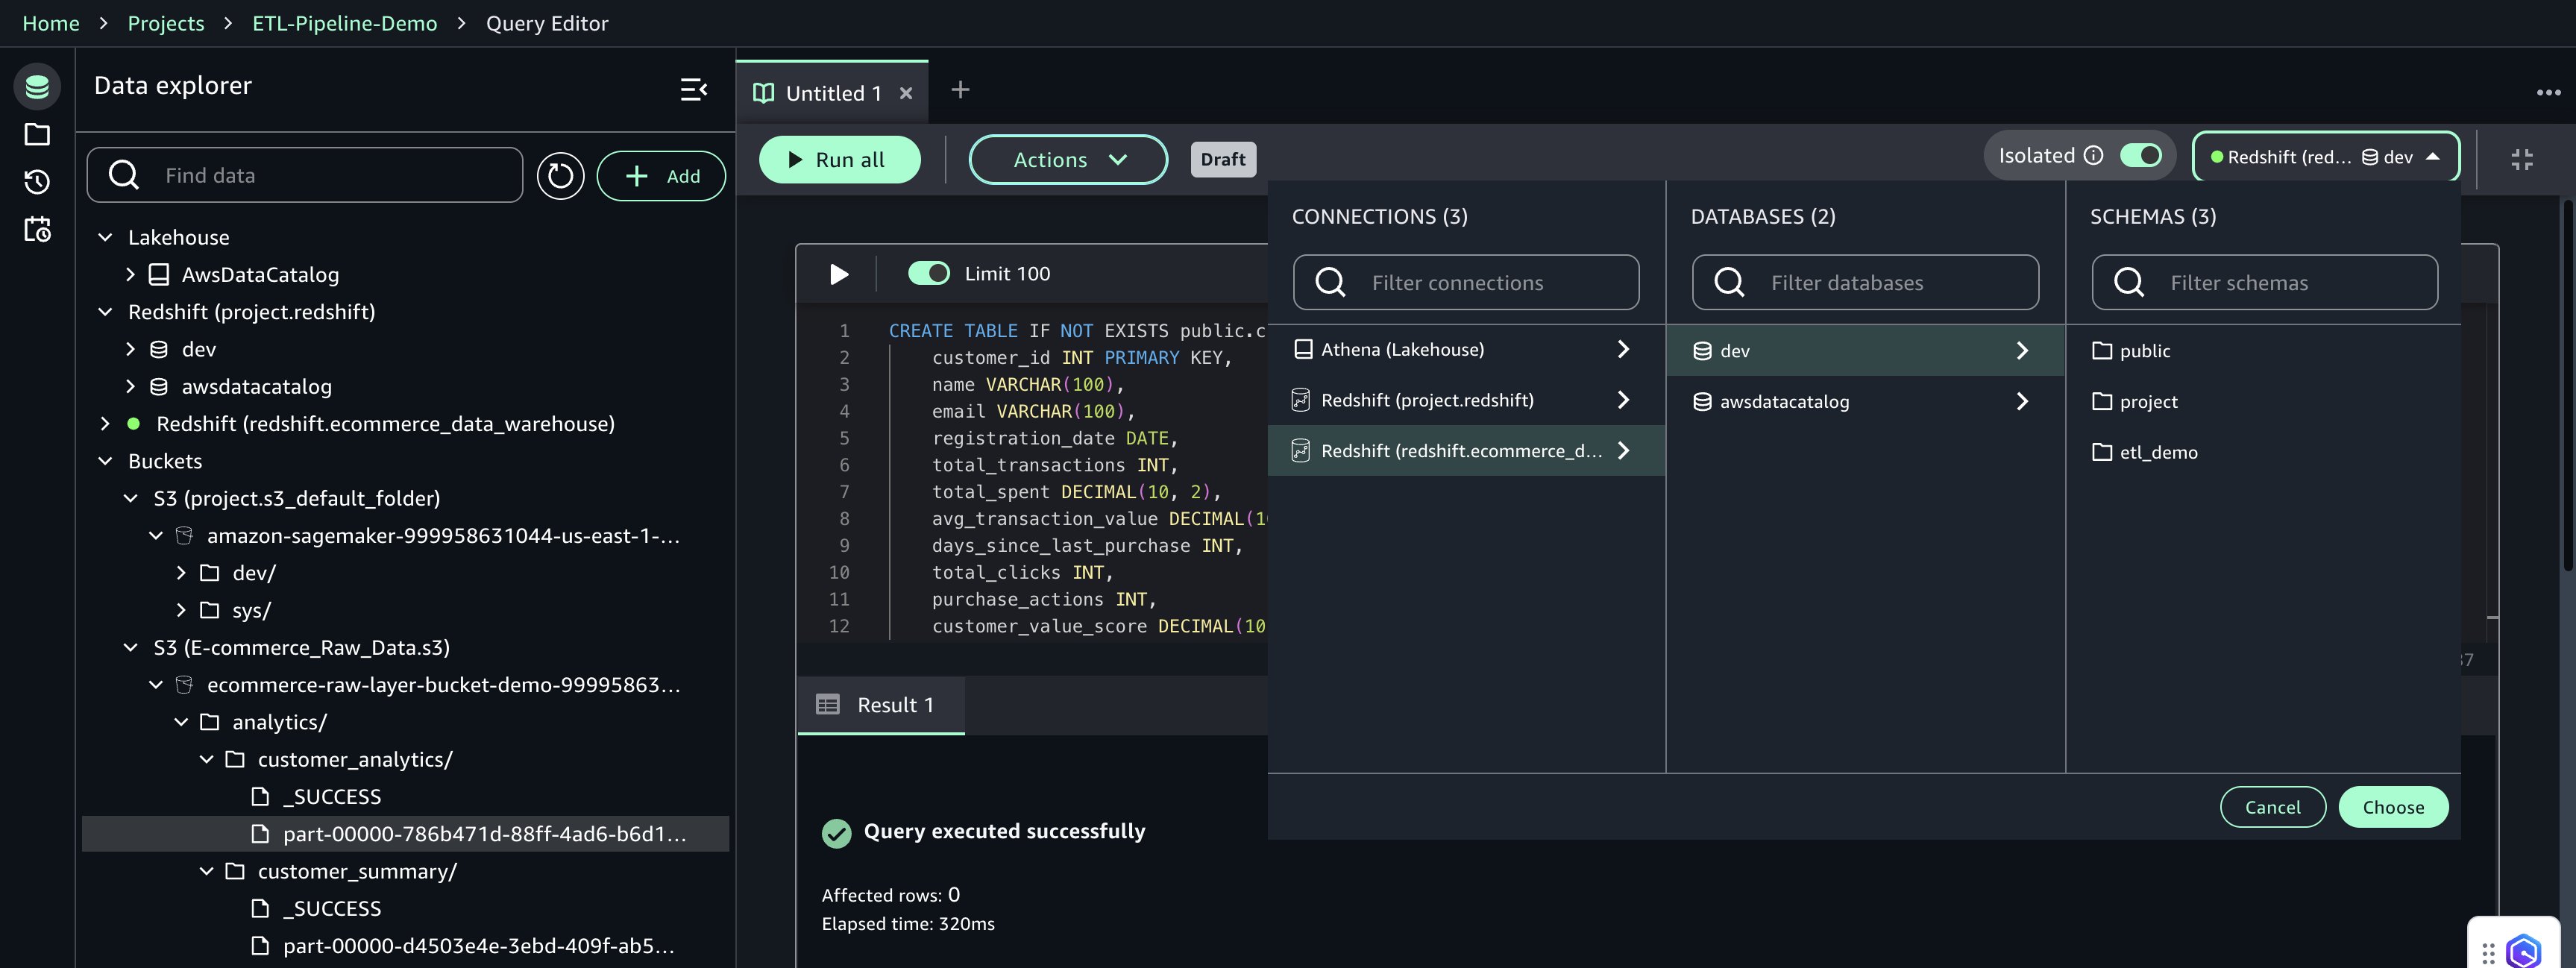
- Connection:
- Select Select to use the connection settings.
- Select Run Cell for every cell to create the
customer_summarydesk within the public schema after which load information from Amazon S3. - Select Actions, Save, title the querybook
final_data_product, and select Save modifications.
This completes the creation and execution of the Redshift information product utilizing the querybook.
Create and handle the workflow setting
This part describes the way to create a shared workflow setting and outline a code-based workflow that automates a buyer information pipeline utilizing Apache Airflow inside SageMaker Unified Studio. Shared environments facilitate collaboration amongst challenge members and centralized workflow administration.
Create the workflow setting
Workflow environments should be created by challenge homeowners. After they’re created, members of the challenge can sync and use the workflows. Solely challenge homeowners can replace or delete workflow environments. Full the next steps to create the workflow setting:
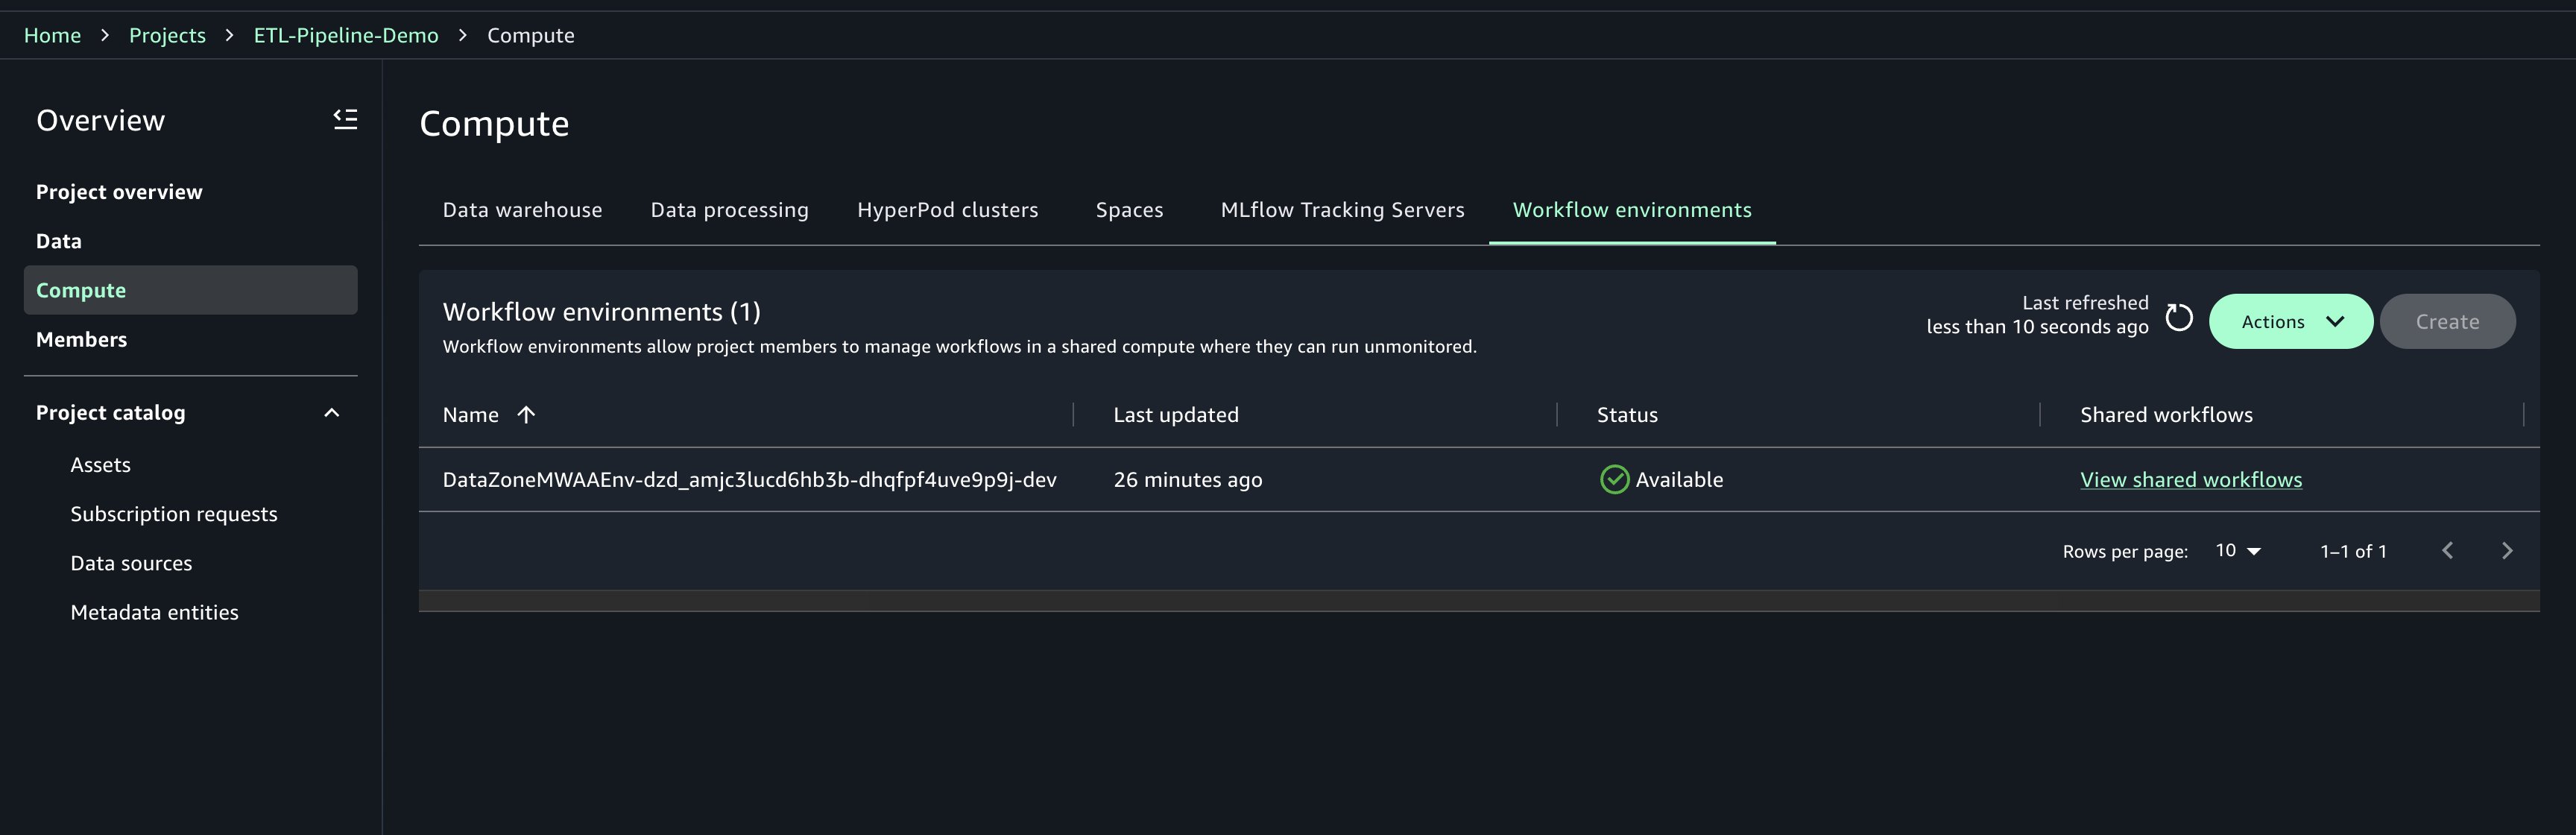
- Select Compute in your challenge.
- On the Workflow environments tab, select Create.
- Assessment the configuration parameters and select Create workflow setting.
- Look ahead to the setting to be totally provisioned earlier than continuing It’ll take round 20 minutes to provision.
Create the code-based workflow
When the workflow setting is prepared, outline a code-based ETL pipeline utilizing Airflow. This pipeline automates day by day processing duties throughout providers like AWS Glue, EMR Serverless, and Redshift Serverless.
- On the Construct menu, beneath Orchestration, select Workflows.
- Select Create new workflow, then select Create workflow in code editor.
- Configure House and select the occasion kind ml.t3.xlarge. This ensures your JupyterLab occasion has at the very least 4 vCPUs and 4 GiB of reminiscence.
- Select Configure and Restart House to launch your setting.

The next script defines a day by day scheduled ETL workflow that automates a number of actions:
- Preliminary information transformation utilizing AWS Glue
- Knowledge high quality validation utilizing AWS Glue (EvaluateDataQuality)
- Superior information processing with EMR Serverless utilizing a Jupyter pocket book
- Loading remodeled outcomes into Redshift Serverless from a querybook
- Substitute the default DAG template with the next definition, guaranteeing that job names and enter paths match the precise names utilized in your challenge:
- Select File, Save python file, title the file
shared/workflows/dags/customer_etl_pipeline.py, and select Save.
Deploy and run the workflow
Full the next steps to run the workflow:
- On the Construct menu, select Workflows.
- Select the workflow
customer_etl_pipelineand select Run.
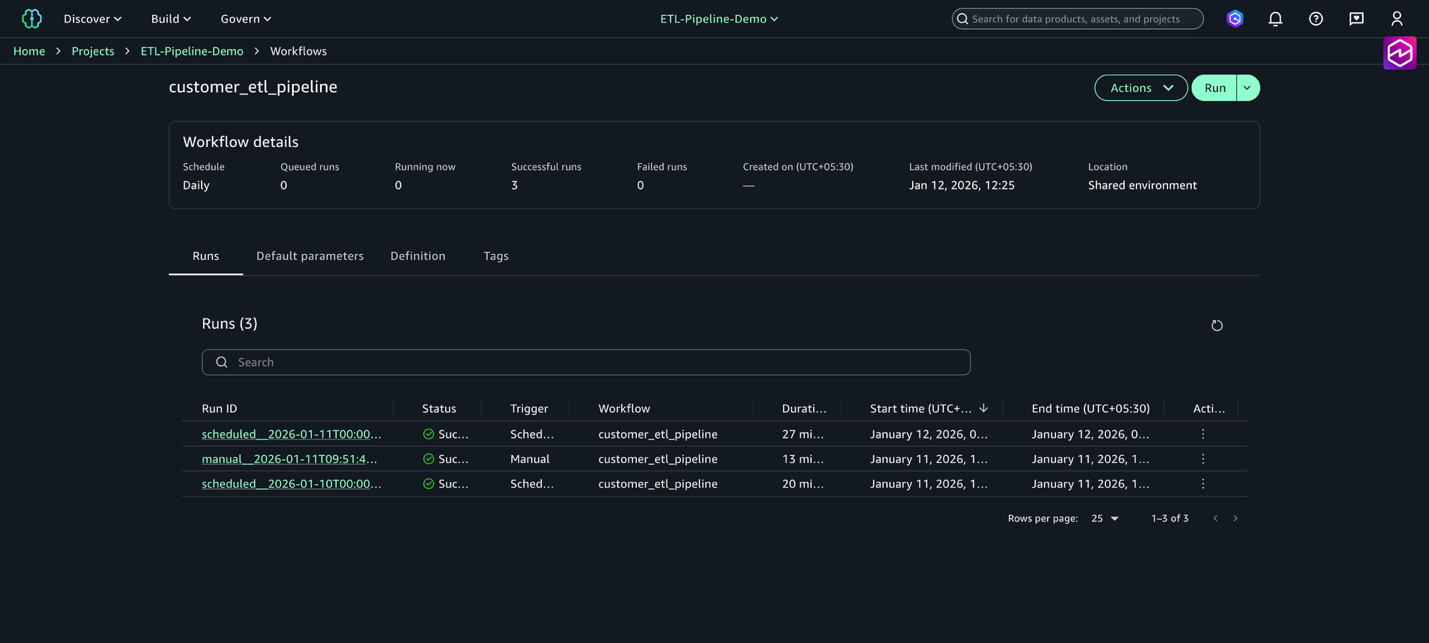
Operating a workflow places duties collectively to orchestrate Amazon SageMaker Unified Studio artifacts. You may view a number of runs for a workflow by navigating to the Workflows web page and selecting the title of a workflow from the workflows listing desk.
To share your workflows with different challenge members in a workflow setting, seek advice from Share a code workflow with different challenge members in an Amazon SageMaker Unified Studio workflow setting.
Monitor and troubleshoot the workflow
After your Airflow workflows are deployed in SageMaker Unified Studio, monitoring turns into important for sustaining dependable ETL operations. The built-in Amazon MWAA setting offers complete observability into your information pipelines by way of the acquainted Airflow net interface, enhanced with AWS monitoring capabilities. The Amazon MWAA integration with SageMaker Unified Studio presents real-time DAG execution monitoring, detailed process logs, and efficiency metrics that can assist you shortly determine and resolve pipeline points. Full the next steps to observe the workflow:
- On the Construct menu, select Workflows.
- Select the workflow
customer_etl_pipeline. - Select View runs to see all executions.
- Select a selected run to view detailed process standing.
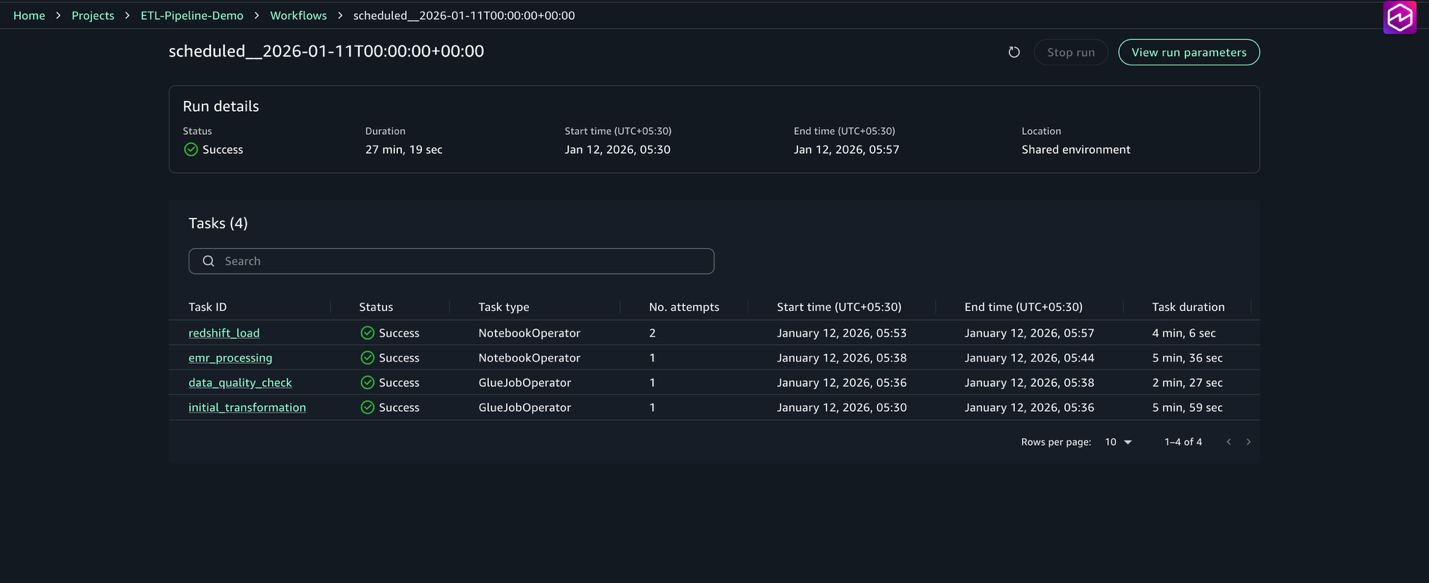
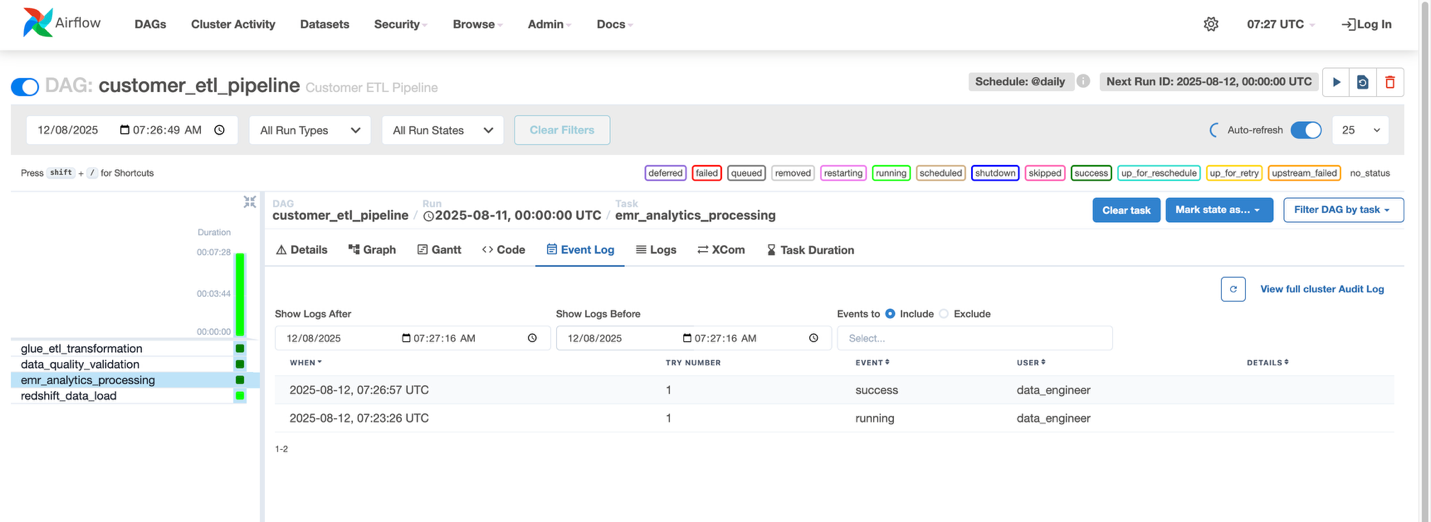
For every process, you possibly can view the standing (Succeeded, Failed, Operating), begin and finish occasions, length, and logs and outputs. The workflow can also be seen within the Airflow UI, accessible by way of the workflow setting, the place you possibly can view the DAG graph, monitor process execution in actual time, entry detailed logs, and think about the standing.
- Go to Workflows and choose the workflow named customer_etl_pipeline.
- From the Actions menu, select Open in Airflow UI.
After the workflow completes efficiently, you possibly can question the information product within the question editor.
- On the Construct menu, beneath Knowledge Evaluation & Integration, select Question editor.
- Run
choose * from "dev"."public"."customer_summary"
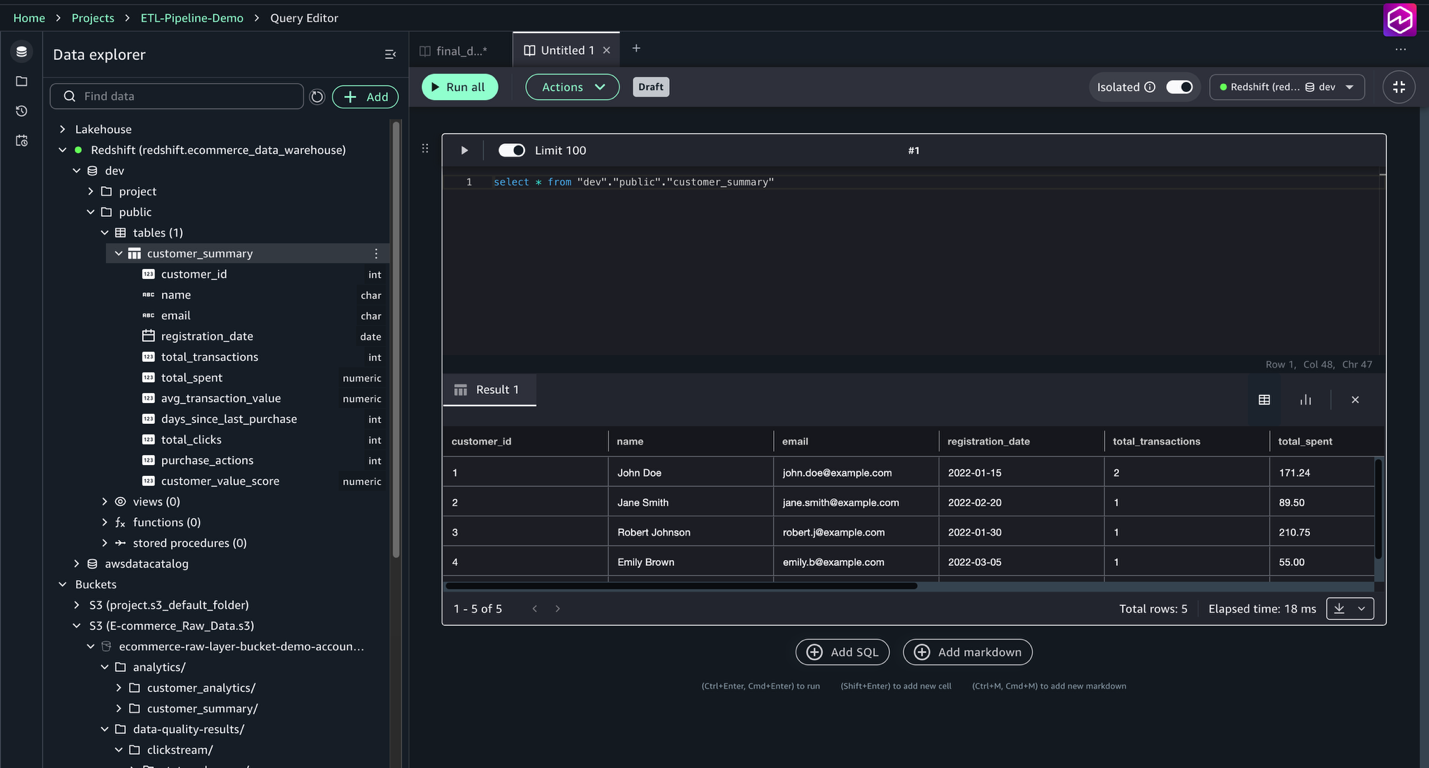
Observe the contents of the customer_summary desk, together with aggregated buyer metrics similar to whole transactions, whole spent, common transaction worth, clicks, and buyer worth scores. This enables verification that the ETL and information high quality pipelines loaded and remodeled the information appropriately.
Clear up
To keep away from pointless expenses, full the next steps:
- Delete a workflow setting.
- For those who now not want it, delete the challenge.
- After you delete the challenge, delete the area.
Conclusion
This put up demonstrated the way to construct an end-to-end ETL pipeline utilizing SageMaker Unified Studio workflows. We explored the whole improvement lifecycle, from establishing elementary AWS infrastructure—together with Amazon S3 CORS configuration and IAM permissions—to implementing subtle information processing workflows. The answer incorporates AWS Glue for preliminary information transformation and high quality checks, EMR Serverless for superior processing, and Redshift Serverless for information warehousing, all orchestrated by way of Airflow DAGs. This strategy presents a number of key advantages: a unified interface that consolidates vital instruments, Python-based workflow flexibility, seamless AWS service integration, collaborative improvement by way of Git model management, cost-effective scaling by way of serverless computing, and complete monitoring instruments—all working collectively to create an environment friendly and maintainable information pipeline answer.
Through the use of SageMaker Unified Studio workflows, you possibly can speed up your information pipeline improvement whereas sustaining enterprise-grade reliability and scalability. For extra details about SageMaker Unified Studio and its capabilities, seek advice from the Amazon SageMaker Unified Studio documentation.
In regards to the authors
