
Find out how Jim Leemhuis is utilizing PETG 3D filament to create superb speaking tiki statues.
Posted on September 20, 2017
by
Visitor Contributor: Jim Leemhuis
My identify is Jim Leemhuis. I’m 34 years previous from Lexington, Kentucky. By day, I’m a mechanical engineer serving to design laser printers for Lexmark Worldwide Inc. By night time, I spend my time 3D printing, coding, and assembling animatronic figures.

I’ve spent the final ten years utilizing 3D printing to go with my design work at Lexmark. We use giant SLA resin and Objet printers to create and take a look at printer elements and fixtures earlier than releasing merchandise to market. Having the ability to create and take a look at elements shortly was essential for me at work and, in 2015, I bought my Lulzbot Mini so I may create elements at dwelling. I discovered I may flip round designs for work in a single day and guarantee they labored earlier than utilizing the bigger (and extra pricey to run) SLA/Objet printers at work to print the ultimate working.
I’ve all the time had a fascination with Disney audio animatronics from a really younger age. It appears, right now, like many theme parks are shifting increasingly in the direction of digital projections, however for my part, nothing beats a bodily determine shifting, speaking, and interacting in entrance of you. I knew after I was older that I might attempt to construct my very own animatronics. 3D printing, together with open supply platforms like Arduino, has allowed me to try this.
My first main animatronic venture was an audio animatronic bust with a Haunted Mansion theme. This was an enormous leap into open supply electronics and an amazing start line to make sure I may design and print purposeful elements. You may see a video of the ultimate venture right here: https://youtu.be/g5WGrtmRxQU
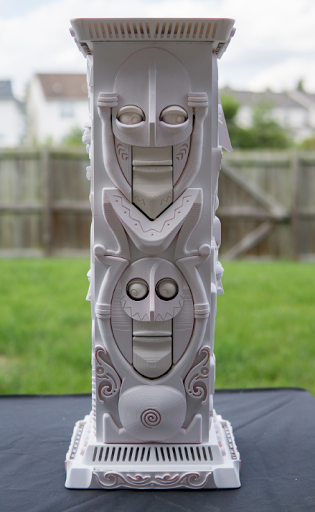
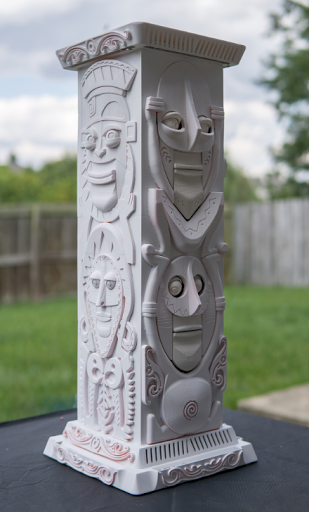
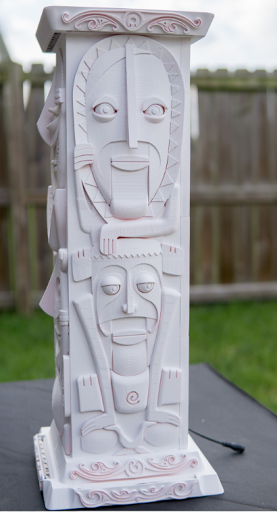
As soon as I had efficiently accomplished my Haunted Mansion audio animatronic, I knew I wished to do a venture primarily based on the primary present to make use of audio animatronics, Walt Disney’s Enchanted Tiki Room. Everybody I do know loves the chanting tiki totems within the present. After learning them for a bit, I spotted the animatronics wouldn’t be as advanced as my final venture, however it will undoubtedly be problem to check my 3D design and printing abilities. I had seen individuals who had designed and printed tiki poles earlier than; however nobody I knew had taken on the problem of recreating an enchanted speaking tiki totem that included movement, audio, and synchronized lighting. It’s can be my very own small tribute to these authentic Disney Animatronics.
The totem design makes use of a majority of Matterhackers PRO PETG, with PLA and a few ABS used as properly, in smaller quantities. The totem pole construction, high, and base are all made out of PETG. Why was PETG the appropriate materials for this job? PETG has an amazing mixture of robust layer adhesion, minimal warp whereas printing giant elements, greater glass transition temperature, together with being far more sturdy and far simpler to post-process in comparison with PLA. This allowed for very giant elements to be printed with out worrying about layer splits (extra widespread in giant ABS prints), breaking printed items attributable to brittleness, and being able to have elements flex to create tight matches.
Examine this hyperlink to see the Tiki undergo its “present” (Notice: on the time of publication, paint has not been absolutely utilized but): https://youtu.be/DhtXnlpF3e0
After utilizing PETG for this venture, there are just a few suggestions I’ve realized via experimentation with the fabric in addition to from others.
Epoxies and different glues will NOT bond to PETG. It’s good to use a particular solvent used for acrylics. I used SciGrip Weldon #4. Notice that this solvent has the consistency of water and must be utilized with an applicator with a skinny needle. You need to have good air flow when making use of this solvent. Making use of open air is finest. Nevertheless, it dries inside a couple of minutes.
I used to be in a position to bond PETG elements collectively simply in addition to bonding PETG elements to PLA elements (though the bond isn’t fairly as robust as PETG to PETG) utilizing Weldon #4. Thanks, @keebie81, for telling me about this nice solvent!
In my expertise, PETG may be very delicate to over extrusion. You should definitely set your slicer’s stream % as little as doable that also provide you with a strong first layer. That is very true of elements with giant preliminary floor areas. After you have it dialed in, nonetheless, it prints with none subject. This additionally minimized the possibilities of PETG materials sticking to the nozzle throughout printing. PETG appears to need to follow the nozzle more-so than ABS or PLA. Should you’re experiencing this subject, strive decreasing your stream charge a bit and ensure the Z top is appropriate.
PETG and ABS have very related sanding properties. By testing, I’d rank ABS best to sand with PETG in a really shut second and PLA in a distant third. Should you’re trying to put up course of your prints, maintain this in thoughts if making an attempt to resolve between PETG and PLA attributable to their related anti-warping properties. Sanding these pesky layer strains out of PETG can be a lot faster than PLA.
Whereas warping throughout printing with PETG is minimal, you should still expertise a small quantity on bigger prints. This will likely trigger a niche between prints in the event you’re adhering two elements of an meeting collectively. To fill gaps or seams, utilizing ProBond Wooden Filler works amazingly properly. It’s straightforward to use along with your finger, cleans up properly with water, dries shortly, and sands flush to the half extraordinarily simply. I used this to fill in all my seams on my Tiki totem meeting.
Because of @UncleJessy4Real for initially declaring this nice filler product to me.
PETG paints properly when first coated with a twig can primer. The Speaking Tiki is coated with Rust-oleum Common Bonding Primer. I used to be then in a position to paint the elements utilizing commonplace acrylic paints and a protecting clear enamel coat to guard the paint.
Total, I’m more than happy with how PETG labored for my venture. Whereas it does have its personal challenges, resembling gluing; the minimal printing warp, ease of sanding, elevated half energy, greater glass transition temperature, and half flexibility greater than outweigh the challenges.
My closing piece of general recommendation: Pursue a venture you might be extraordinarily enthusiastic about. You usually tend to push your self, be taught from errors and check out once more, and put within the required effort and time when you find yourself actually “addicted” to your venture. Discover that venture that matches what you’re enthusiastic about and don’t give up till you obtain your objective!
——————
Comply with together with Speaking Tiki progress by following Jim on twitter @jimscuba2386 or following the venture on Twitter by trying to find #talkingtiki.
Do you could have cool venture the place you utilize a particular MatterHackers filament? Tell us within the feedback under or ship an electronic mail to [email protected].
